
Homemade French Bread is a classic delight that fills your kitchen with a delicious aroma. Baking your own bread can seem daunting, but this recipe makes it simple and fun. Enjoy a crusty exterior and soft, airy interior. This guide helps you bake a perfect artisan loaf.
Key Takeaways
- Baking homemade French bread is rewarding and simpler than you think.
- Only a few basic pantry staples are needed for a delicious loaf.
- Following the seven easy steps ensures a perfectly risen dough.
- Proper shaping and two rises contribute to a light, airy texture.
- Achieve a beautiful, crispy crust by controlling oven conditions.
- Learn storage solutions to keep your freshly baked bread delightful.
Baking bread brings joy. It is a rewarding kitchen skill. Fresh bread smells amazing. A warm slice tastes wonderful. Enjoy making this classic today.
Homemade French Bread: A Classic Delight
There’s something uniquely satisfying about pulling a warm loaf of homemade French bread from your oven. The delicious aroma wafting through your home is just the beginning of this delightful culinary adventure. Forget store-bought versions; creating your own French bread offers an unparalleled freshness and flavor that truly elevates any meal. It’s a classic delight that can quickly become a staple in your kitchen, perfect for sharing with family and friends.
Why make your own bread?
Making your own bread allows you to control the quality of ingredients, ensuring no unwanted additives or preservatives. Beyond that, the process itself is incredibly therapeutic and a wonderful way to connect with the food you eat. The sense of accomplishment when you slice into your own freshly baked bread, with its perfect crispy crust and tender interior, is unmatched. It’s a fundamental skill that can open doors to many other baking projects, making you a more confident cook. Plus, the cost savings compared to artisan bakery loaves are significant over time. For more baking inspiration, check out our baking category.
Overview of the easy steps
Baking your own artisan loaf doesn’t have to be complicated. This homemade French bread recipe breaks down the process into clear, manageable steps. We’ll start with activating the yeast, mixing the dough, and then moving through the kneading, rising, shaping, and baking stages. Each step is designed to be easy to understand, even for beginner bakers. By following these instructions carefully, you’ll achieve a beautiful, delicious loaf that tastes far superior to anything from the grocery store. It’s truly a simple, rewarding journey.
Simple Ingredients for Your Loaf
One of the best aspects of making homemade French bread is how few ingredients you actually need. You don’t require any fancy equipment or exotic spices; just a few basic pantry staples are sufficient to create a truly spectacular loaf. The quality of these simple ingredients, however, does make a difference. Opt for good quality flour and fresh yeast for the best results. This minimalism highlights the natural flavors of the bread itself, allowing the distinct characteristics of the flour and yeast to shine through. Preparing a truly authentic, fresh bread starts with understanding each component.
What you will need
Before you begin, gather your tools and ingredients. You’ll need a large mixing bowl, a measuring cup, measuring spoons, a kitchen scale (optional, but highly recommended for accuracy), a clean kitchen towel, a baking sheet, and a sharp knife or lame for scoring. For ingredients, ensure you have active dry yeast, warm water, granulated sugar, all-purpose flour, and salt. That’s it! With these humble components, you’re ready to craft a delicious aroma that will fill your home and bring smiles to everyone who tastes it. This minimal list makes easy bread making truly accessible.
Basic pantry staples
The beauty of this homemade French bread recipe lies in its reliance on items you likely already have on hand. Active dry yeast is crucial for giving the bread its rise and airy texture. Warm water (around 105-115°F or 40-46°C) helps activate the yeast effectively. A pinch of granulated sugar gives the yeast a little food to get started, ensuring a robust fermentation. All-purpose flour provides the structure, and salt enhances the flavor profile of the bread. No need for special bread flour unless you prefer it, as good old all-purpose works wonderfully. These simple ingredients combine to create something truly magical.
The 7 Easy Steps to Make Dough
Making the dough for your homemade French bread is the heart of the process. While it might seem intimidating at first, breaking it down into seven easy steps makes it very approachable. From activating your yeast to the final knead, each stage is vital for developing the gluten structure and ensuring a light, airy loaf. Pay attention to the textures and timings, and you’ll be well on your way to creating a perfect foundation for your artisan loaf. Patience and observation are key here, guiding you through the transformation of simple ingredients into a living, breathing dough.
Activating yeast and sugar
First, pour your warm water into a large mixing bowl. Sprinkle the active dry yeast and a teaspoon of granulated sugar over the water. Stir gently and let it sit for about 5-10 minutes. You’ll know your yeast is active when it becomes foamy and bubbly, indicating that the yeast is alive and ready to work its magic. This activation step is crucial; if your yeast doesn’t foam, it might be old or the water temperature was off, and you should start again. This simple beginning is vital for a successful rise and an airy interior.
Mixing flour and salt
Once your yeast is frothy, add the flour and salt to the bowl. Use a wooden spoon or a dough whisk to mix everything together until a shaggy dough forms. Don’t worry if it looks a bit rough at this stage; the kneading process will smooth it out. Ensure all the flour is incorporated, scraping down the sides of the bowl as needed. The salt is essential not only for flavor but also for controlling yeast activity and strengthening the gluten network. Proper mixing sets the stage for a well-structured bread.
Kneading until smooth
Turn the shaggy dough out onto a lightly floured surface. Now comes the kneading! Knead the dough for 8-10 minutes, or until it becomes smooth, elastic, and no longer sticky. You can do this by hand, pushing the dough away from you with the heels of your hands, folding it over, and repeating. Alternatively, a stand mixer with a dough hook can do the work for you. A properly kneaded dough will pass the windowpane test: a small piece can be stretched thinly enough to see light through it without tearing. This develops the gluten, crucial for the bread’s texture.
First Rise: Homemade French Bread Dough
The first rise, often called bulk fermentation, is a critical period for your homemade French bread dough. During this time, the yeast gets busy converting sugars into carbon dioxide and alcohol, which creates the bubbles that give bread its light texture and unique flavor. This stage isn’t just about size; it’s about developing complex flavors and a strong gluten structure. Rushing this step can lead to a dense, less flavorful loaf, so patience is truly a virtue here. Allowing the dough adequate time to grow is one of the secrets to easy bread making.
Giving dough time to grow
After kneading, place your dough in a lightly oiled bowl, turning it once to coat the entire surface. Cover the bowl tightly with plastic wrap or a clean kitchen towel to prevent it from drying out. Leave it in a warm, draft-free place for 1 to 1.5 hours, or until it has doubled in size. The exact time can vary depending on the temperature of your kitchen and the vitality of your yeast. A warm oven (turned off, with just the light on) or a sunny spot on your counter can be ideal. For other delightful recipes that require rising, try making our Creamy Baked Mac and Cheese.
What to look for
When assessing if your dough has sufficiently risen, look for it to be noticeably larger, typically doubled in volume. It should also appear puffy and feel soft and airy to the touch. A good test is the “poke test”: gently press two fingers into the dough about half an inch deep. If the indentations remain, the dough is ready. If they spring back immediately, it needs more time. If they collapse completely, it may be over-proofed. Achieving this perfect first rise is key for the final texture and a truly delicious aroma in your freshly baked bread.
Shape Your Classic French Bread Loaf
Once your dough has completed its first rise, it’s time for the exciting part: shaping it into those classic, elongated French bread loaves. This step is crucial for achieving the bread’s characteristic appearance and ensuring an even bake. Don’t be intimidated; with a little practice, you’ll be forming perfect shapes in no time. The goal is to create tension on the surface of the dough, which helps it hold its form during the second rise and baking, contributing to that coveted crispy crust. This stage transforms your simple dough into an artisan loaf.
Punching down the dough
Gently punch down the risen dough to release the accumulated gases. This step, also known as degassing, helps redistribute the yeast and creates a more uniform texture in the final bread. Turn the dough out onto a lightly floured surface and flatten it gently into a rectangle. Avoid being too aggressive, as you don’t want to completely deflate all the air, just enough to make it manageable for shaping. This prepares the dough for its transformation into its final elegant form. Remember, the goal is to gently persuade the dough, not to fight it.
Forming the perfect shape
To form each loaf, take one half of the dough and flatten it into a rectangle. Fold the top third down to the center, pressing firmly. Then, fold the bottom third up over the previous fold and press the seam. Finally, roll the dough tightly from one end to the other, creating a log. Pinch the seam firmly along the entire length to seal it. Gently taper the ends if desired. Place the shaped loaves seam-side down on a baking sheet lined with parchment paper or a non-stick mat. For another amazing main course idea, consider our Crispy Parmesan Chicken, often served with crusty bread!
Second Rise for a Light Loaf
After shaping your loaves, the dough needs another period of rest and rising – the second rise, or proofing. This final resting period is just as important as the first, as it allows the dough to relax, expand further, and become truly light and airy. Skipping or rushing this step can result in a dense, heavy loaf, far from the light, delicate texture you expect from homemade French bread. The goal is to allow the yeast to produce more gas, puffing up the shaped loaves to their optimal volume before they hit the heat of the oven. This stage is crucial for achieving a perfect artisan loaf.
Final resting period
Once your loaves are shaped and placed on the baking sheet, cover them loosely with a clean kitchen towel or plastic wrap. Let them rise in a warm, draft-free place for another 30-45 minutes. Again, the exact time will depend on your kitchen’s temperature. During this time, the loaves should visibly puff up and increase in size, though not necessarily double like in the first rise. They should look plump and feel soft and airy. This final resting allows the gluten to relax and the yeast to do its last bit of work, setting the stage for an incredible bake and a beautiful crispy crust. Patience here leads to perfection.
Bake Your Golden French Bread
The moment of truth arrives when your perfectly proofed loaves are ready for the oven. Baking is where the magic truly happens, transforming soft dough into a golden, crusty homemade French bread. Achieving that signature crispy crust and tender interior requires attention to oven temperature and baking technique. Don’t underestimate the power of a properly preheated oven and a little steam; these elements are key to unlocking the full potential of your freshly baked bread. This stage brings your easy bread making journey to a delicious conclusion.
Preheat oven temperature
Before your loaves are ready for baking, it’s absolutely crucial to preheat your oven to a high temperature, typically around 450°F (230°C). Allow it to preheat for at least 20-30 minutes after it reaches the set temperature. This ensures the oven walls and any baking surfaces (like a pizza stone, if using) are thoroughly heated, providing a strong burst of initial heat that helps the bread rise rapidly – known as oven spring. This intense heat sets the crust quickly and locks in moisture, contributing to the desirable crispy crust. A properly preheated oven is non-negotiable for success.
Baking for crisp crust
Just before baking, use a sharp knife or lame to make several diagonal slashes (about ½ inch deep) across the top of each loaf. This allows the bread to expand without tearing randomly. Transfer the loaves to the preheated oven. To achieve a really crispy crust, creating steam in the oven is vital (more on this later). Bake for 20-25 minutes, or until the bread is golden brown and sounds hollow when tapped on the bottom. If you have a thermometer, the internal temperature should be around 200-210°F (93-99°C). For another savory dish that pairs well with a side of bread, check out our Chicken Bacon Ranch Tater Tot Casserole.
Cooling and Slicing Your Delight
After the excitement of pulling a golden, fragrant loaf of homemade French bread from the oven, it can be tempting to slice into it immediately. However, exercising a little patience during the cooling phase is essential for the best possible results. This seemingly simple step plays a crucial role in the bread’s final texture and flavor. Properly cooling allows the internal moisture to redistribute and the crust to set perfectly, making your freshly baked bread truly a classic delight. Don’t rush this final, vital stage.
Let bread cool completely
Once baked, immediately transfer your French bread loaves to a wire rack to cool completely. This allows air to circulate around all sides, preventing the bottom crust from becoming soggy. Cooling is a continuation of the baking process; as the bread cools, the internal structure stabilizes, and residual heat continues to cook the interior gently. Slicing into hot bread can result in a gummy texture. For optimal flavor and texture, allow the bread to cool for at least 30 minutes, or even an hour, before cutting. This patience ensures a perfect artisan loaf.
Enjoying fresh slices
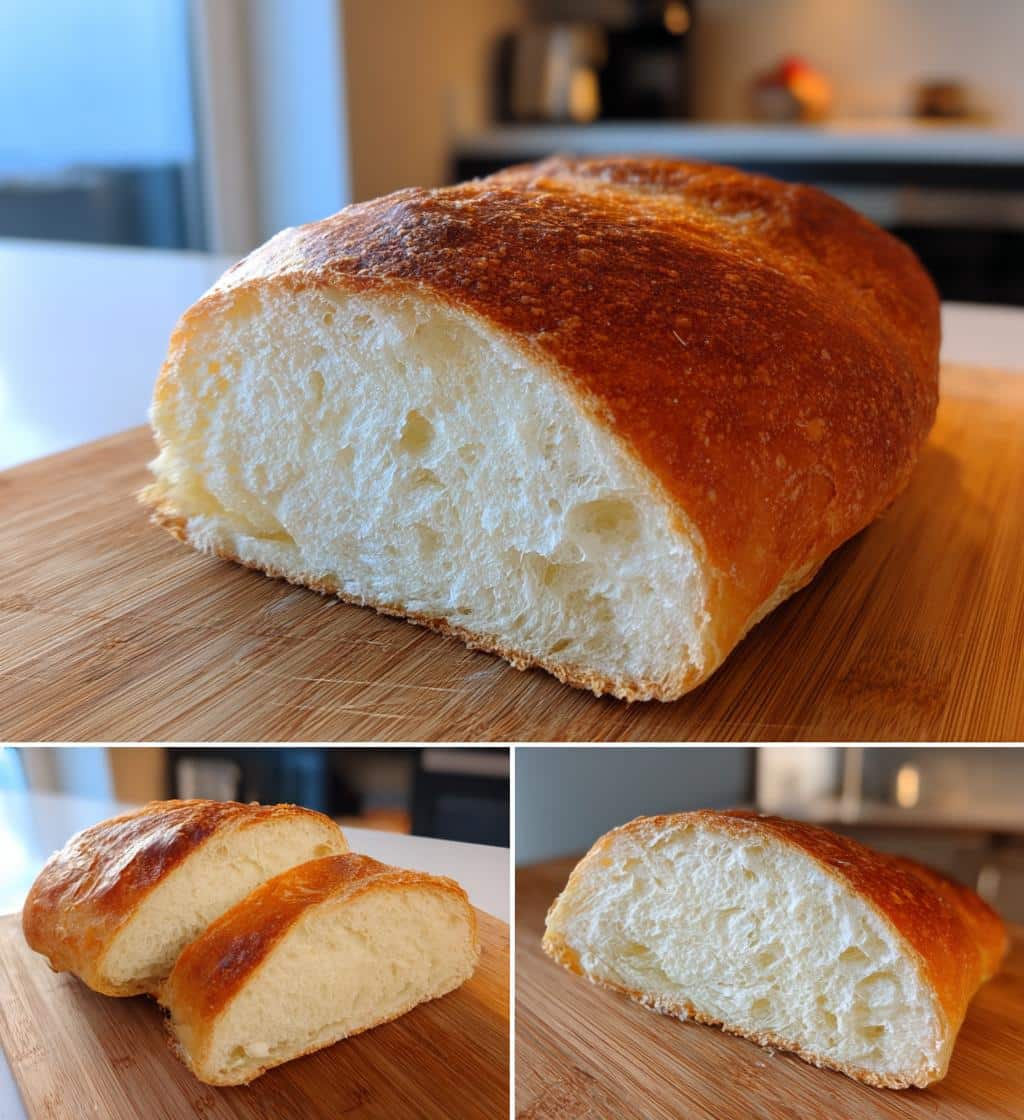
Once cooled, your homemade French bread is ready to be enjoyed! Slice it with a serrated knife for clean cuts. Serve it alongside your favorite meals, use it for sandwiches, or simply enjoy it with butter and a sprinkle of salt. The crispy crust and soft, airy interior are perfect for dipping in olive oil, sopping up sauces, or accompanying a hearty soup. There’s nothing quite like the taste and delicious aroma of freshly baked bread. Share your creations on social media; you can find more inspiration on our Pinterest and Instagram!
Homemade French Bread: Tips for Success
Baking homemade French bread is a craft that improves with practice, but a few key tips can help ensure your success from the very first loaf. These baking tips focus on common pitfalls and best practices to help you consistently achieve that perfect crispy crust and tender crumb. Pay attention to the subtle cues the dough gives you, and don’t be afraid to adjust based on your environment. Mastering these techniques will make your easy bread making journey even more rewarding, ensuring every loaf is a classic delight.
Don’t rush rising time
One of the most common mistakes in bread making is rushing the rising times. Yeast needs time to work its magic, developing both the volume and the complex flavors of the bread. If your kitchen is cooler, the dough might take longer to rise than the recipe suggests. Always go by the visual cues (like doubling in size) rather than strictly adhering to the clock. Under-proofed dough will result in a dense loaf, while perfectly proofed dough yields a light, airy, and flavorful bread. Patience is truly the secret ingredient for a wonderful artisan loaf.
Serve bread while fresh
Homemade French bread is at its absolute best when enjoyed fresh, ideally within a few hours of baking. The crispy crust is most pronounced and the interior most tender shortly after it has cooled. While there are good storage solutions for keeping it longer, the peak experience comes from slicing into a still-warm loaf. Plan your baking schedule so that your bread is ready just before your meal. This ensures you and your loved ones get to savor the delicious aroma and incredible texture at its finest, truly making it a classic delight.
Getting a Crustier French Bread
The hallmark of excellent homemade French bread is its wonderfully crispy crust, contrasting beautifully with a soft, airy interior. Achieving this coveted characteristic often comes down to a few specific techniques that mimic professional bakery conditions. These methods help create the perfect environment for a robust crust development, ensuring that satisfying crunch with every bite. If you’re aiming for an even more authentic artisan loaf, incorporating these strategies will significantly elevate your easy bread making results and truly deliver a classic delight.
Using a pizza stone
A preheated pizza stone or baking steel can make a significant difference in achieving a crispy crust. Place the stone in your oven while it preheats. When you slide your dough onto the hot stone, it provides an immediate burst of intense heat to the bottom of the bread, leading to excellent oven spring and a much crispier bottom crust. If you don’t have a pizza stone, an inverted heavy baking sheet can work as a substitute, but a stone is highly recommended for superior results. This method contributes greatly to that freshly baked bread experience.
Creating steam in oven
Steam is the secret to a thin, crispy crust. The moisture in the oven prevents the crust from hardening too quickly, allowing the bread to expand fully before the crust sets. To create steam, you can place a cast iron pan or an oven-safe dish on the bottom rack while the oven preheats. Just before putting the bread in, carefully pour about a cup of hot water into the hot pan to generate steam. Be quick and careful, then close the oven door. Alternatively, you can spritz the oven walls with water during the first 10 minutes of baking. Remember to wear oven mitts to protect your hands from the steam. This technique is essential for a true artisan loaf.
Storing Your Fresh French Bread
While homemade French bread is undoubtedly best enjoyed fresh, you might find yourself with leftovers or wish to plan ahead. Proper storage is key to extending its life and maintaining its delicious aroma and texture for as long as possible. Understanding the best methods will help preserve that crispy crust and soft interior, ensuring your easy bread making efforts don’t go to waste. From short-term solutions for a few days to long-term freezing, these storage solutions will help you savor every bit of your classic delight.
Airtight container method
For short-term storage (1-2 days), allow your bread to cool completely. Wrap it tightly in aluminum foil or place it in a large airtight plastic bag or container. While this method will keep the interior soft, it will inevitably soften the crispy crust. If you wish to revive the crust, simply place the bread directly on the oven rack in a 350°F (175°C) oven for 5-10 minutes. This quick reheat will bring back some of that satisfying crunch, making it feel more like freshly baked bread again. Avoid refrigerating French bread, as it tends to stale faster in cold temperatures.
Freezing for later use
If you want to enjoy your homemade French bread beyond a couple of days, freezing is an excellent option. Once the bread has cooled completely, wrap it tightly in plastic wrap, then an additional layer of aluminum foil. You can freeze whole loaves or slice them first and freeze the slices, separating them with parchment paper. Frozen bread can last for up to 3 months. To reheat, thaw the loaf at room temperature, then refresh it in a 350°F (175°C) oven for 10-15 minutes, or until warmed through and the crispy crust is revived. This ensures you always have a delightful artisan loaf on hand.
Nutrition Facts for French Bread
Understanding the nutritional value of your homemade French bread can be helpful, especially if you’re mindful of your dietary intake. While specific values can vary based on ingredients and exact recipe, we can provide general estimates for a typical serving. This section offers a basic overview, allowing you to incorporate your freshly baked bread into your diet knowledgeably. Knowing the approximate calories and other values helps you enjoy your classic delight responsibly as part of a balanced diet.
Serving size details
A typical serving size for French bread is often considered to be about 1 inch (2.5 cm) thick slice, or approximately 50-60 grams. However, this can fluctuate based on the density and size of your homemade loaf. It’s important to remember that these are approximate values. If you’re tracking your intake precisely, using a kitchen scale to measure your serving is recommended. Being aware of the serving size helps manage your intake and enjoy your delicious aroma without overindulging. This small detail is part of overall nutritional info awareness.
Calories and other values
Generally, one 1-inch slice (about 50g) of plain homemade French bread contains approximately 130-160 calories. It typically provides about 25-30 grams of carbohydrates, 4-6 grams of protein, and less than 1 gram of fat. It is usually low in fiber and contains minimal vitamins or minerals unless fortified flour is used. Sodium content will vary based on the amount of salt added. These values offer a general idea for your nutritional info. Always refer to specific ingredient labels for precise data if dietary restrictions are a concern. Enjoy your artisan loaf in moderation!