
Creamy Chicken Alfredo Lasagna Rolls.
A Cozy Meal Twist
Beyond their speed, these rollups offer a genuinely cozy meal twist. They evoke the warmth and familiarity of a classic cheeseburger but present it in an innovative, comforting package. The golden-brown crescent exterior gives way to a savory, cheesy, and meaty interior, creating a delightful textural contrast. This isn’t just a meal; it’s an experience, perfect for gathering around the table on a chilly evening or serving as a hearty snack during a casual get-together. The rich flavors of beef, bacon, and melted cheddar, enhanced by garlic, make this dish a truly special and inviting offering. If you like cozy meals, try our Chicken Bacon Ranch Tater Tot Casserole.
Ingredients for Cheeseburger Rollups Recipe
Gathering the right ingredients is the first step to crafting these irresistible garlic butter beef bacon cheeseburger rollups. What makes this recipe particularly appealing is its reliance on readily available, common pantry items and fresh components you likely already have or can easily acquire. The combination of savory meats, creamy cheese, and a flaky crust, all tied together with aromatic garlic, creates a harmonious blend of flavors that truly sings. Preparing these ingredients in advance, known as ‘mise en place,’ can significantly streamline your cooking process, allowing you to enjoy the assembly more and reduce stress in the kitchen.
Meat and Dairy Items You Need
For the heart of your rollups, you’ll need a few key meat and dairy components. Start with lean ground beef, which forms the savory base of your filling. The lean variety helps reduce excess grease, resulting in a cleaner flavor and less draining. Next, good quality bacon is crucial for that smoky, salty crunch; we recommend cooking it until crispy and then crumbling it. Finally, shredded cheddar cheese provides the gooey, cheesy goodness that melts beautifully into the beef and bacon mixture. Feel free to use sharp, mild, or a cheddar blend depending on your preference. For the outer layer, you’ll need refrigerator crescent dough sheets or rolls. Consider using quality butter for the garlic butter mixture to get the best flavor, as detailed on Wikipedia’s butter page.
Pantry Staples and Flavor Boosters
Beyond the core meat and dairy, several pantry staples and flavor boosters elevate these cheeseburger rollups from good to outstanding. Onions are essential for adding an aromatic depth and a touch of sweetness to the beef mixture. Garlic, of course, is paramount; fresh minced garlic is highly recommended for the garlic butter mixture, providing that pungent, fragrant kick. Salt and black pepper are fundamental for seasoning the beef to perfection. A dash of Worcestershire sauce or even a little ketchup can add an extra layer of umami and classic burger flavor to your filling. Don’t forget fresh parsley for an optional garnish, adding a burst of color and a hint of freshness at the end. These simple additions truly make the difference.
Brown Beef and Onion Mixture
The foundation of your delicious garlic butter beef bacon cheeseburger rollups lies in properly browning the beef and onion mixture. This crucial step not only cooks the meat thoroughly but also develops a deep, savory flavor that will permeate the entire filling. The caramelization of the onions alongside the browning beef creates a rich aromatic base, essential for that classic cheeseburger taste. Paying attention to this stage ensures your rollups are flavorful and well-textured. Start with a large skillet over medium-high heat to achieve a good sear on the beef, which locks in moisture and enhances the overall depth of flavor.
Cook Until No Pink Remains
When cooking the ground beef, it’s important to ensure that it’s thoroughly cooked until no pink remains. This typically involves breaking up the beef with a spoon or spatula as it cooks, allowing it to brown evenly. As the beef begins to brown, add the chopped onions to the skillet. The onions will soften and become translucent, absorbing the beef’s savory juices while releasing their own sweet, pungent notes. Stirring occasionally helps prevent sticking and promotes even cooking. This process usually takes about 7-10 minutes, depending on the heat and the quantity of beef. Ensuring the beef is fully cooked is important for both safety and taste, as undercooked beef can be unappetizing in the final product. A great example of using ground beef can be found in our Ground Turkey and Peppers recipe, though we’re using beef here!
Drain Off Excess Grease
After your beef and onion mixture is fully cooked and no pink remains, the next critical step is to drain off any excess grease. Ground beef, especially if not extra lean, can render a significant amount of fat during cooking. Leaving this grease in the mixture can result in soggy, greasy rollups that lack the desired texture and flavor. To drain, carefully tilt the skillet and use a spoon or spatula to push the beef mixture to one side, allowing the fat to pool on the other. Then, spoon or pour the grease into a heat-safe container or discard it properly (avoid pouring it down the drain, as it can cause clogs). Blotting the mixture with paper towels can also help absorb any remaining oil, ensuring your filling is savory and moist, but not oily. This step contributes significantly to the overall quality and enjoyment of your bacon cheeseburger crescent rolls.
Mix in Bacon and Cheese
Once your savory beef and onion mixture is perfectly browned and drained, it’s time to introduce the stars that truly make these garlic butter beef bacon cheeseburger rollups shine: the bacon and cheese. This step is where the flavors really come together, transforming a simple beef base into a rich, decadent filling. The combination of salty, crispy bacon with gooey, melted cheddar cheese creates a texture and taste profile that is undeniably classic cheeseburger, making every bite a delight. Ensuring these ingredients are well-incorporated guarantees a consistent burst of flavor in each rollup, a key to their success as main course appetizers or savory snacks.
Cooked Bacon and Shredded Cheddar
For the bacon, it’s essential to have it pre-cooked and crumbled. You can cook bacon in a skillet, in the oven, or even in the microwave until it’s perfectly crisp. Once cooled, crumble it into small, bite-sized pieces. This crispness will add a wonderful textural contrast to the soft beef and melted cheese. Next, incorporate the shredded cheddar cheese directly into the warm beef and onion mixture. The residual heat from the cooked beef will gently melt the cheese, creating a gooey, binding element that holds the filling together beautifully. Stir these ingredients thoroughly until the cheese is mostly melted and evenly distributed throughout the beef and bacon. This forms a cohesive, flavorful filling that’s ready to be encased in the crescent dough. For another cheesy delight, check out our Cheesy Garlic Chicken Wraps.
Assemble Garlic Butter Cheeseburger Rollups
Assembling the garlic butter cheeseburger rollups is arguably the most satisfying part of the process, bringing together all your prepared components into their final, delectable form. This stage is where you truly see your ingredients transform into the individual rollups, ready for baking. Patience and a gentle touch are key here to ensure each rollup is neatly formed, well-filled, and ready to bake to golden perfection. The crescent dough provides a fantastic canvas, offering both ease of use and a wonderfully flaky texture once baked, making these ideal appetizers or a substantial snack.
Fill Crescent Dough Triangles
Begin by unrolling your crescent dough. Most refrigerated crescent dough comes in a perforated sheet that easily separates into triangles. Lay these triangles flat on a clean surface or a baking sheet lined with parchment paper. Place about 1-2 tablespoons of your cooled beef, bacon, and cheese filling at the wide end of each crescent dough triangle. It’s important not to overfill, as this can make rolling difficult and cause the filling to spill out during baking. Distribute the filling evenly across the dough at the widest part, leaving a small border to allow for sealing. The goal is to have enough filling for a hearty bite without stretching the dough too thin.
Roll Them Up Neatly
Once the filling is in place, it’s time to roll them up. Starting from the wide end with the filling, gently roll the crescent dough towards the narrow tip. As you roll, try to keep the filling tucked inside, creating a snug package. The natural curve of the crescent dough makes this relatively easy. The narrow tip should end up on top, neatly sealing the rollup. Pinch the sides gently to fully enclose the filling, preventing any cheesy goodness from escaping during baking. Arrange the rolled-up triangles on your baking sheet, leaving a little space between each one to allow for even baking and browning. This careful assembly ensures that each bacon cheeseburger crescent roll will be a perfectly sealed, flavorful package.
Brush with Garlic Butter Mixture
The final touch before these delightful cheeseburger rollups head into the oven is arguably the most critical for achieving their signature flavor: brushing them generously with a fragrant garlic butter mixture. This step infuses the flaky crescent dough with a rich, aromatic essence that transforms the entire dish. It not only adds an incredible depth of flavor but also contributes to a beautiful golden-brown crust and a savory sheen that makes these rollups utterly irresistible. Don’t skip this part; it’s what truly elevates these from simple baked goods to extraordinary Carina Recipes creations.
Melt Butter with Minced Garlic
Preparing the garlic butter mixture is simple yet impactful. In a small microwave-safe bowl or a small saucepan, melt about 2-3 tablespoons of unsalted butter. Once the butter is melted, stir in 1-2 cloves of freshly minced garlic. Fresh garlic is highly recommended over garlic powder for its robust flavor and aroma. Allow the garlic to steep in the warm butter for a minute or two; this gently infuses the butter with its pungent, savory notes. You can also add a pinch of dried parsley or Italian seasoning to the mixture for an extra layer of herbal flavor, complementing the richness of the butter and garlic. This simple blend is the secret weapon for an unforgettable taste.
Coat Tops for Best Flavor
With your garlic butter mixture ready, use a pastry brush to generously coat the tops and sides of each assembled cheeseburger rollup. Ensure an even application, making sure every part of the crescent dough gets a good slathering of the fragrant butter. This coating will not only impart that delicious garlic flavor but also help the dough achieve a beautiful golden-brown color and a slightly crispy texture as it bakes. The butter acts as a flavor carrier, ensuring that the savory notes penetrate the dough, creating a truly harmonious bite. This is the stage where the “garlic butter” in “garlic butter beef bacon cheeseburger rollups” truly comes to life, promising a delightful aroma that will fill your kitchen as they bake. Keep an eye on our latest creations on Instagram!
Bake Rollups Until Golden Brown
The moment of truth arrives when your garlic butter beef bacon cheeseburger rollups enter the oven. Baking is where the magic happens, transforming the soft dough and savory filling into golden, crispy, and piping-hot delights. Achieving that perfect golden-brown crust is key to both the visual appeal and the textural enjoyment of these rollups. This step ensures that the crescent dough is cooked through, flaky, and has a satisfying crunch, while the filling inside becomes wonderfully warm and the cheese perfectly melted and gooey. Proper baking ensures every bite is a delightful combination of textures and flavors.
Oven Temperature and Time
For optimal results, preheat your oven to approximately 375°F (190°C). This temperature is ideal for baking crescent dough, allowing it to puff up and turn golden without burning. Arrange your brushed rollups on a baking sheet, ensuring they have enough space around them for air to circulate, which promotes even browning. Bake for about 12-18 minutes. The exact baking time can vary depending on your oven and the thickness of your rollups, so it’s always a good idea to keep a watchful eye on them. The goal is to see a beautiful golden hue and for the dough to be fully cooked, as described on Wikipedia’s baking page.
Look for Golden Deliciousness
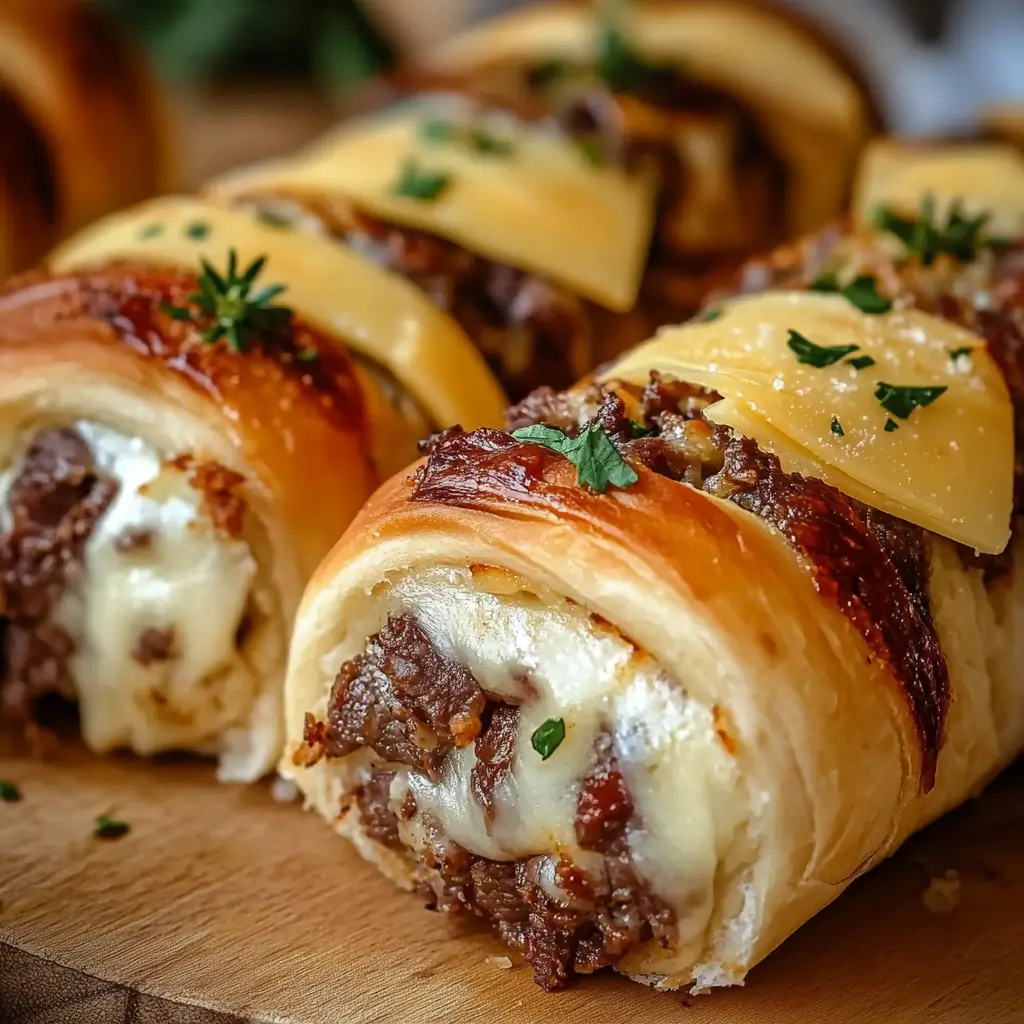
As the rollups bake, you’ll notice their color changing from pale to a rich, appetizing golden brown. This is your visual cue that they are nearing perfection. The tops should be slightly crisp, and the edges of the dough should be visibly browned. You might even see a little bit of the cheese bubbling out, which is perfectly fine and adds to their rustic charm. Once they reach this stage of “golden deliciousness,” carefully remove them from the oven. Let them cool for a few minutes on the baking sheet before transferring them to a wire rack. This brief cooling period allows the filling to set slightly, making them easier to handle and preventing any potential burns from the molten cheese. This ensures a perfect golden deliciousness for your easy cheeseburger bake.
Serve Your Bacon Cheeseburger Rollups
The aroma filling your kitchen will be a clear signal that it’s time to serve your incredible bacon cheeseburger rollups. Fresh out of the oven, these golden-brown pockets of savory goodness are a treat for the senses, promising warmth, flavor, and comfort. Serving them properly enhances the overall enjoyment, whether they are destined for a family dinner, a casual party, or a game day snack. Presentation, even for something as inherently delicious as these rollups, adds to the appeal, making them even more inviting to eager diners. Get ready for smiles and satisfied sighs.
Garnish with Fresh Parsley
A simple yet effective way to elevate the presentation of your bacon cheeseburger rollups is with a sprinkle of fresh parsley. Finely chopped fresh parsley adds a vibrant pop of green color, contrasting beautifully with the golden-brown crust of the rollups. More than just visual appeal, parsley also offers a fresh, herbaceous note that can cut through the richness of the beef, bacon, and cheese, providing a refreshing counterpoint. Sprinkle it just before serving for the best effect. This small touch makes your savory beef snacks look even more appetizing, signaling to your guests that care has been taken in their preparation.
Best Dips for Rollups
While these garlic butter beef bacon cheeseburger rollups are perfectly delicious on their own, pairing them with the right dipping sauces can take the experience to a whole new level. Classic burger condiments like ketchup and mustard (Dijon or yellow) are always a hit. A tangy thousand island dressing or a creamy, smoky barbecue sauce also makes an excellent companion, enhancing the savory flavors of the beef and bacon. For those who enjoy a bit of heat, a sriracha mayo or a spicy ranch dip can add an exciting kick. Offering a selection of dips allows everyone to customize their rollup experience, catering to different taste preferences and making these party food favorites even more engaging.
Tips for Perfect Cheeseburger Rollups
Achieving truly perfect cheeseburger rollups isn’t difficult, but a few key tips can elevate your results from good to outstanding. These recommendations focus on maximizing flavor, ensuring proper cooking, and making the assembly process as smooth as possible. By paying attention to these small details, you can consistently produce delicious, well-structured, and incredibly satisfying bacon cheeseburger crescent rolls that will impress everyone who tries them. These insights are derived from common cooking wisdom, helping you avoid pitfalls and enhance your overall cooking experience for these quick dinner ideas.
Use Lean Ground Beef
One of the most important tips for perfect cheeseburger rollups is to use lean ground beef. While fattier beef can be flavorful, it renders a significant amount of grease, which can lead to a soggy filling and a less appealing texture in your rollups. Leaner ground beef, such as 90/10 or even 93/7, minimizes the amount of fat needing to be drained, resulting in a cleaner, less greasy filling. This not only improves the texture of the inside but also prevents the crescent dough from becoming saturated with oil during baking. If you only have fattier beef, be extra diligent about draining off all excess grease after browning to ensure the best outcome for your savory beef snacks.
Don’t Overfill Rollups
Another crucial tip is to resist the urge to overfill your rollups. While it might be tempting to pack in as much of that delicious beef, bacon, and cheese mixture as possible, overfilling can lead to several problems. Firstly, it makes the rollups difficult to seal properly, increasing the chances of the filling bursting out during baking. Secondly, it can cause the crescent dough to stretch too thin, resulting in a less flaky and potentially undercooked crust in certain spots. Aim for about 1-2 tablespoons of filling per crescent triangle. This amount allows for a generous, satisfying bite while ensuring the dough can fully encase the filling and bake evenly to a beautiful golden brown.
Making Ahead These Garlic Rollups
One of the fantastic advantages of this garlic butter beef bacon cheeseburger rollups recipe is its make-ahead potential. Preparing components in advance can significantly cut down on last-minute kitchen hustle, making these a perfect option for meal prep, busy weeknights, or when you’re entertaining. The ability to do much of the work beforehand means you can enjoy fresh-baked rollups with minimal effort right before serving, ensuring they are at their absolute best. This flexibility makes them an excellent addition to your repertoire of family-friendly meals or party food, providing convenience without sacrificing flavor.
Prepare Filling Day Before
The primary component that can be prepared in advance is the savory beef, bacon, and cheese filling. You can cook the ground beef and onion, drain the grease, mix in the crumbled bacon and shredded cheddar, and allow it to cool completely. Preparing the filling the day before allows the flavors to meld beautifully, potentially even enhancing the taste. This step is a game-changer for reducing stress on the day you plan to serve the rollups. Having the filling ready to go means all that’s left is the quick assembly and baking, which can be done in under 30 minutes. This method is similar to preparing fillings for other make-ahead recipes like our Southern-Style Collard Green and Potato Stew where components can be prepped.
Store Filling in Fridge
Once your beef, bacon, and cheese filling is thoroughly cooled, transfer it to an airtight container and store it in the refrigerator. It can be safely stored for up to 2-3 days. When you’re ready to make the rollups, simply take the filling out of the fridge about 15-20 minutes beforehand to allow it to come slightly closer to room temperature, making it easier to work with. If the cheese has solidified too much, you can gently warm the mixture in the microwave for a short burst (about 30 seconds) and stir to loosen it up, ensuring it’s pliable enough for filling the crescent dough. This organized approach to storage ensures freshness and simplifies your cooking process for these delectable crescent roll appetizers.
Reheat Leftover Cheeseburger Rollups
Sometimes, you might find yourself with a few leftover garlic butter beef bacon cheeseburger rollups – a rare but delightful occurrence! While they are best enjoyed fresh from the oven, reheating them properly ensures they maintain their delicious flavor and texture, avoiding sogginess. The key is to bring back that golden crispness of the crescent dough and the warm, gooey interior without drying them out. With the right technique, you can enjoy these delightful savory beef snacks for another meal or snack, making them even more versatile and reducing food waste. Don’t let those tasty leftovers go to waste!
Oven Reheating Instructions
The best way to reheat leftover cheeseburger rollups is undoubtedly in the oven. Microwaving them can often lead to a soft, chewy crust and a less appealing texture. To reheat in the oven, preheat it to 300-325°F (150-160°C). Arrange the rollups on a baking sheet, ideally lined with parchment paper, allowing some space between each one. Bake for approximately 10-15 minutes, or until they are heated through and the crescent dough has regained some of its crispness. Keep an eye on them to prevent over-browning. This method gently warms the filling while rejuvenating the flaky crust, bringing them back close to their freshly baked glory.
Bring Garlic Butter to Life
To really bring the garlic butter flavor back to life on your reheated rollups, consider a quick refresh. As they are warming in the oven, you can quickly melt a tiny bit of butter with a touch of fresh minced garlic (or even garlic powder) and a pinch of dried parsley. Once the rollups are hot and crispy from reheating, give them another light brush with this fresh garlic butter mixture. This revitalizes that aromatic, savory coating that makes these rollups so special, ensuring every bite is as flavorful as the first. This little extra step makes a big difference for your make-ahead recipes.
Bacon and Cheese Substitutions
While the classic combination of bacon and cheddar cheese is undeniably delicious in these garlic butter beef bacon cheeseburger rollups, this recipe is incredibly versatile. Dietary preferences, availability, or simply a desire to experiment can lead to some fantastic substitutions for both the bacon and cheese. Adapting the recipe allows you to tailor it to specific tastes or requirements, ensuring that everyone can enjoy these savory beef snacks. Exploring alternatives can also introduce new flavor profiles, making your family-friendly meals even more exciting and customizable to individual palates.
Try Turkey Bacon Alternatives
For those looking for a lighter option or avoiding pork, turkey bacon is an excellent alternative to traditional pork bacon. When cooked until crispy and crumbled, turkey bacon offers a similar smoky and savory flavor profile, albeit with less fat. Ensure it’s cooked thoroughly until crisp to provide that essential textural contrast within the rollup. Another option for a smoky flavor without bacon is to incorporate a tiny dash of liquid smoke into your beef mixture, along with a bit of smoked paprika. This can mimic the bacon’s essence while keeping the recipe adaptable for various dietary needs, perfect for those seeking healthier quick dinner ideas.
Other Cheese Options to Consider
Cheddar cheese is a fantastic choice for its meltability and classic flavor, but the world of cheese offers many delightful alternatives that can enhance your cheeseburger rollups.
- Monterey Jack: A mild, creamy cheese that melts beautifully, offering a smoother texture.
- Pepper Jack: For a little kick, pepper jack adds a subtle spice that complements the beef and garlic butter wonderfully.
- Colby Jack: A blend of Colby and Monterey Jack, offering a mild flavor and excellent melt.
- Swiss Cheese: If you prefer a nuttier, slightly stronger flavor, Swiss can be a sophisticated twist.
- Provolone: A classic Italian-American cheese, provolone melts well and offers a sharp, tangy taste.
- Mozzarella: For extreme stretch and mild flavor, mozzarella makes a great kid-friendly option.
Feel free to mix and match or use a blend of your favorite cheeses to customize the flavor profile of your bacon cheeseburger crescent rolls. Each cheese will bring its unique character to the overall taste.