
Southern-style collard green and potato stew, or simply enjoyed on its own with a spread.
Our focus is on creating a soft, pliable bread that’s perfect for scooping up sauces, making simple sandwiches, or serving alongside your favorite curry. With minimal effort, you can achieve impressive results that taste far superior to store-bought alternatives. The beauty of this recipe lies in its speed and simplicity, making it ideal for busy weeknights or impromptu gatherings. Get ready to impress your family and friends with a delicious bread that’s truly fresh baked and ready in a flash.
Gather Your Simple Flatbread Ingredients
Crafting these wonderful flatbreads begins with assembling a few common pantry staples. You won’t need any exotic items; just basic ingredients that likely already reside in your kitchen. The core components for this no-yeast bread include all-purpose flour, baking powder (our leavening agent), a pinch of salt for flavor, and a liquid component, typically yogurt or milk, which lends both moisture and a subtle tang. Some recipes, including ours, often benefit from a touch of oil or melted butter to enhance tenderness.
For the best texture and flavor in your yogurt flatbread, we recommend using full-fat plain yogurt. However, don’t fret if you only have milk on hand; it can often be substituted, though the texture might vary slightly. Ensure your baking powder is fresh for optimal puffing results. Having these few items ready means you’re just moments away from mixing your dough and enjoying truly fresh warm bread ready in minutes. Remember, the quality of your ingredients can often shine through in simple recipes like this, so choose wisely.
Mix Dough for Quick Fluffy Bread
The mixing process for this quick bread is incredibly forgiving and swift, ensuring you spend less time in preparation and more time enjoying your meal. Unlike yeast breads that demand precise measurements and long proofing, this flatbread dough comes together in a snap. The key is to achieve a soft, slightly sticky consistency that’s easy to handle but not overly wet. This simplicity is why it’s considered such an easy flatbread option for any home cook.
Combine Wet Then Add Dry
Start by combining your wet ingredients in a large mixing bowl. This typically includes your chosen liquid (yogurt or milk) and any oil or melted butter. Whisk them together until well blended. In a separate bowl, sift together your dry ingredients: flour, baking powder, and salt. Sifting helps to aerate the flour and prevent lumps, contributing to a smoother dough and better rise. Once combined, gradually add the dry mixture to the wet mixture, stirring with a spoon or spatula until a shaggy dough forms. For more insights on general cooking techniques, visit the Carina Recipes Pinterest page.
Gently Mix, Avoid Over-kneading
After the dry ingredients are mostly incorporated, transfer the dough to a lightly floured surface. Now, it’s time for a very brief kneading session. Unlike traditional bread, this dough does not require extensive kneading. Gently work the dough for just 1-2 minutes, bringing it together until it forms a cohesive ball. The goal is to develop just enough gluten for structure without making the bread tough. Over-kneading can result in dense, chewy flatbreads, which we want to avoid. The dough should feel soft and pliable. Once formed, your dough is almost ready for shaping, bringing you closer to delicious quick flatbreads.
Shape and Rest Dough for Flexibility
Proper shaping is crucial for achieving uniformly cooked and aesthetically pleasing flatbreads. While the dough itself is very cooperative, a little attention to this step ensures your efforts result in beautifully round and even pieces. The resting period, though brief, is also vital, allowing the gluten to relax, making the dough easier to roll without snapping back. This makes the overall process of making homemade bread much more enjoyable and less frustrating, especially for beginners.
Roll Dough Balls, Let Them Rest
Once your dough is mixed, divide it into equal portions. Depending on your desired flatbread size, you might aim for 6-8 balls. Gently roll each portion between your palms to form smooth, round balls. Place these dough balls on a lightly floured surface or a plate, cover them with a clean kitchen towel or plastic wrap, and let them rest for about 10-15 minutes. This short rest allows the gluten in the dough to relax, which makes it significantly easier to roll out without resistance. Skipping this step can lead to dough that springs back, making it harder to achieve thin, even circles.
Flatten Each Ball Evenly by Hand
After resting, take one dough ball at a time and place it on a lightly floured surface. Using a rolling pin, or even just the palms of your hands, flatten each ball into a thin, round disc, approximately 6-8 inches in diameter and about 1/8 to 1/4 inch thick. Aim for an even thickness throughout, as this promotes uniform cooking. If the dough resists, let it rest for another couple of minutes before continuing. The goal is to create thin pieces that will cook quickly and puff up beautifully on the skillet, delivering that satisfying texture of fresh warm bread ready in minutes.
Cook Your Flatbreads on a Hot Skillet
The cooking method for these flatbreads is one of their most appealing features – it’s fast and requires only a basic skillet. This direct heat method gives them their characteristic slightly charred spots and soft, chewy interior. It’s the moment where your simple ingredients transform into delicious skillet bread. Ensuring your skillet is at the right temperature is key to achieving that perfect golden-brown finish and lovely puff.
Warm Skillet, Brush With Oil
Place a heavy-bottomed skillet or cast-iron pan over medium-high heat. Allow it to heat up for a good 2-3 minutes; a hot pan is essential for the flatbreads to cook quickly and puff. You can test if it’s hot enough by flicking a few drops of water onto the surface – if they sizzle and evaporate immediately, it’s ready. Lightly brush the surface of the skillet with a small amount of oil (vegetable, canola, or olive oil works well) or melted butter between each flatbread, ensuring a non-stick surface and promoting a beautiful golden crust. This step is critical for preventing sticking and contributing to the overall deliciousness of your quick flatbreads.
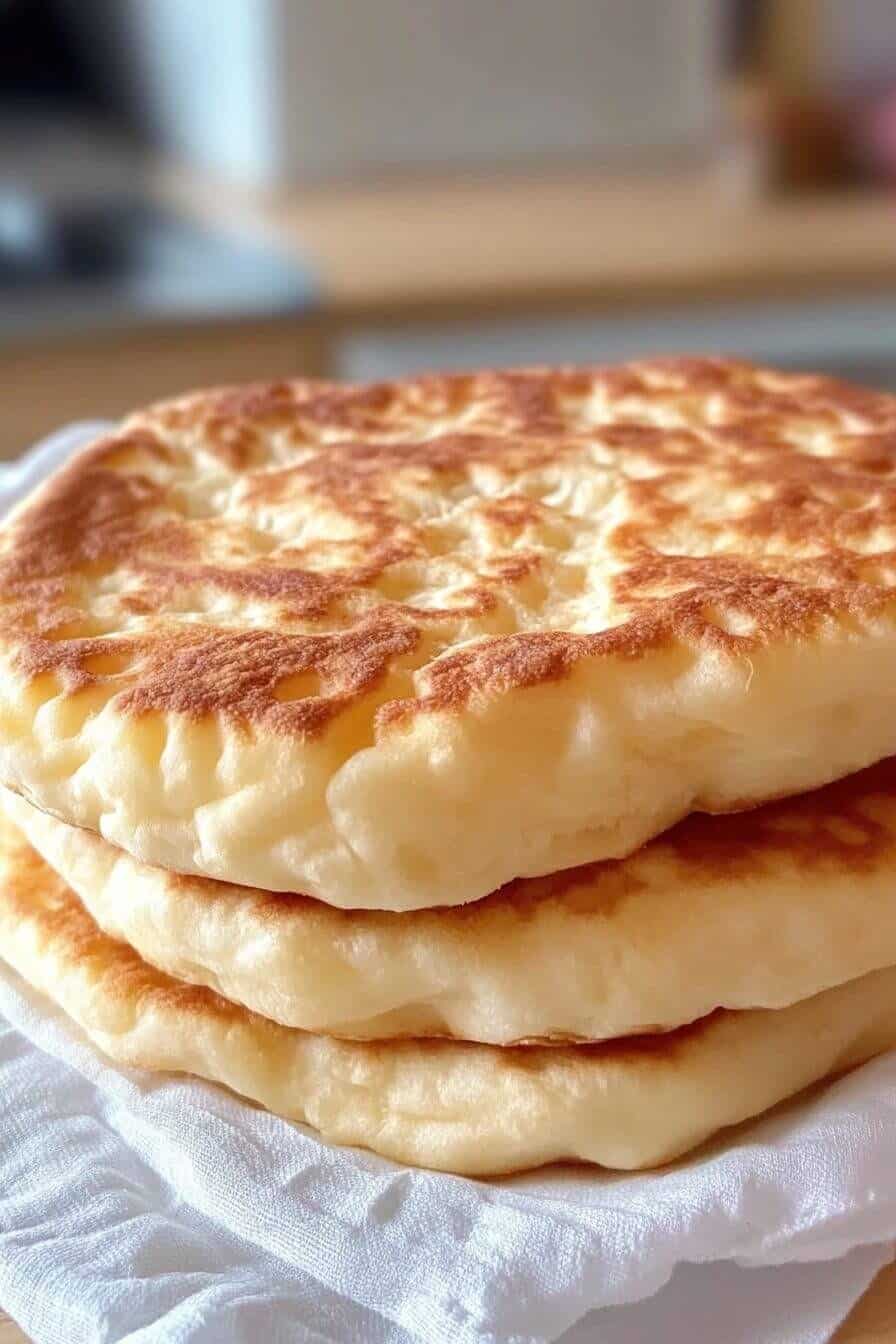
Cook Until Golden Brown Spots
Carefully place one flattened dough disc onto the hot, lightly oiled skillet. Cook for about 1-2 minutes per side. You’ll know it’s time to flip when you see bubbles forming on the surface and the underside has developed golden-brown spots. Flip the flatbread and cook for another 1-2 minutes on the second side, until it also has golden spots and looks cooked through. The flatbreads might puff up like a balloon – this is a good sign, indicating a light and airy interior! Remove the cooked flatbreads and either serve immediately or stack them on a plate covered with a clean kitchen towel to keep them warm while you cook the rest. Enjoying this bread with a savory dish like cheesy chicken and rice casserole makes for a delightful meal.
Serve Your Fresh Warm Bread Ready In Minutes
Once your flatbreads are cooked, the real fun begins: serving them! There’s nothing quite like hot, tender bread fresh off the skillet. This fresh warm bread ready in minutes is incredibly versatile and can complement a vast array of dishes, making it a staple in any kitchen. Whether you’re pairing it with a rich curry or using it as a base for a quick pizza, its soft texture and mild flavor make it universally appealing. Consider exploring other main course recipes for inspiration on pairings at Carina Recipes Main Course section.
Brush With Butter, Keep Them Warm
For an extra touch of flavor and a lovely sheen, brush your freshly cooked flatbreads with melted butter as soon as they come off the skillet. This adds a rich, comforting taste and helps keep them soft. You can also sprinkle a pinch of flaky sea salt or finely chopped fresh herbs like parsley or cilantro for an aromatic finish. As you continue to cook the remaining flatbreads, stack the finished ones on a plate and cover them with a clean kitchen towel. This traps the steam, keeping them warm and tender until you’re ready to serve everyone. The warmth and softness are key to truly enjoying this homemade bread at its best.
Pro Tips for Perfect Flatbread Results
While making fresh warm bread ready in minutes is straightforward, a few expert tips can elevate your results from good to absolutely fantastic. These small adjustments can make a significant difference in the texture, flavor, and overall success of your easy flatbread, ensuring every batch is as delicious as possible. Mastering these nuances will turn a simple recipe into a consistently perfect one.
Sift Flour, Check Baking Powder
Sifting your flour before adding it to the wet ingredients is a small step that yields big rewards. It aerates the flour, preventing lumps and creating a lighter, more tender dough. This makes for a more uniform mix and a softer crumb in your finished bread. Equally important is the freshness of your baking powder. Baking powder loses its potency over time, and an old batch won’t provide the necessary lift for fluffy flatbreads. To check its freshness, mix a teaspoon with a tablespoon of hot water; if it fizzes vigorously, it’s good to go. These two simple checks ensure your quick bread achieves its intended lightness.
Use Full-Fat Yogurt for Richness
The type of yogurt you use significantly impacts the flavor and texture of your yogurt flatbread. Opt for full-fat plain yogurt whenever possible. The higher fat content contributes to a richer, more tender crumb and a delightful tang that complements the simple flavor of the bread. Low-fat or non-fat yogurts can be used in a pinch, but they may result in a slightly less tender bread. Avoid flavored or sweetened yogurts unless you’re intentionally making a sweet version. The tang from plain yogurt also helps activate the baking powder, contributing to a better rise and a truly remarkable homemade bread experience. To learn more about yogurt, you can check its Wikipedia page.
Customize Your Flatbreads with Variations
One of the joys of making homemade bread, especially flatbreads, is how easily they can be customized. This versatility makes them perfect for pairing with a wide range of meals, from savory dinners like easy honey garlic chicken to sweet dessert-like creations. Don’t be afraid to experiment with different additions to tailor these quick flatbreads to your taste preferences or the meal you’re serving. The possibilities for creative expression are nearly endless.
Add Herbs, Cheese, or Whole Wheat
Elevate your basic flatbread by incorporating additional flavors directly into the dough. Freshly chopped herbs like rosemary, thyme, or oregano can impart a wonderful aromatic quality. Grated cheese, such as Parmesan, cheddar, or feta, will melt into pockets of savory goodness as the bread cooks. For a healthier, nuttier flavor, you can substitute a portion of the all-purpose flour with whole wheat flour; start with replacing 1/4 to 1/2 cup to maintain a good texture while adding fiber. These simple additions transform a plain flatbread into something special, perfectly complementing various cuisines.
Make Stuffed Pockets or Sweet Bread
Beyond mixing ingredients into the dough, you can also create stuffed flatbreads. Roll out your dough, place a filling (like spiced potatoes, minced meat, or a cheese mixture) in the center, and then seal the edges before rolling it out again into a disc. These make fantastic savory pockets. Alternatively, transform your dough into a delightful sweet flatbread. Add a touch of sugar or honey to the dough, and after cooking, brush with melted butter and sprinkle with cinnamon sugar, or drizzle with honey and chopped nuts for a dessert-like treat. The versatility truly makes this quick bread a kitchen hero.
Spice Up Your Dough Easily
For an extra kick, consider adding various spices to your dough. A pinch of garlic powder, onion powder, red pepper flakes, or a blend like za’atar can instantly change the flavor profile. These subtle additions can make your flatbreads an even more exciting accompaniment to main dishes. For more delicious recipe ideas and culinary inspiration, be sure to check out Carina Recipes on Instagram, where you can find diverse ways to enhance your cooking.
Prepare Dough Ahead for Later
One of the fantastic advantages of this easy flatbread recipe is the ability to prepare the dough in advance. This makes it an excellent option for meal prepping or simply for having ingredients ready to go when you need a quick side dish or snack. Having pre-made dough means you can truly enjoy fresh warm bread ready in minutes even on your busiest days. It’s a game-changer for spontaneous meal planning and reducing kitchen stress.
Make Dough the Night Before
You can easily prepare the flatbread dough the night before and store it in the refrigerator. After mixing and gently kneading the dough, shape it into a ball, lightly grease it with oil to prevent drying, and place it in an airtight container or wrap it tightly in plastic wrap. Refrigerate for up to 24-48 hours. When you’re ready to cook, simply remove the dough from the fridge, let it sit at room temperature for about 15-20 minutes (or until it’s pliable enough to roll), and then proceed with shaping and cooking as usual. This makes whipping up a batch of skillet bread incredibly convenient, especially for breakfast or a quick dinner side.
Store and Reheat Fresh Warm Bread Ready In Minutes
Even though these flatbreads are best enjoyed fresh, you can certainly make a larger batch and store them for later. Knowing how to properly store and reheat your homemade bread ensures that you can savor that delightful soft texture and delicious flavor anytime. This makes the concept of fresh warm bread ready in minutes even more practical for busy households and meal preppers, extending the enjoyment beyond the initial cooking time. For information on flatbreads in general, consider visiting the Wikipedia page for Flatbread.
Refrigerate or Freeze for Later
To store cooked flatbreads, allow them to cool completely. Stack them with parchment paper in between to prevent sticking, then place them in an airtight container or a resealable plastic bag. They can be refrigerated for up to 3-4 days. For longer storage, flatbreads freeze beautifully. Wrap individual flatbreads tightly in plastic wrap, then place them in a freezer-safe bag or container. They can be frozen for up to 2-3 months. When storing uncooked dough, wrap it tightly and refrigerate for up to 2 days; for freezing, divide into portions, wrap, and freeze for up to 1 month. This helps ensure your quick flatbreads stay fresh for when you need them.
Quick Ways to Reheat Easily
Reheating your stored flatbreads is simple and brings them back to their delicious, soft state. From the refrigerator, you can quickly warm them in a dry skillet over medium heat for 30-60 seconds per side, until soft and pliable. Alternatively, pop them into a toaster oven for a minute or two, or microwave them briefly (10-20 seconds per flatbread, depending on your microwave). If reheating from frozen, thaw them in the refrigerator overnight or on the counter for a couple of hours, then use one of the reheating methods mentioned above. This ensures you always have fresh warm bread ready in minutes, even from a stored supply, maintaining their lovely texture and flavor.
Common Questions About Flatbread Making
As you venture into making your own homemade bread, particularly quick flatbreads, you might have a few questions. This section addresses some of the most frequently asked queries, providing insights to help you troubleshoot common issues and explore different culinary avenues. Understanding these aspects will empower you to confidently create perfect batches of fresh warm bread ready in minutes every time, adapting the recipe to your specific needs and preferences.
Substitutes for Yogurt or Puffing?
If you don’t have yogurt, you can often substitute with an equal amount of milk (dairy or non-dairy), sometimes with a tablespoon of lemon juice or vinegar added to it and left to sit for 5 minutes to create a buttermilk substitute. This acidity helps react with the baking powder. For flatbreads that don’t puff, several factors could be at play: your skillet might not be hot enough, the dough might be rolled too thick or too thin, or your baking powder might be old. Ensure your skillet is screaming hot and the dough is consistently about 1/8 to 1/4 inch thick for the best chance of puffing and creating a wonderfully light skillet bread.
Gluten-Free, Keeping Soft, Sweet?
Making these flatbreads gluten-free is possible by using a good quality gluten-free all-purpose flour blend (one that contains xanthan gum). You might need to adjust the liquid slightly as gluten-free flours absorb liquids differently. To keep flatbreads soft, avoid over-kneading, ensure the dough is sufficiently hydrated, and store them properly (covered). Brushing with butter after cooking also helps. To make them sweet, incorporate a tablespoon or two of sugar into the dough, and after cooking, brush with melted butter and sprinkle with cinnamon sugar, or drizzle with honey and a dash of cardamom. This transforms your basic easy flatbread into a delightful sweet treat, suitable for breakfast or dessert.
Enjoy Homemade Fresh Warm Bread Ready In Minutes
There is immense satisfaction in creating something delicious from scratch, and these fresh warm bread ready in minutes flatbreads are no exception. They embody the essence of simple, satisfying cooking, proving that incredible flavors don’t always require intricate recipes or hours of effort. From gathering simple ingredients to seeing your creations puff on a hot skillet, every step is a testament to the joy of homemade goodness.
Whether you serve them as a comforting side, a base for creative meals, or simply as a warm snack with a sprinkle of salt, these homemade bread flatbreads are sure to become a beloved staple in your kitchen. So go ahead, preheat your skillet, and prepare to delight your senses with the soft, chewy texture and inviting aroma of freshly made bread, ready to be enjoyed in just a few delightful moments. Happy cooking!
