
Making Your Own Flavorful Crack Sticks is a rewarding culinary adventure that brings joy to any snack time. This simple recipe ensures crispy perfection and delightful taste every time. Learn to craft these savory homemade sticks, perfect for dipping or enjoying plain. We also cover delicious cream cheese rolls, offering versatile snacking options.
Key Takeaways
- Homemade crack sticks are easy to prepare with simple ingredients.
- Achieve perfect crispiness through proper rolling, shaping, and baking.
- Store and reheat crack sticks effectively for lasting freshness.
- Cream cheese rolls offer a delightful alternative, with sweet and savory filling ideas.
- Customize your snacks with gluten-free, spicy, or herbed variations.
Homemade snacks are truly special. They bring joy to any gathering. Fresh ingredients make a big difference. Crafting them is surprisingly simple. Enjoy delicious results every time.
Making Your Own Flavorful Crack Sticks
There’s nothing quite like the satisfaction of creating crispy, flavorful crack sticks right in your own kitchen. This simple process allows for incredible customization, making it a fantastic activity for home bakers of all skill levels. Forget store-bought options; homemade crack sticks boast unparalleled freshness and a delightful crunch that will quickly become a family favorite. Whether you’re planning a party or just need a satisfying snack, these savory sticks are incredibly versatile. We’ll walk you through each step, ensuring your crack sticks are perfectly seasoned and wonderfully crispy every single time. Get ready to impress yourself and your guests with these irresistible treats.
Gather Ingredients For Crispy Sticks
To begin making your own flavorful crack sticks, you’ll need a few common pantry staples. The foundation typically includes all-purpose flour, cold butter, a pinch of salt, and a touch of water or milk. For added flavor, consider incorporating grated Parmesan cheese, garlic powder, onion powder, or even a hint of paprika into your dry ingredients. The quality of your butter is quite important here, as it contributes significantly to the sticks’ flakiness and rich taste. Ensure your butter is very cold and cut into small cubes; this helps create pockets of steam during baking, leading to that coveted crispy texture. Measuring accurately is key to a consistent dough, so have your measuring cups and spoons ready. Some recipes also call for a touch of baking powder to give them a slight lift, making them even lighter and crisper. Gathering all your components beforehand makes the mixing process smooth and enjoyable.
Easy Steps To Mix Dough
Mixing the dough for these delicious snacks is straightforward. In a large bowl, combine your flour, salt, and any chosen dry seasonings like garlic powder or grated cheese. Next, add the cold, cubed butter. Using your fingertips, a pastry blender, or a food processor, cut the butter into the flour until the mixture resembles coarse crumbs with some pea-sized pieces of butter still visible. This step is crucial for achieving that light, flaky texture. Gradually add cold water or milk, one tablespoon at a time, mixing until the dough just comes together. Be careful not to overmix, as this can develop the gluten too much, resulting in tough crack sticks instead of light, crispy ones. Once combined, gently form the dough into a disk, wrap it in plastic, and refrigerate it for at least 30 minutes. Chilling the dough makes it much easier to handle and prevents the butter from melting too quickly, preserving the crispiness. This initial preparation sets the stage for perfectly crispy snacks later on.
Preparing And Shaping Crack Sticks Dough
Once your dough has had sufficient time to chill, it’s ready for the crucial steps of rolling and shaping. Proper handling at this stage is essential for achieving uniform crispiness and an appealing presentation. The cold dough will be firm, making it less sticky and easier to work with. Resist the urge to add extra flour unless absolutely necessary, as too much additional flour can alter the dough’s texture and make the final product dry. Take your time with these steps; patience here will pay off with beautifully consistent crack sticks that bake evenly and taste incredible. Precision in rolling and cutting ensures that each stick gets the same golden crisp perfection.
Roll Dough To Even Thickness
Remove your chilled dough from the refrigerator and place it on a lightly floured surface. Using a rolling pin, gently roll the dough out to an even thickness, ideally around 1/8 to 1/4 inch. An even thickness is paramount for consistent baking. If some parts are thicker than others, you’ll end up with some sticks that are perfectly crisp while others are still soft or even burnt. You can use a ruler or a rolling pin with thickness guides to ensure uniformity. Work quickly to prevent the butter in the dough from warming up too much. If the dough starts to become sticky or difficult to handle, don’t hesitate to place it back in the fridge for another 10-15 minutes to firm up. This brief chilling period can make a significant difference in the ease of handling and the final texture of your crispy sticks. Proper rolling makes the next step, slicing, much simpler and more effective.
Slice And Twist Into Strips
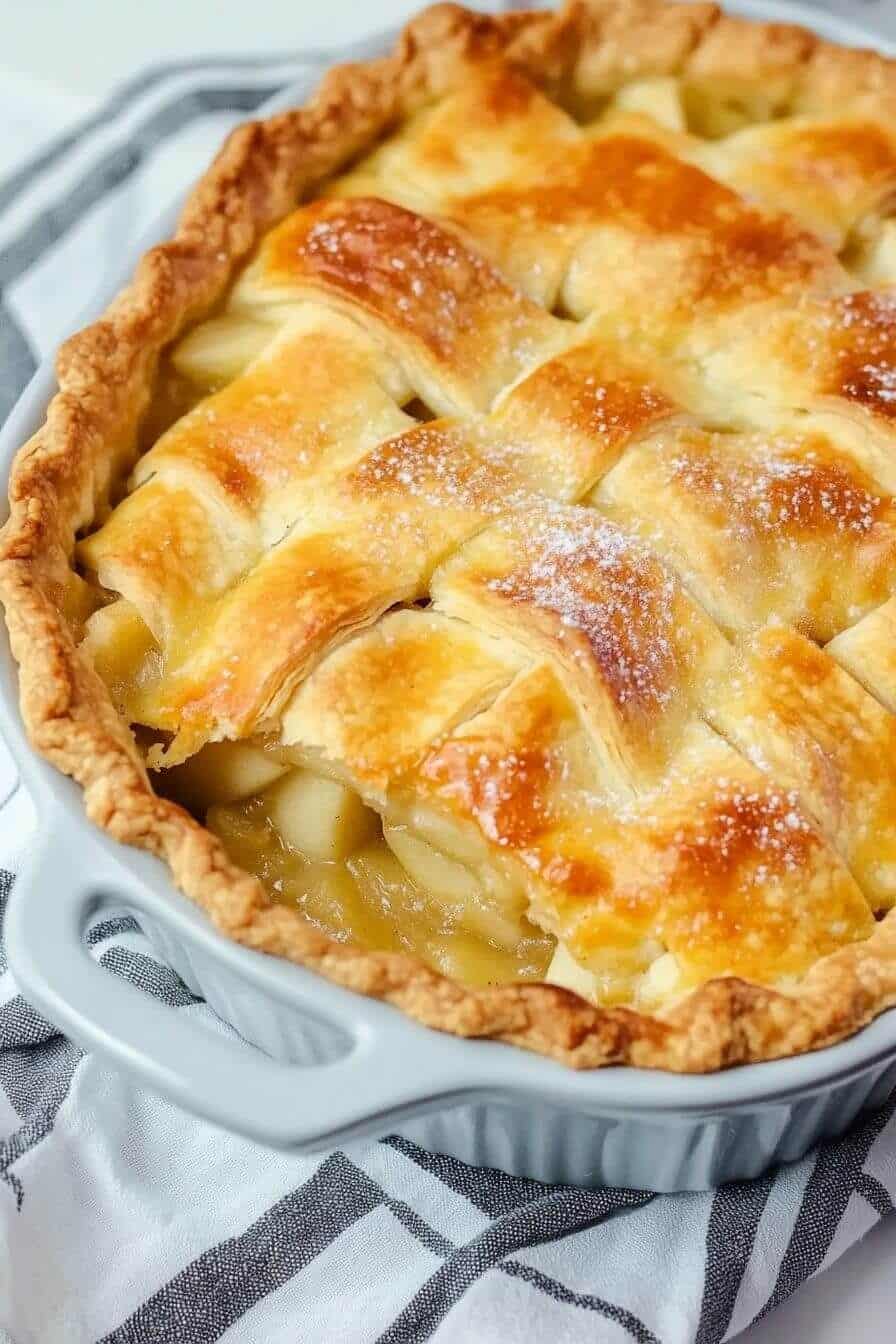
After achieving an even thickness, it’s time to transform your rolled dough into individual crack sticks. Using a sharp knife or a pizza cutter, slice the dough into long strips, approximately 1/4 to 1/2 inch wide and 4-6 inches long. The length and width can be adjusted based on your preference; thinner strips will be extra crispy, while wider ones might offer a bit more chew. For a fun, artisanal look, gently twist each strip a few times before placing it on a baking sheet lined with parchment paper. Ensure there’s enough space between each twisted strip to allow for even air circulation, which promotes uniform browning and crispiness. A single sheet should not be overcrowded. If you prefer, you can also leave them untwisted for a simpler, cracker-like appearance. The twisting not only adds visual appeal but can also contribute to a slightly more irregular, delightful crunch. This shaping process is what gives crack sticks their distinctive, appealing form. You can find more crispy recipes on our site.
Baking Sticks To Golden Crisp Perfection
The baking process is where your crack sticks truly come to life, transforming from raw dough into golden, crunchy delights. Achieving that perfect crispness requires attention to oven temperature and baking time. It’s a delicate balance to ensure they are fully cooked through without becoming overly browned or burnt. Each oven can vary slightly, so keeping a close eye on your sticks, especially during the last few minutes, is important. The aroma filling your kitchen will be a wonderful indicator of the delicious treats to come, promising a satisfying crunch with every bite.
Preheat Oven For Optimal Baking
Before your twisted dough strips even think about entering the oven, it’s crucial to preheat your oven to the correct temperature. For most crack stick recipes, a temperature between 350°F (175°C) and 400°F (200°C) works best. Preheating ensures that the oven reaches and maintains the desired temperature throughout the baking process. This consistent heat is vital for the dough to cook evenly and achieve that desired crisp texture. Placing dough into a cold or insufficiently preheated oven can result in uneven baking, where some parts are undercooked and soft, while others might be too dry. Allow at least 15-20 minutes for your oven to fully preheat after it indicates it has reached temperature, as internal temperatures can fluctuate. A properly preheated oven is the first step towards those irresistible golden, crispy crack sticks.
Brush With Butter And Salt
Once your crack sticks are arranged on the baking sheet, a final touch before baking can significantly enhance their flavor and appearance. Lightly brush the tops of each dough strip with melted butter. This not only adds a rich, savory flavor but also promotes beautiful golden-brown coloring during baking. After brushing with butter, sprinkle a pinch of flaky sea salt or your preferred seasoning over each stick. This coarse salt provides a wonderful textural contrast and a burst of savory goodness. You can experiment with other seasonings like a sprinkle of dried herbs, grated Parmesan cheese, or even a touch of smoked paprika for an added flavor dimension. This simple step elevates the overall taste and visual appeal of your homemade crack sticks, ensuring they are not just crispy, but also incredibly flavorful. Baking typically takes about 12-18 minutes, depending on your oven and the thickness of the sticks. They should be golden brown and firm to the touch. For more creative snack ideas, check out our snacks category.
Serving Your Delicious Homemade Crack Sticks
The moment you’ve been waiting for is finally here: serving your delicious homemade crack sticks! These crispy, savory treats are perfect for a wide array of occasions, from casual snacking to elegant entertaining. The warm, fresh-from-the-oven aroma alone is enough to tempt anyone. Presentation can also enhance the experience; arranging them neatly on a platter makes them even more inviting. Whether you’re pairing them with a dip or enjoying them on your own, their satisfying crunch and rich flavor are sure to be a hit. Get ready for compliments!
Enjoy Warm With Favorite Dips
While crack sticks are utterly delightful on their own, serving them warm with your favorite dips elevates the snacking experience to another level. Think creamy hummus, a tangy marinara, a rich spinach artichoke dip, or even a simple homemade ranch dressing. The warmth of the sticks makes them even more inviting, and their sturdy, crispy texture makes them perfect for scooping up generous amounts of dip without breaking. Consider a flavorful cheese dip for a truly indulgent treat, or a refreshing tzatziki for a lighter option. Arranging an assortment of dips alongside your crack sticks allows guests to customize their experience, making for a more interactive and enjoyable snack time. This versatility makes them a fantastic addition to any appetizer spread. For another cheesy option, consider making creamy baked mac and cheese.
Perfect Snack For Any Occasion
Homemade crack sticks are truly a perfect snack for any occasion, from an impromptu gathering to a planned party. Their savory profile and satisfying crunch make them universally appealing. They are excellent alongside a cheese board, adding a homemade touch that elevates the entire spread. Pack them in lunchboxes for a delightful midday treat, or serve them as a simple yet elegant appetizer before dinner. Kids and adults alike will appreciate their comforting familiarity and delicious flavor. The ease of making them, combined with their crowd-pleasing nature, solidifies their status as a go-to snack. They are far more impressive than store-bought crackers and offer a unique texture and depth of flavor that can’t be matched. Embrace the versatility of these delightful crunchy sticks and make them a staple in your culinary repertoire.
Quick Tips For Perfect Crack Sticks
Achieving consistently perfect crack sticks involves a few clever tricks that can make all the difference. These simple tips go beyond the basic recipe steps, helping you troubleshoot common issues and enhance the overall quality of your homemade snacks. From temperature control to flavor enhancements, these insights are designed to ensure every batch you bake turns out wonderfully crisp and delicious. Mastering these small details will make you a crack stick connoisseur, capable of crafting truly outstanding savory treats for any occasion.
Don’t Forget To Chill Dough
One of the most critical steps, often overlooked, is properly chilling your dough. After mixing, wrap the dough tightly in plastic and refrigerate it for at least 30 minutes, or even up to an hour. This chilling period allows the gluten to relax, making the dough easier to roll without snapping back. More importantly, it firms up the butter pieces within the dough. When cold butter hits a hot oven, it creates pockets of steam that expand rapidly, separating the layers of dough and resulting in an incredibly flaky and crispy texture. If the dough is too warm, the butter will melt too quickly, leading to a greasy and dense stick rather than a light and airy one. This simple step is fundamental for achieving that signature crack stick crispiness that everyone loves.
Try Different Cheese Or Herbs
While a basic salted crack stick is always a winner, don’t shy away from experimenting with different cheeses and herbs to customize your flavor profile. Instead of just Parmesan, consider incorporating sharp cheddar for a bolder taste, Gruyère for a nutty depth, or even a smoked gouda for a unique twist. Finely grated cheese melts beautifully into the dough, imparting rich flavor throughout. When it comes to herbs, dried Italian seasoning, rosemary, thyme, or oregano can be mixed directly into the flour for an aromatic boost. For a fresh touch, sprinkle finely chopped fresh chives or dill over the sticks before baking. These additions can transform a simple snack into an gourmet appetizer, offering endless possibilities for variety. Each batch can be a new adventure in flavor, making these homemade snacks truly unique and catering to various palates.
Storing And Reheating Crack Sticks Easily
To enjoy your homemade crack sticks for more than just one sitting, proper storage and reheating are key. These techniques ensure that your crispy creations retain their delightful texture and flavor for several days. Knowing how to store them correctly prevents them from becoming stale or soft, while effective reheating brings back their freshly baked crispness. Don’t let your efforts go to waste; a little planning in storage can extend the enjoyment of these delicious snacks, making them a convenient option for quick treats or unexpected guests.
Keep Leftovers In Airtight Container
Once your crack sticks have completely cooled, transfer them to an airtight container. This is crucial for maintaining their crispiness and preventing them from absorbing moisture from the air, which can make them soft and chewy. A cookie tin with a tight-fitting lid or a sealed plastic food storage container works perfectly. Store the container at room temperature on your counter or in a pantry. Avoid refrigerating crack sticks, as the cold, moist environment can actually make them go stale faster and lose their crunch. Stored correctly, these savory sticks will remain fresh and delightfully crispy for up to 3-5 days. For longer storage, you can freeze unbaked twisted dough strips and bake them directly from frozen, adjusting the baking time slightly. This method allows you to have fresh, warm crack sticks ready at a moment’s notice.
Re-crisp Stored Sticks In Oven
If your stored crack sticks have lost a bit of their initial crispness, don’t despair! They can be easily re-crisped to almost their original perfection. Simply preheat your oven to a moderate temperature, around 300°F (150°C). Spread the crack sticks in a single layer on a baking sheet, ensuring they are not overcrowded. Bake them for about 5-10 minutes, or until they feel firm and crunchy again. Keep a close watch to prevent them from burning. This brief reheating in the oven will drive out any absorbed moisture, bringing back that satisfying snap. Avoid using a microwave for reheating, as it will only make them softer and chewier. A quick oven refresh is the best way to enjoy your stored crack sticks as if they were just baked, making them a consistently delicious snack option. You can always visit our Pinterest page for more creative recipe ideas and tips on food storage.
Delicious Cream Cheese Rolls Recipe You Need to Try
Beyond the savory delight of crack sticks, there’s another incredibly versatile and delicious snack waiting to be explored: cream cheese rolls. These delightful pastries, often made with crescent roll dough or puff pastry, offer a completely different texture and flavor profile. They can be sweet or savory, making them perfect for breakfast, dessert, or an appetizer. The creamy, rich filling provides a wonderful contrast to a flaky, golden crust, creating an irresistible treat that’s surprisingly simple to make. Get ready to add another fantastic recipe to your baking repertoire, one that will surely impress.
Why This Recipe Is So Special
This particular cream cheese rolls recipe stands out due to its incredible versatility and universal appeal. What makes it special is the perfect balance between the tender, slightly sweet pastry and the rich, tangy cream cheese filling. Unlike many recipes, it’s easily adaptable to suit various tastes. You can transform it from a sweet breakfast item, perhaps with a touch of vanilla and sugar in the cream cheese, to a savory appetizer by adding herbs, garlic, or even chopped bacon to the filling. The use of store-bought crescent roll dough streamlines the preparation, making it an accessible recipe for even novice bakers. It’s a comforting, satisfying treat that feels gourmet but requires minimal effort. Whether you’re serving it at a brunch, a potluck, or just for a family snack, these rolls consistently receive rave reviews. The combination of textures—the flaky exterior and the smooth, creamy interior—is simply unbeatable, making it a truly remarkable and memorable dish that complements other snacks like our homemade crack sticks beautifully.
Exploring Other Delicious Cream Cheese Rolls Recipes
While the basic cream cheese roll recipe is a fantastic starting point, the world of cream cheese pastries is vast and exciting. Many variations exist, each offering unique textures and flavor combinations. From elaborate Danish pastries to simple, quick puff pastry creations, cream cheese plays a starring role in numerous beloved baked goods. Exploring these different recipes allows you to expand your baking skills and discover new favorites. Whether you prefer a yeast-risen dough for a softer roll or a crispier pastry, there’s a cream cheese roll out there for every preference and occasion. This section will touch upon the broader landscape of these delightful treats.
Simple Steps For Cream Cheese Rolls
The core process for making cream cheese rolls remains fairly consistent across many recipes, ensuring they are generally straightforward to prepare. Typically, you start by preparing your dough, which could be store-bought crescent rolls, puff pastry, or a homemade yeast dough. For the filling, you’ll combine softened cream cheese with sugar, an egg yolk (for richness and binding), and vanilla extract for sweet versions. For savory, you might mix cream cheese with herbs, garlic powder, or finely chopped scallions. The next step involves spreading the filling onto the dough, then rolling or folding it into individual portions. Baking instructions vary based on the dough type, but usually involve a medium-hot oven until golden brown and puffed. A common tip is to ensure your cream cheese is at room temperature for a lump-free, smooth filling. These simple steps ensure a delightful, creamy center and a perfectly baked exterior, making these rolls a quick and satisfying treat. You can find many inspiring cooking videos on our Instagram page.
Compare Crack Sticks With Cream Cheese Rolls
While both crack sticks and cream cheese rolls offer delicious snacking experiences, they cater to different cravings and occasions. Understanding their distinct characteristics can help you choose which one to make, or how to pair them effectively. Crack sticks are primarily savory, crispy, and often serve as an excellent vehicle for dips or a crunchy accompaniment to meals. Cream cheese rolls, on the other hand, boast a soft, flaky pastry shell around a creamy filling, making them more adaptable to both sweet and savory profiles, and often more substantial as a standalone treat. Both are homemade delights, but their textures and primary flavor notes diverge quite a bit.
Both Are Great For Snacking
Despite their differences, both crack sticks and cream cheese rolls undeniably excel as versatile snacks. Crack sticks, with their robust crunch and savory seasoning, are perfect for when you desire a crispy, satisfying bite. They complement a glass of wine, a bowl of soup, or a cheese platter beautifully. Their sturdy nature makes them ideal for dipping into heartier spreads. Cream cheese rolls, with their tender dough and creamy interior, offer a more comforting and often richer snacking experience. Sweet versions are delightful with coffee or tea, while savory variations can be a light lunch or a sophisticated appetizer. Both share the common advantage of being homemade, which always adds a special touch compared to store-bought options. They bring joy to any snack spread, offering a delightful contrast when served together. Imagine serving these homemade snacks alongside Cheesy Garlic Chicken Wraps for a full-on savory feast.
Ideas For Delicious Cream Cheese Rolls Fillings
The true magic of cream cheese rolls lies in their adaptability, particularly when it comes to fillings. The creamy base of cream cheese acts as a perfect canvas for a myriad of flavors, allowing you to tailor your rolls to any preference or occasion. This flexibility is what makes them such a popular choice for bakers looking to get creative in the kitchen. From classic combinations to more adventurous pairings, the filling options are virtually endless, ensuring there’s always a new delicious experience to be had. Experimenting with fillings is where the fun truly begins!
Sweet Or Savory Filling Options
The choice between sweet and savory fillings for your cream cheese rolls depends entirely on your craving. For sweet rolls, popular additions include fruit preserves like raspberry, strawberry, or apricot, often swirled into the cream cheese mixture. A sprinkle of cinnamon sugar, lemon zest, or even a few chocolate chips can turn them into a delightful dessert or breakfast treat. Consider adding chopped nuts, shredded coconut, or a drizzle of honey for extra texture and flavor. On the savory side, the possibilities are equally exciting. Mix finely chopped chives, garlic powder, onion powder, and a dash of black pepper into the cream cheese for a simple yet flavorful appetizer. You could also incorporate crumbled bacon, sun-dried tomatoes, chopped olives, or even a pinch of red pepper flakes for a little kick. Grated cheddar or Parmesan cheese can also be mixed in or sprinkled on top before baking. Don’t forget herbs like dill, parsley, or rosemary. These varied fillings ensure that cream cheese rolls can be a delightful addition to any meal or snack time, catering to every palate. To understand the foundational science of these delicious transformations, you can read more about dough and its properties.
Crack Sticks: Gluten-Free And Spicy Options
For those with dietary restrictions or a penchant for bolder flavors, homemade crack sticks offer fantastic flexibility. The beauty of baking at home means you’re in control of every ingredient, allowing for easy substitutions and additions. Creating gluten-free versions or adding a spicy kick opens up a whole new world of possibilities, ensuring that everyone can enjoy these crispy, savory treats. Don’t let specific preferences limit your enjoyment; with a few simple tweaks, your crack sticks can be tailored to perfection, proving that homemade truly means custom-made.
Substitute Flour For Gluten-Free Blend
Making crack sticks gluten-free is simpler than you might think, thanks to the wide availability of excellent gluten-free flour blends. When substituting, look for a good all-purpose gluten-free flour blend that contains xanthan gum, as this helps with the dough’s structure and elasticity, mimicking traditional wheat flour. Simply swap the standard all-purpose flour in the recipe with an equal amount of your chosen gluten-free blend. You might find the dough is a little less pliable or slightly more crumbly, so handle it gently. Sometimes, a tiny bit more liquid might be needed to bring the dough together, but add it very sparingly, just a teaspoon at a time. The result will be wonderfully crispy gluten-free crack sticks that are just as flavorful and satisfying as their traditional counterparts, allowing everyone to enjoy this delightful snack. Crackers, in general, are a versatile snack, and making them gluten-free expands their reach.
Add Red Pepper Flakes For Kick
If you love a little heat, adding red pepper flakes to your crack sticks is an easy way to introduce a spicy kick. You can mix the red pepper flakes directly into the dry ingredients along with the salt and other seasonings. Start with about 1/2 to 1 teaspoon for a mild heat, and increase to your preference for a bolder, more fiery flavor. The flakes will be distributed throughout the dough, providing bursts of warmth in every bite. For an even more intense heat, consider adding a pinch of cayenne pepper or a dash of hot sauce to the melted butter used for brushing before baking. This layering of spice ensures a well-rounded heat that isn’t overwhelming but certainly noticeable. Spicy crack sticks make an excellent accompaniment to cool dips, or as a standalone snack for those who enjoy a bit of zest in their food. This simple addition can completely transform the character of your homemade savory sticks, adding an exciting dimension to your snacking.
Creative Flavor Twists For Crack Sticks
Beyond basic salt and cheese, there’s a whole world of creative flavor twists waiting to be explored for your homemade crack sticks. Thinking outside the box with herbs, spices, and infused ingredients can elevate your snack game to gourmet levels. These twists aren’t just about adding new ingredients; they’re about layering flavors to create a more complex and memorable taste experience. Don’t be afraid to experiment with different combinations to find your perfect signature crack stick. The kitchen is your laboratory, and these ideas are just the starting point for culinary innovation.
Infuse Butter With Garlic Or Herbs
One of the most effective ways to introduce deep, aromatic flavors to your crack sticks is by infusing the butter you’ll use for brushing. Instead of plain melted butter, gently melt the butter with crushed garlic cloves, fresh rosemary sprigs, or thyme. Allow the mixture to simmer very gently for about 5-10 minutes to let the flavors meld and infuse. Strain out the solids before brushing the infused butter onto your dough strips. This method imparts a delicate yet potent garlic or herbal note throughout the sticks, creating a sophisticated taste. The warm butter helps carry these volatile aromatic compounds directly into the surface of the crack sticks, ensuring a fragrant and delicious outcome. Imagine the rich aroma of garlic and rosemary permeating every crispy bite—it’s an easy step that yields impressive results.
Try Smoked Paprika For Unique Taste
For a truly distinctive and intriguing flavor profile, incorporate smoked paprika into your crack stick dough or sprinkle it on top before baking. Smoked paprika, unlike its sweet or hot counterparts, offers a deep, earthy, and slightly smoky flavor that can transform your snack. It brings a warmth and complexity that is both comforting and exotic. Mix it directly into the flour blend for an even distribution, or dust it over the butter-brushed sticks for a more concentrated burst of smoky flavor on the surface. This spice pairs wonderfully with cheese and adds a beautiful reddish hue to your crack sticks. It’s an unexpected twist that will surely have people asking for your secret ingredient. Combining it with a hint of cayenne can create a smoky-spicy version that is absolutely addictive. These creative additions make your crack sticks not just snacks, but culinary statements.