
Air Fryer Garlic Flatbread offers a delightful way to enjoy fresh, warm bread with minimal effort. This easy flatbread recipe brings savory flavors right to your table, perfect for a quick snack or side. Follow our simple instructions to achieve perfectly cooked, golden-brown flatbreads every time, making homemade flatbread a regular delight.
Key Takeaways
- Effortlessly prepare delicious Air Fryer Garlic Flatbread using simple ingredients.
- Master dough mixing and shaping for perfect, fluffy flatbreads.
- Learn the ideal air fryer settings for golden-brown, crispy results.
- Discover useful tips for storing and customizing your flatbread creation.
- Understand the nutritional aspects of this savory, quick air fryer bread.
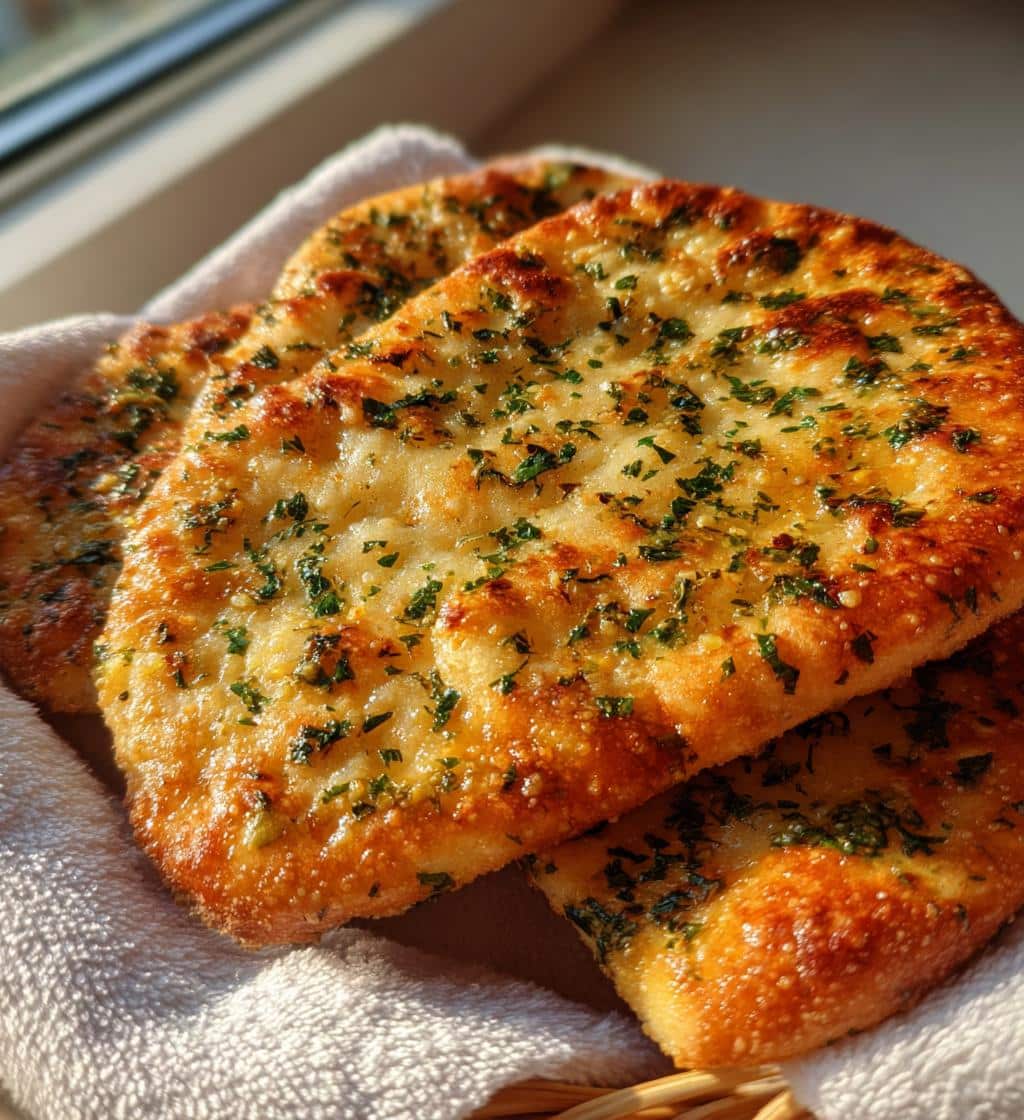
Imagine warm, garlicky flatbread. It’s crispy, tender, and so fresh. Your air fryer makes it easy. A savory treat for any meal. Enjoy this simple pleasure soon.
Making Delicious Air Fryer Garlic Flatbread
Creating delicious Air Fryer Garlic Flatbread at home is a rewarding experience, transforming basic ingredients into a wonderfully aromatic and flavorful treat. This easy flatbread recipe is designed for efficiency and amazing taste, perfect for those moments when you crave something special but lack extensive time. The air fryer excels at providing a crispy exterior and tender interior, mimicking results often achieved in a traditional oven but in a fraction of the time. Whether you’re looking for a delightful appetizer, a perfect accompaniment to a hearty meal, or a satisfying snack, this quick air fryer bread delivers every time. It’s a wonderful alternative to store-bought bread, allowing you to control the freshness and quality of ingredients. The fragrant garlic and vibrant parsley infuse each bite with a captivating aroma and rich taste, making this homemade flatbread a standout dish. Preparing this Air Fryer Garlic Flatbread isn’t just about cooking; it’s about crafting a delightful culinary experience from scratch with minimal fuss. The simple process involved makes it an accessible recipe for cooks of all skill levels, ensuring that even beginners can achieve impressive results. Think of serving these warm flatbreads alongside dishes like Cheesy Garlic Chicken Wraps, amplifying the garlic goodness throughout your meal.
Why Try This Easy Flatbread?
There are numerous compelling reasons to incorporate this easy flatbread recipe into your cooking repertoire. Firstly, its sheer simplicity makes it incredibly appealing; you don’t need to be an expert baker to achieve fantastic results. The air fryer significantly speeds up the cooking process, meaning fresh, warm bread can be on your table in under an hour. Furthermore, this method often requires less oil than traditional frying, making it a potentially lighter option. The distinctive flavor of fresh garlic combined with parsley creates a universally loved profile that pairs well with countless meals, from soups and stews to salads and main courses. It’s a versatile dish that can serve as an elegant appetizer for guests or a comforting snack for your family. The satisfaction of baking your own homemade flatbread, infused with aromatic garlic, is unparalleled, offering a sense of accomplishment with every bite. This quick air fryer bread provides a superior taste and texture compared to many pre-packaged options, boasting a delightful crispness on the outside and a soft, chewy inside. It’s also an excellent way to use common pantry staples, turning them into something extraordinary.
Quick Steps to Heavenly Bites
The path to creating these heavenly Air Fryer Garlic Flatbread bites is straightforward and designed for efficiency. It begins with quickly mixing a simple dough using flour, yeast, water, and a few other staples. This foundational step is less intimidating than it sounds, requiring minimal kneading thanks to the air fryer’s cooking method. Next, the dough is allowed a short rest, developing flavor and elasticity. While the dough is resting, you can prepare the aromatic garlic and parsley topping, a blend of minced garlic, fresh parsley, and melted butter or olive oil that infuses the flatbread with its signature flavor. The dough is then divided and rolled into individual flatbreads, brushed generously with the garlic-herb mixture. Finally, these delectable creations are transferred to the preheated air fryer, where they cook to golden perfection in mere minutes. The entire process, from mixing to serving, is streamlined, allowing you to enjoy fresh, warm, homemade flatbread without the lengthy wait associated with traditional baking. Each step is easy to follow, ensuring that even novice bakers can achieve perfectly crispy and flavorful results. This quick air fryer bread offers an immediate gratification, turning a craving into a delicious reality almost instantly.
Gathering Your Air Fryer Flatbread Ingredients
Successful baking, even for something as seemingly simple as Air Fryer Garlic Flatbread, begins with having all your ingredients precisely measured and ready. This preparatory step, often called “mise en place,” ensures a smooth and stress-free cooking process, preventing last-minute rushes or omissions. For this easy flatbread recipe, the ingredients fall into two main categories: the core pantry staples that form the dough and the fresh components that create the vibrant, aromatic garlic and parsley topping. Starting with fresh, high-quality ingredients is paramount, especially when garlic and herbs are at the forefront of the flavor profile. Ensuring your yeast is active is also a key factor for a light and airy dough. Before you even begin mixing, take a moment to double-check that you have everything listed, measured out, and conveniently placed on your countertop. This simple habit will streamline your cooking and contribute significantly to the overall success of your homemade flatbread, leading to a consistently delicious outcome. Quality ingredients are the foundation of any great dish, and this quick air fryer bread is no exception, relying on the interplay of fresh and staple components.
Pantry Staples for Dough
The foundation of your Air Fryer Garlic Flatbread dough relies on a few common pantry staples that are likely already in your kitchen. You’ll need all-purpose flour, which provides the main structure for your flatbreads. For leavening, instant yeast is the preferred choice, as it doesn’t require prior activation and can be mixed directly with the dry ingredients, speeding up the process. A touch of granulated sugar helps to feed the yeast, encouraging it to activate and rise, while also contributing a subtle sweetness that balances the savory garlic. Salt is crucial for enhancing flavor and controlling the yeast’s activity. Lukewarm water is essential for hydrating the dough and activating the yeast; ensure it’s not too hot (which can kill the yeast) or too cold (which can hinder its activity). Finally, olive oil or another neutral cooking oil adds richness to the dough, contributes to its tender texture, and prevents it from sticking. These simple ingredients, when combined correctly, will form a pliable and delicious dough, perfect for your homemade flatbread. Having these ready makes the mixing process swift for your crispy flatbread.
Fresh Garlic and Parsley
The heart and soul of this Air Fryer Garlic Flatbread recipe truly lie in the fresh garlic and parsley that make up its signature topping. Do not underestimate the impact of using fresh ingredients here; they lend a brightness and pungency that dried alternatives simply cannot replicate. For the garlic, you’ll need several cloves. Opt for firm, unblemished garlic bulbs. The quantity can be adjusted based on your preference for intense garlic flavor, but a generous amount is highly recommended for a truly savory flatbread. Fresh parsley, preferably flat-leaf or Italian parsley, brings a vibrant color and a fresh, herbaceous note that beautifully complements the robust garlic. Look for bright green, crisp bunches of parsley without any yellowing or wilting. These two fresh ingredients are critical for elevating the simple flatbread dough into an aromatic and irresistible delight. They are what transforms this from a basic bread into a truly memorable Air Fryer Garlic Flatbread, ensuring each bite bursts with fresh, authentic taste. Their freshness is key to a truly delicious air fryer snack.
Mixing Dough for Your Heavenly Flatbread
The process of mixing the dough for your Air Fryer Garlic Flatbread is surprisingly straightforward, even for those new to baking. It’s a foundational step that sets the stage for the texture and rise of your final product. The key is to combine ingredients systematically, ensuring everything is properly incorporated without overmixing. Unlike some bread recipes that demand extensive kneading in the initial stages, this easy flatbread recipe is forgiving, designed for efficiency while still yielding a wonderfully pliable and flavorful dough. The use of instant yeast further simplifies the process, eliminating the need for a separate proofing step. Paying attention to the water temperature is crucial here; it should be warm enough to activate the yeast but not so hot that it kills it. Aim for a temperature around 105-115°F (40-46°C). As you begin to mix, you’ll see the ingredients transform from separate components into a cohesive, shaggy mass, which is exactly what you want before the kneading stage. This simple flatbread truly relies on this initial careful mixing.
Combine Dry Ingredients First
To start mixing your Air Fryer Garlic Flatbread dough, always begin by combining the dry ingredients. In a large mixing bowl, measure out your all-purpose flour, instant yeast, granulated sugar, and salt. Whisk these ingredients together thoroughly with a spoon or a whisk. This step is more important than it might seem; it ensures that the yeast, sugar, and salt are evenly distributed throughout the flour. Even distribution means that the yeast will have access to nutrients (sugar) to activate properly, and the salt will be balanced, preventing pockets of overly salty or bland dough. Skipping this step can lead to an uneven rise or inconsistent flavor in your homemade flatbread. The initial whisking also helps to aerate the flour slightly, which can contribute to a lighter texture in the finished flatbread. Once your dry ingredients are well combined, you’re ready to move on to incorporating the liquids, which will bring everything together into a cohesive dough for your quick air fryer bread.
Adding Liquids to Form Dough
Once your dry ingredients are perfectly combined, it’s time to introduce the liquids to form your Air Fryer Garlic Flatbread dough. Create a well in the center of your dry mixture. Pour in the lukewarm water and olive oil into this well. Using a sturdy spoon or a dough whisk, begin to stir the wet and dry ingredients together, starting from the center and gradually incorporating the flour from the sides of the bowl. Continue mixing until all the flour is hydrated and a shaggy, somewhat sticky dough forms. At this stage, it’s normal for the dough to look a little rough and not perfectly smooth; it doesn’t need to be perfectly uniform yet. Avoid the temptation to add more flour unless the dough is excessively sticky and unmanageable. The goal is to bring all the ingredients together into a single mass. Once the dough has formed a rough ball and most of the flour has been incorporated, cover the bowl with a clean kitchen towel or plastic wrap and let it rest for about 10-15 minutes. This resting period, known as autolyse, allows the flour to fully hydrate, making the subsequent kneading process much easier and helping to develop gluten for a tender, crispy flatbread.
Kneading and Shaping Perfect Flatbread Dough
Kneading and shaping are crucial steps in transforming your shaggy dough into the perfect foundation for Air Fryer Garlic Flatbread. While this easy flatbread recipe is designed to be less demanding than traditional bread making, proper kneading ensures the gluten develops sufficiently, resulting in a tender yet resilient crumb. The shaping process, in turn, dictates the appearance and evenness of your cooked flatbreads, ensuring they fit well into your air fryer basket and cook uniformly. Don’t be intimidated by the idea of kneading; it’s a therapeutic and straightforward process once you get the hang of it. The goal is to create a smooth, elastic dough that springs back when gently poked, indicating good gluten development. Once kneaded, dividing and rolling the dough requires a gentle touch and an eye for consistency, ensuring each piece of homemade flatbread cooks to perfection. This attention to detail in these steps contributes significantly to the delightful texture and overall success of your quick air fryer bread, making it a truly satisfying savory flatbread.
How to Knead Dough
After your dough has rested, it’s time for the kneading process, a key step for developing the gluten structure that gives your Air Fryer Garlic Flatbread its characteristic chewiness. Lightly flour a clean work surface. Turn the shaggy dough out onto the floured surface. Begin to knead the dough by folding it over onto itself, pressing down with the heels of your hands, then rotating the dough a quarter turn and repeating the process. You can also push the dough away from you, fold it back, and then push again. The motion should be rhythmic and continuous. Initially, the dough might feel sticky, but as you continue to knead, it will become smoother, more elastic, and less sticky. Knead for about 5-7 minutes until the dough is smooth, supple, and springs back slowly when you gently poke it with a finger. Avoid adding too much extra flour during kneading, as this can make the flatbread tough; only use enough to prevent sticking. Proper kneading is essential for achieving a light and airy texture in your homemade flatbread. For more general information on dough and its properties, Wikipedia offers an excellent resource.
Dividing Dough for Servings
Once your Air Fryer Garlic Flatbread dough is perfectly kneaded and smooth, it’s time to divide it into individual servings. This step ensures that each flatbread is roughly the same size, promoting even cooking in your air fryer. Gently roll the kneaded dough into a log shape on your lightly floured surface. Using a sharp knife or a dough scraper, divide the log into 4-6 equal portions, depending on how large you want your flatbreads to be and the size of your air fryer basket. For standard air fryers, dividing it into 4 portions usually works well, yielding flatbreads that are a good serving size and fit without overcrowding. If you prefer smaller, more appetizer-sized bites, you might divide it into 6 or even 8 portions. Once divided, take each piece of dough and gently shape it into a smooth ball. You can do this by cupping it in your hand and rotating it against the counter, or by gently folding the edges under to create tension on the surface. Place the dough balls on a lightly floured surface or a baking sheet lined with parchment paper, cover them loosely with a clean kitchen towel, and let them rest for another 5-10 minutes. This short rest helps the gluten relax, making the dough easier to roll out.
Rolling Each Flatbread Shape
With your dough portions rested, the final shaping step for your Air Fryer Garlic Flatbread is to roll each ball into its distinctive flatbread shape. Lightly flour your work surface and your rolling pin. Take one dough ball and place it on the floured surface. Begin rolling from the center outwards, rotating the dough frequently to ensure an even thickness and prevent sticking. The goal is to roll each piece into an oval or round shape, approximately 6-8 inches in diameter and about ⅛ to ¼ inch thick. The exact size and thickness will depend on the capacity of your air fryer basket and your preference for a thinner, crispier flatbread or a slightly thicker, chewier one. Be mindful not to roll them too thin, as they might become brittle, or too thick, as they may not cook through evenly in the air fryer. If the dough springs back too much, let it rest for a minute or two before continuing to roll; this allows the gluten to relax. Once shaped, carefully transfer the raw flatbreads to a separate piece of parchment paper or a lightly floured surface, ready for the topping application. This precise shaping is key to achieving a uniformly cooked and crispy flatbread.
Preparing Garlic and Parsley Topping
The garlic and parsley topping is the aromatic heart of your Air Fryer Garlic Flatbread, infusing each bite with irresistible flavor. This simple yet powerful mixture elevates the plain flatbread dough into a savory delight. The freshness of both the garlic and parsley is non-negotiable here; their vibrant flavors are what make this recipe truly stand out. While some recipes might call for dried herbs, for this homemade flatbread, fresh is always best. The process of preparing this topping is quick and straightforward, easily done while your dough is resting or shaping. The combination of pungent garlic with the bright, herbaceous notes of parsley creates a harmonious blend that is both comforting and exciting. Remember, the quality of your ingredients directly impacts the final taste, so choose the freshest garlic and parsley you can find for this simple flatbread. This topping is what transforms a quick air fryer bread into a memorable culinary experience, promising a burst of flavor with every crispy bite.
Mincing Garlic for Flavor
For the Air Fryer Garlic Flatbread topping, precise garlic preparation is paramount to achieving maximum flavor. You’ll want to use fresh garlic cloves, typically 3-4 depending on their size and your desired intensity. Begin by peeling the cloves. Then, you can either finely mince them using a sharp knife, a garlic press, or even a microplane for a paste-like consistency. Mincing releases the natural oils and pungent flavors of the garlic, ensuring it’s evenly distributed across the flatbread. For an even more robust flavor, some prefer to grate the garlic into a fine paste; this method allows the garlic flavor to permeate more deeply during cooking. Avoid using pre-minced garlic from a jar if possible, as it often lacks the brightness and potent flavor of fresh cloves. The finer you mince the garlic, the more evenly its flavor will spread, preventing any overly strong bites and ensuring a balanced, savory flatbread. For more details on the culinary uses and properties of garlic, check out its Wikipedia page.
Chopping Fresh Parsley Finely
Complementing the robust garlic in your Air Fryer Garlic Flatbread topping is fresh parsley, which adds a crucial layer of herbaceous brightness and a vibrant green color. For this recipe, fine chopping is key. Start by washing a generous bunch of fresh flat-leaf parsley under cold running water and thoroughly patting it dry with paper towels. Any excess moisture can dilute the topping mixture. Remove the leaves from the thicker stems; the tender smaller stems can be included as they are also flavorful. Gather the parsley leaves into a tight bunch and finely chop them using a sharp knife. The goal is to achieve very small, consistent pieces that will adhere well to the flatbread and distribute their flavor evenly without being too chunky. Finely chopped parsley integrates beautifully with the minced garlic and melted butter, creating a harmonious and aesthetically pleasing topping. This attention to detail in chopping ensures that every bite of your homemade flatbread has a balanced blend of garlic and fresh herb flavor, making it a truly delicious air fryer snack.
Brushing Topping on Flatbreads
With your garlic and parsley finely prepped, it’s time to combine them with melted butter or olive oil to create the irresistible topping for your Air Fryer Garlic Flatbread. In a small bowl, melt about 2-3 tablespoons of unsalted butter, or use olive oil for a dairy-free option. Stir in the minced garlic and finely chopped parsley. Add a pinch of salt and black pepper to taste. This mixture is now ready to be brushed generously onto your prepared flatbreads. Using a pastry brush, evenly coat one side of each rolled-out flatbread with the garlic-herb butter or oil. Ensure that the garlic and parsley bits are spread out, not clumped in one spot, so that every part of the flatbread receives a burst of flavor. This brushing step is vital for both flavor and aesthetic appeal, as it provides a beautiful sheen and helps the herbs to lightly toast during cooking. Be gentle as you brush to avoid tearing the delicate dough. Once brushed, your flatbreads are ready to enter the air fryer, promising a golden, aromatic, and incredibly crispy flatbread experience.
Setting Up Your Air Fryer Correctly
Properly setting up your air fryer is a fundamental step to ensure your Air Fryer Garlic Flatbread cooks perfectly, achieving that desirable golden-brown exterior and soft interior. An air fryer works by circulating hot air rapidly around the food, effectively crisping it up and cooking it through. However, its efficiency relies on correct temperature settings and thoughtful arrangement of the food within its basket. Neglecting to preheat or overcrowding the basket can lead to uneven cooking, resulting in some parts being undercooked and others overly browned. This quick air fryer bread benefits immensely from an optimal cooking environment. Understanding your specific air fryer model is also helpful, as some can run hotter or cooler than others, potentially requiring minor adjustments to the recommended times and temperatures. By taking a moment to correctly set up your appliance, you guarantee a more consistent and delicious outcome for every batch of your homemade flatbread, turning a simple flatbread into a culinary triumph. For more versatile bread recipes and cooking methods, consider checking out our bread category.
Preheat Air Fryer Temperature
Preheating your air fryer is a critical first step when making Air Fryer Garlic Flatbread. Just like a conventional oven, an air fryer needs to reach its target temperature before food is placed inside to ensure even and efficient cooking. For this easy flatbread recipe, preheat your air fryer to 375°F (190°C) for about 5 minutes. This allows the internal components to heat up fully and creates an immediate hot environment for the dough. Placing dough into a cold air fryer can lead to a less even rise and a chewier, less crispy texture. The initial burst of heat helps the flatbread to puff up quickly and develop a golden crust. While the air fryer is preheating, you can finalize brushing the garlic-parsley topping onto your shaped flatbreads. Don’t skip this brief but important step; it makes a significant difference in the final quality of your homemade flatbread, contributing to its perfectly crispy texture and delicious flavor. A properly preheated air fryer is the secret to getting a quick air fryer bread with ideal results every time.
Arrange Flatbreads in Basket
Once your air fryer is preheated, the next crucial step is to carefully arrange the Air Fryer Garlic Flatbreads in the basket. The golden rule for air frying is to avoid overcrowding. Place the flatbreads in a single layer, ensuring there is enough space around each one for the hot air to circulate freely. Depending on the size of your air fryer basket and the dimensions of your flatbreads, you might only be able to cook one or two at a time. Resist the urge to stack them or layer them, as this will prevent them from crisping up evenly and cooking through properly. If you’re concerned about sticking or for easier cleanup, you can line the air fryer basket with a piece of parchment paper specifically designed for air fryers, or make sure your basket is well-greased. However, be cautious with parchment paper, ensuring it doesn’t block the air circulation or touch the heating element. Once arranged, the flatbreads are ready for cooking. This careful placement is vital for achieving a perfectly golden-brown and crispy flatbread, ensuring each piece of homemade flatbread is cooked to perfection for a savory flatbread experience.
Cooking Air Fryer Garlic Flatbread Perfectly
The moment of truth arrives when your Air Fryer Garlic Flatbread enters the preheated appliance. Achieving perfectly cooked flatbreads involves more than just setting a timer; it requires understanding the nuances of air frying and knowing how to check for doneness. The air fryer’s rapid circulation of hot air is fantastic for creating a crisp exterior, but it can also lead to quick browning, so vigilance is key. This easy flatbread recipe is designed for speed, so cooking times are relatively short compared to conventional baking. The goal is a beautifully golden-brown crust with a soft, airy interior, and a delightful aroma filling your kitchen. Every air fryer model can vary slightly, so consider the initial recommended times as a starting point and be prepared to make minor adjustments. This proactive approach ensures that your homemade flatbread achieves that ideal crispy flatbread texture and savory flavor. Learning to cook your quick air fryer bread perfectly will make it a regular favorite in your kitchen.
Cook Time for Golden Brown
For your Air Fryer Garlic Flatbread, the cook time is typically quite short, making this a truly quick air fryer bread recipe. Once the flatbreads are arranged in a single layer in the preheated air fryer basket, cook them at 375°F (190°C) for 3-5 minutes per side. The exact time will depend on the thickness of your flatbreads and the specific wattage of your air fryer. After the initial 3-5 minutes, carefully flip the flatbreads using tongs and continue cooking for another 2-4 minutes, or until both sides are a beautiful golden brown and the flatbread has puffed up slightly. The garlic and parsley topping should appear slightly toasted, releasing a fragrant aroma. Keep a close eye on them during the last few minutes, as air fryers can go from perfectly golden to slightly burnt very quickly. You’re aiming for a lovely crispy flatbread texture that is firm but still tender when pressed. For another great air fryer recipe that achieves perfect crispness, try our Crispy Cauliflower recipe.
How to Check for Doneness
Ensuring your Air Fryer Garlic Flatbread is perfectly done is crucial for the best taste and texture. The primary indicators of doneness are visual and tactile. Look for a uniform golden-brown color across the entire surface of the flatbread, both top and bottom. The edges should appear slightly darker and crisp. The flatbread should also have puffed up nicely, indicating that the yeast has worked effectively and created an airy internal structure. To check for crispiness, gently lift a flatbread; it should feel light and relatively firm. A quick tap on the surface should sound hollow, signaling a well-cooked interior and a crispy flatbread exterior. If it still feels soft or looks pale in areas, continue cooking for another minute or two, checking frequently. Remember that carryover cooking can occur once removed from the air fryer, so it’s better to remove them just as they reach perfection. Once cooked, transfer the flatbreads to a wire rack to cool slightly before serving, preventing them from becoming soggy on the bottom. This ensures a delicious air fryer snack every single time.
Total Time for This Quick Recipe
One of the most appealing aspects of this Air Fryer Garlic Flatbread recipe is its incredibly efficient total time, making it a perfect choice for busy weeknights or impromptu gatherings. Unlike traditional bread baking that can involve hours of rising time, this quick air fryer bread significantly streamlines the process without compromising on flavor or texture. The combined prep and cooking duration is surprisingly short, allowing you to enjoy fresh, warm, homemade flatbread in a fraction of the time typically required for baked goods. This efficiency is a testament to the power of the air fryer, which accelerates the cooking process while still delivering exceptional results. Whether you’re looking for a speedy appetizer or a quick side dish, the minimal time investment means you can whip up this savory flatbread whenever a craving strikes. Its fast turnaround is truly a highlight of this easy flatbread recipe, guaranteeing a delicious air fryer snack without the wait.
Fast Prep for Your Flatbreads
The preparation for your Air Fryer Garlic Flatbread is designed to be as fast and efficient as possible, ensuring you spend less time in the kitchen and more time enjoying your delicious creation. The initial mixing of the dough takes only about 5-7 minutes, combining dry ingredients before adding the liquids. Following this, a short 10-15 minute rest period allows the gluten to relax, making the dough easier to handle. While the dough rests, you can quickly mince your fresh garlic and chop the parsley, a task that takes another 5-7 minutes. The division and shaping of the dough into individual flatbreads, followed by brushing with the garlic-herb topping, can be completed in another 10-15 minutes. In total, the active preparation time, excluding the brief resting periods, is remarkably minimal, typically under 30 minutes. This efficient prep allows you to move quickly from craving to creating, making homemade flatbread a truly achievable weeknight delight. The fast prep ensures this simple flatbread is a convenient choice.
Short Cooking Time Needed
The most impressive time-saving aspect of this Air Fryer Garlic Flatbread recipe is undoubtedly the incredibly short cooking duration. Once prepped, each individual flatbread cooks to golden-brown perfection in the air fryer in just 5-9 minutes, depending on the thickness and your specific appliance. This rapid cooking means that a batch of 4-6 flatbreads can be ready in less than 20 minutes, including the time it takes to swap out batches if your air fryer basket can only accommodate a couple at a time. The powerful circulating hot air in the air fryer works quickly to crisp the exterior and cook the dough through, providing that desired tender interior. This short cooking time is a game-changer, especially when you need a quick side dish or a fast, satisfying snack. The efficiency of the air fryer transforms what could be a lengthy baking process into a nearly instant gratification, delivering a fresh, warm, crispy flatbread without the wait. This is truly a fast flatbread solution for any meal.
Storing Leftover Air Fryer Flatbread Easily
While Air Fryer Garlic Flatbread is undoubtedly best enjoyed fresh and warm straight from the appliance, it’s reassuring to know that any leftovers can be stored and enjoyed later without a significant loss of quality. Proper storage techniques are key to maintaining its delicious flavor and texture, whether you plan to eat it the next day or much further down the line. The goal is to protect the flatbread from drying out or becoming stale, ensuring that its savory garlic notes and tender crumb remain intact. This easy flatbread recipe, despite its quick cooking nature, provides versatile storage options that fit various needs. Whether you’re preparing a larger batch for meal prep or simply have a few pieces remaining, these simple storage methods ensure your homemade flatbread stays fresh and ready for reheating. Don’t let any of this delicious air fryer snack go to waste; proper storage means you can extend its enjoyment.
Airtight Container for Freshness
For short-term storage of your Air Fryer Garlic Flatbread, placing it in an airtight container is the most effective method to maintain its freshness. Once the flatbreads have cooled completely to room temperature, stack them with a piece of parchment paper between each one to prevent sticking. Place the stack into a rigid airtight container or a heavy-duty resealable plastic bag. Store the container in the refrigerator for up to 2-3 days. While they won’t be as crispy as when they were freshly made, this method helps to keep them soft and prevents them from drying out too quickly. When ready to enjoy again, you can easily reheat them in the air fryer, oven, or even a toaster oven to bring back some of their original crispiness and warmth. This simple storage solution ensures that your homemade flatbread remains a convenient and delicious air fryer snack for a few days after preparation.
Freezing Flatbread for Later
If you have a larger batch of Air Fryer Garlic Flatbread or wish to enjoy them at a later date, freezing is an excellent option for long-term storage. Once your flatbreads have cooled completely, wrap each individual flatbread tightly in plastic wrap, then place them together in a freezer-safe bag or airtight container. This double-layer protection helps to prevent freezer burn and maintains the flatbread’s quality. Frozen flatbreads can be stored for up to 2-3 months. When you’re ready to enjoy them, there’s no need to thaw them first. You can reheat them directly from frozen in a preheated air fryer at 350°F (175°C) for about 5-8 minutes, or in a conventional oven, until they are heated through and crispy again. Freezing is a fantastic way to have homemade flatbread readily available, making this quick air fryer bread an even more convenient addition to your meal rotation. It ensures you always have a delicious air fryer snack on hand, even on the busiest days.
Nutrition Facts for Each Flatbread Bite
Understanding the nutrition facts for your Air Fryer Garlic Flatbread can help you incorporate this delicious air fryer snack into your dietary plan. While homemade recipes can vary based on exact ingredient measurements and brands, providing estimated nutritional information offers a general idea of what each serving provides. This easy flatbread recipe is designed to be a satisfying and flavorful option, and being aware of its caloric, macronutrient, and micronutrient content can be beneficial. Keep in mind that these figures are approximations, and precise values would require laboratory analysis or the use of a detailed nutrition calculator with exact ingredient inputs. However, these estimates still offer valuable insight into the contributions of this simple flatbread to your daily intake. It’s a way to enjoy a homemade treat responsibly, knowing roughly what you’re consuming with each savory flatbread bite.
Calories per Serving Size
When considering your Air Fryer Garlic Flatbread, the estimated calorie count per serving size is a useful piece of information. For a typical serving, which might be one medium-sized flatbread (approximately 6-8 inches in diameter), you can expect it to contain around 180-250 calories. This estimation will fluctuate depending on the precise amount of flour used, the type and quantity of oil or butter in the dough and topping, and any additional ingredients or toppings you might add. For instance, using more olive oil or butter will naturally increase the caloric value. This makes it a moderately caloric snack or side dish, fitting well into most meal plans without being excessively heavy. Being aware of the calorie content helps in portion control and in balancing it with other foods in your diet, ensuring this homemade flatbread remains a guilt-free pleasure. Always remember that these are approximate figures for this quick air fryer bread.
Breakdown of Carbs and Protein
Beyond calories, understanding the macronutrient breakdown of your Air Fryer Garlic Flatbread, specifically carbohydrates and protein, provides a clearer picture of its dietary impact. Each flatbread typically offers a significant amount of carbohydrates, primarily from the all-purpose flour. You can expect approximately 30-45 grams of carbohydrates per serving, making it a good source of energy. The protein content, while not as high as meat-based dishes, is still present due to the flour and yeast. A single serving of homemade flatbread might contain around 5-8 grams of protein. These figures can vary slightly depending on the exact type of flour (e.g., whole wheat would increase fiber and potentially protein) and any added ingredients. This balance of carbs and protein makes the crispy flatbread a satisfying component of a meal, providing sustained energy. It’s a simple flatbread that offers more than just flavor.
Fat and Sodium Content
The fat and sodium content in your Air Fryer Garlic Flatbread are also important nutritional factors to consider. The fat in this easy flatbread recipe comes primarily from the olive oil used in the dough and the butter (or additional olive oil) in the garlic-parsley topping. A single serving might contain approximately 5-10 grams of total fat. You can adjust this by controlling the amount of oil/butter you use. Regarding sodium, the salt added to the dough and the topping contributes to its content. Each flatbread could have an estimated 200-350 milligrams of sodium. This amount can be easily controlled by reducing the salt in the recipe, especially if you are monitoring your sodium intake. Using unsalted butter for the topping also gives you more control over the sodium levels. Being mindful of these figures allows you to enjoy this delicious air fryer snack while managing your dietary needs, making it a customizable and savory flatbread.
Customizing Your Air Fryer Flatbread Recipe
One of the true joys of preparing homemade dishes like Air Fryer Garlic Flatbread is the freedom to customize the recipe to suit your personal taste and dietary preferences. This easy flatbread recipe serves as a fantastic base, a blank canvas ready for your creative touches. Whether you prefer a milder garlic flavor or an extra kick of spice, or you’re keen to experiment with different herbs, the possibilities for customization are vast. Adapting the recipe allows you to truly make it your own, ensuring that every batch of quick air fryer bread perfectly matches what you’re craving. Don’t be afraid to experiment with the quantities of ingredients or to introduce new flavors; baking is an art, and personalization is part of the fun. This flexibility makes the simple flatbread even more appealing, allowing you to create a truly unique and savory flatbread experience tailored to your palate.
Adjusting Garlic to Your Taste
The amount of garlic in your Air Fryer Garlic Flatbread is entirely up to your personal preference, offering a wonderful opportunity for customization. The recipe suggests a standard amount of minced garlic for a robust, savory flatbread flavor, but you can easily adjust this. If you are a true garlic enthusiast, feel free to increase the quantity by one or two extra cloves for an even more intense garlic punch. Conversely, if you prefer a more subtle garlic note, you can reduce the number of cloves by half. For a milder flavor, you might also consider roasting the garlic beforehand, which mellows its pungency and adds a sweeter, caramelized depth. Another option is to use garlic powder in the dough for a foundational flavor, then fresh minced garlic in the topping for brightness. Experiment with different amounts in small batches to find your perfect garlic balance. This adjustability ensures your homemade flatbread is always precisely to your liking.
Try Other Herbs and Spices
While fresh parsley is a classic complement to garlic in this Air Fryer Garlic Flatbread, the recipe is highly adaptable to other herbs and spices, allowing you to create various flavor profiles. Consider swapping out or adding to the parsley with other fresh herbs like rosemary, thyme, or oregano for an earthier, more Mediterranean feel. A sprinkle of dried Italian seasoning or Herbes de Provence can also elevate the flavor significantly. For a bit of heat, a pinch of red pepper flakes mixed into the garlic-butter topping adds a delightful kick. Smoked paprika can impart a warm, smoky depth, while a dash of onion powder in the dough can enhance the savory notes. You might even experiment with a touch of Everything Bagel seasoning for a unique twist. Don’t limit yourself to just herbs; a sprinkle of grated Parmesan or crumbled feta cheese (similar to what you might find in Spinach Feta Quesadillas) added after brushing the topping can introduce a creamy, salty element that melts beautifully. The possibilities are endless, making each batch of quick air fryer bread an exciting culinary adventure.
Frequently Asked Questions About Flatbread
As with any new recipe, especially one involving dough and a specific appliance like an air fryer, questions are bound to arise. This section addresses some of the most common inquiries about making Air Fryer Garlic Flatbread, providing practical answers to help you navigate the process with confidence. Understanding how to manage your dough ahead of time and the best techniques for reheating ensures that your homemade flatbread experience is as convenient and enjoyable as possible. These insights aim to troubleshoot potential issues and offer flexible solutions, making this easy flatbread recipe even more approachable for every home cook. Whether you’re planning a meal in advance or dealing with delicious leftovers, these answers will guide you toward continuous success with your quick air fryer bread. Remember, for more inspiration, check out our Pinterest at CarinaRecipes and follow us on Instagram at @carinarecipes20 for daily culinary ideas.
Can I Make Dough Ahead?
Yes, you can absolutely prepare the Air Fryer Garlic Flatbread dough ahead of time, which is a fantastic way to streamline your meal prep and make this quick air fryer bread even more convenient. After the initial kneading step, instead of letting the dough rise at room temperature, place the dough ball in a lightly oiled bowl, cover it tightly with plastic wrap, and refrigerate it for up to 24-48 hours. The cold temperature will significantly slow down the yeast activity, allowing the dough to slowly ferment and develop even more flavor. When you’re ready to make the flatbreads, remove the dough from the refrigerator about 30-60 minutes before you plan to roll it out, allowing it to come closer to room temperature. Then proceed with dividing, shaping, topping, and cooking as directed. This method ensures you can enjoy freshly baked, homemade flatbread with minimal fuss right when you need it, making meal times much easier and ensuring a truly delicious air fryer snack.
Best Ways to Reheat?
Reheating leftover Air Fryer Garlic Flatbread effectively is key to recapturing its delicious texture and flavor. While a microwave can warm it up, it often results in a soft, sometimes chewy, flatbread that lacks the original crispiness. The best way to reheat your homemade flatbread is to use the appliance it was cooked in: the air fryer. Simply preheat your air fryer to 350°F (175°C) and place the cold flatbreads in a single layer in the basket. Reheat for 2-4 minutes, checking frequently, until they are warmed through and have regained their crispy exterior. Alternatively, a toaster oven or conventional oven also works well. Preheat to 375°F (190°C) and bake for 3-5 minutes, or until crisp and hot. These methods ensure that your savory flatbread returns to its golden, slightly crispy state, almost as good as fresh. This makes enjoying leftovers a truly pleasant experience, reinforcing the convenience of this easy flatbread recipe.