
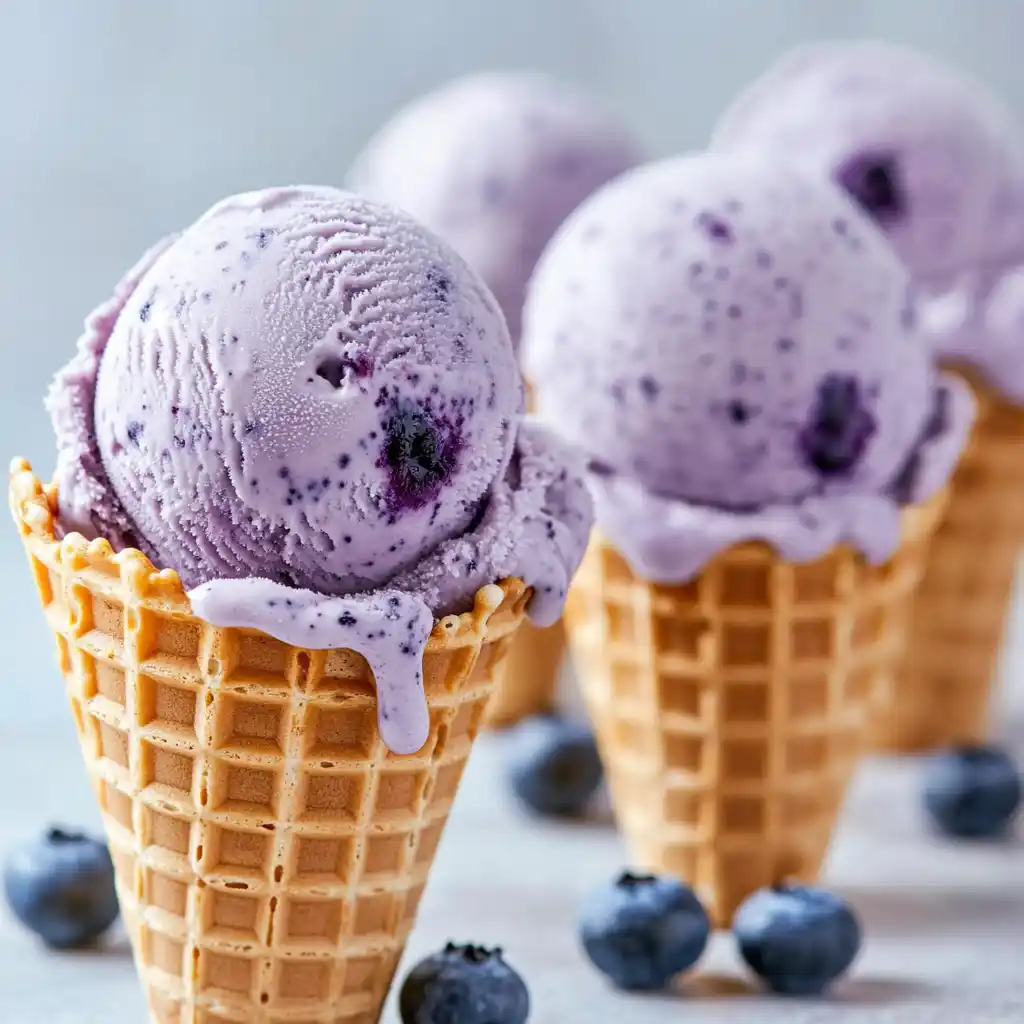
Homemade Blueberry Ice Cream Recipe offers a delightful way to enjoy a cool, creamy dessert. This guide helps you craft a rich frozen treat, perfect for summer. Learn to make this fresh fruit recipe with or without an ice cream maker for sweet success.
Key Takeaways
- Create a smooth, flavorful blueberry puree as the core of your ice cream.
- Combine a rich dairy base with the fruit mixture for optimal texture and taste.
- Utilize an ice cream maker for churning, or explore simple no-churn methods.
- Follow expert tips for perfect consistency, enhanced flavor, and ideal storage.
Crafting homemade ice cream is simple. Fresh blueberries bring vibrant flavor. A creamy base ensures pure delight. Freezing creates a perfect treat. Enjoy this easy dessert.
Homemade Blueberry Ice Cream Recipe
Prep, Cook, Total Times
Making your own homemade blueberry ice cream is a rewarding process, offering a delicious, personalized frozen treat far superior to store-bought options. This recipe is designed to be straightforward, allowing even novice dessert makers to achieve professional-quality results. Understanding the time commitment upfront helps in planning your culinary adventure. We’ve broken down the process into key stages: preparation, actual cooking time, and the overall time you’ll invest from start to finish. While some steps require active involvement, much of the time is passive, such as chilling the mixture or allowing the ice cream to firm up in the freezer.
The prep work focuses on getting your ingredients ready and preparing the blueberry puree, which is crucial for infusing that vibrant fruit flavor throughout the ice cream. Cooking time is specifically for simmering the blueberries to soften them and enhance their natural sweetness. The total time includes all these stages, right up to when your creamy blueberry ice cream is ready to be scooped and enjoyed. Paying attention to these timings ensures you allocate enough time for each step, preventing rushed processes that could compromise the final texture or flavor. A well-planned approach guarantees a smooth, enjoyable cooking experience and, ultimately, a fantastic dessert.
Servings for This Recipe
This homemade blueberry ice cream recipe is typically designed to yield enough for a small gathering or several delightful servings for your family over a few days. The exact number of servings can vary based on individual portion sizes and the capacity of your ice cream maker. Generally, this recipe will produce approximately 1.5 to 2 quarts of luscious ice cream. This quantity is ideal for about 6 to 8 generous servings, making it perfect for a dessert at a summer barbecue or a special treat on a weeknight.
If you’re planning for a larger crowd, it’s easy to scale up the recipe. Simply double all the ingredients to produce a larger batch. However, ensure your ice cream maker has the capacity for the increased volume. Alternatively, you can make two separate batches if your machine has a smaller capacity. Remember that rich, homemade ice cream tends to be quite satisfying, so even smaller portions can feel incredibly indulgent. Always consider your audience and their appetite when determining how much to make.
Gather Ingredients for Blueberry Ice Cream
The foundation of any great recipe lies in its ingredients, and homemade blueberry ice cream is no exception. Selecting high-quality, fresh components is paramount to achieving that vibrant flavor and creamy texture we all crave. This section outlines the core ingredients you’ll need, detailing why each plays a vital role in creating a truly exceptional frozen treat. From the star fruit to the dairy and flavor enhancers, every item contributes to the magic.
Before you begin any cooking, take the time to ensure you have everything measured out and ready. This practice, known as mise en place, streamlines the process and helps prevent any last-minute scrambling. Having all your ingredients at hand means you can focus on the technique and enjoyment of making your ice cream. A quick check of your pantry and refrigerator before starting will save you time and potential frustration.
Fresh Blueberries and Sugar
Fresh blueberries are undoubtedly the star of this recipe. Their sweet-tart flavor profile and beautiful color are what make this ice cream so appealing. When selecting blueberries, look for plump, firm berries with a dusty bloom—a sign of freshness. While fresh is always best for optimal flavor and texture, frozen blueberries can also be used, especially if fresh ones are out of season or too expensive. If using frozen, there’s no need to thaw them beforehand; you can often cook them directly from frozen, though the cooking time might increase slightly.
Granulated sugar works in tandem with the blueberries to balance their tartness and enhance their natural sweetness. Sugar also plays a critical role in the texture of ice cream. It lowers the freezing point of the mixture, preventing it from becoming an icy block and contributing to that desirable smooth, scoopable consistency. The amount of sugar can be adjusted slightly to your personal preference, but be mindful that reducing it too much can affect the final texture of your frozen dessert. For another delightful dessert that uses fruit, try our Blueberry Muffin Cookies with Streusel.
Cream, Milk, and Vanilla
The creamy base of your ice cream relies heavily on the quality and fat content of your dairy. Heavy cream (or whipping cream) provides the richness and fat crucial for a luxurious, smooth mouthfeel. Its high-fat content helps prevent large ice crystal formation, ensuring a velvety texture. Don’t be tempted to substitute with lower-fat alternatives, as this will significantly impact the final consistency and creaminess of your ice cream.
Whole milk is combined with the heavy cream to create the perfect balance. It lightens the richness of the cream slightly while still contributing to the overall creamy body. Using whole milk ensures enough fat for a decadent result without making the ice cream excessively heavy. If you’re exploring different desserts, you’ll find that a good dairy base is often key to success.
Vanilla extract is a powerhouse flavor enhancer that complements the blueberries beautifully. A good quality pure vanilla extract adds a subtle warmth and depth that rounds out the fruit flavors without overpowering them. It’s an often-underestimated ingredient that brings all the elements of the ice cream together. Avoid imitation vanilla for the best taste.
Essential Lemon and Salt
While often overlooked in sweet recipes, lemon juice (preferably fresh) and a pinch of salt are incredibly important for elevating the flavor of your blueberry ice cream. A small amount of lemon juice brightens the fruit flavor, making the blueberries taste even more vibrant and less flat. It adds a subtle tang that perfectly balances the sweetness of the sugar and the richness of the cream. Think of it as a secret ingredient that wakes up all the other flavors.
Similarly, a tiny pinch of fine sea salt doesn’t make the ice cream taste salty; instead, it acts as a flavor enhancer. Just like in savory dishes, salt brings out the sweetness and complexity of the other ingredients. It helps to deepen the blueberry flavor and prevent the ice cream from tasting one-dimensional. These two ingredients are small additions that make a big difference in the overall deliciousness of your homemade treat. To learn more about the science behind ice cream, visit Wikipedia’s ice cream page.
Preparing Your Blueberry Mixture
The blueberry mixture is the heart and soul of this homemade ice cream. It’s where the vibrant flavor and beautiful color are developed. Taking the time to properly prepare your berries ensures a smooth, intensely fruity base that will shine through in every scoop. This section details the steps involved in transforming fresh or frozen blueberries into a luscious puree, ready to be incorporated into your creamy ice cream base. Attention to detail here will significantly impact the final taste and texture of your frozen delight.
Cooking Blueberries with Sugar
To start, combine your fresh or frozen blueberries with a portion of the sugar (usually about half, as the rest goes into the cream base) in a medium saucepan. Place the saucepan over medium heat. As the mixture warms, the blueberries will begin to release their juices, and the sugar will dissolve, creating a syrupy liquid. Stir occasionally to prevent sticking and ensure even cooking. The goal is to cook the blueberries until they are soft and jammy, and the liquid has thickened slightly. This process typically takes about 5-10 minutes, depending on the ripeness and type of berries. Cooking them down intensifies their flavor and breaks down their structure, making them easier to blend into a smooth puree. The aroma filling your kitchen will be absolutely delightful, a promising preview of the treat to come.
Cooling and Blending Berries
Once your blueberries are soft and bubbly, remove the saucepan from the heat. It’s crucial to let the blueberry mixture cool down considerably before proceeding. Blending hot liquids can be dangerous and can also introduce unwanted warmth into your ice cream base. Transfer the cooked blueberries to a heatproof bowl and allow them to cool at room temperature for at least 30 minutes, or even chill them in the refrigerator for an hour or two. Once cooled, carefully transfer the blueberry mixture to a blender or food processor. Blend until you achieve a smooth, uniform puree. Depending on the power of your blender, this might take a minute or two. Scrape down the sides as needed to ensure all berries are fully incorporated. The smoother the puree, the smoother your final ice cream will be.
Straining for Smooth Puree
For an extra-silky, seed-free blueberry ice cream, an optional but highly recommended step is straining your blended puree. Place a fine-mesh sieve over a clean bowl. Pour the blueberry puree into the sieve and use a spoon or spatula to press the mixture through, ensuring all the liquid passes into the bowl below. This process removes any lingering skins or tiny seeds that could create a slightly grainy texture in the finished ice cream. What you’ll be left with is a vibrant, intensely flavored blueberry syrup – the perfect consistency for incorporating into your ice cream base. While this step adds a few minutes to your prep time, the resulting luxurious texture is well worth the effort. Discard any solids left in the sieve. Your smooth blueberry puree is now ready to become the star of your frozen dessert. You can explore more about blueberries on their Wikipedia page.
Whisking the Creamy Ice Cream Base
The creamy ice cream base is just as important as the fruit puree. It provides the luxurious mouthfeel and rich flavor that defines excellent ice cream. This section walks you through combining the dairy components and flavorings to create a perfectly balanced foundation. The goal is a homogeneous mixture that, when chilled and churned, transforms into a smooth, decadent frozen treat. Precision in this step ensures that your homemade blueberry ice cream achieves its signature creaminess.
Mixing Cream, Milk, and Sugar
In a large bowl, combine the heavy cream, whole milk, and the remaining granulated sugar. Use a whisk to gently stir these ingredients together. The aim here is to fully dissolve the sugar into the dairy mixture. Continue whisking until you no longer feel any sugar granules at the bottom of the bowl when you stir. This may take a few minutes of steady whisking. Ensuring the sugar is completely dissolved is vital; undissolved sugar can lead to a grainy or icy texture in your finished ice cream. The dairy mixture should look smooth and uniform. This forms the rich canvas upon which the blueberry flavors will be painted, creating a truly exceptional dessert. If you are a fan of rich, creamy bases, you might also enjoy our Creamy Baked Mac and Cheese recipe, which similarly relies on a well-made base.
Adding Vanilla and Salt
Once the cream, milk, and sugar are thoroughly combined and the sugar is dissolved, it’s time to add the flavor enhancers: vanilla extract and a pinch of salt. Pour in the pure vanilla extract. Remember, good quality vanilla makes a noticeable difference, imparting a warm, aromatic depth that beautifully complements the bright fruitiness of the blueberries. Next, add a tiny pinch of fine sea salt. This isn’t to make your ice cream taste salty, but rather to enhance and balance all the other flavors, making the sweetness more pronounced and the blueberry flavor more vibrant.
Whisk these additions into the creamy base until everything is well incorporated. Give the mixture a quick taste test at this point to ensure the balance of sweetness and flavor is to your liking. Remember, flavors can dull slightly when frozen, so it’s okay for the base to taste a little stronger than you might expect. After this step, your creamy ice cream base is complete and ready to be combined with the blueberry puree and chilled before churning. This careful preparation ensures a harmonious blend of flavors in your homemade treat.
Churning This Homemade Blueberry Ice Cream
Churning is the magical process where your liquid ice cream base transforms into a soft, scoopable frozen dessert. This step introduces air and breaks up ice crystals, creating the signature creamy texture of homemade ice cream. Whether you have a dedicated ice cream maker or are exploring other methods, understanding the nuances of churning will help you achieve the best possible result for your blueberry treat. Patience and attention to consistency are key during this stage.
Combining Puree and Cream
Before churning, it’s time to bring together your two meticulously prepared components: the vibrant blueberry puree and the rich, creamy ice cream base. Gently pour the cooled, strained blueberry puree into the bowl containing your whisked cream and milk mixture. Using a whisk or a spatula, carefully fold the puree into the cream base until it is evenly distributed and the mixture takes on a beautiful, uniform purple hue. Avoid over-mixing, as you simply want to combine them thoroughly. This mixture, now infused with the essence of blueberries, is your pre-churned ice cream base. It should be thoroughly chilled before it enters the ice cream maker for optimal results.
Using Your Ice Cream Maker
An ice cream maker simplifies the churning process, doing all the hard work for you. Ensure your ice cream maker’s bowl has been frozen for the recommended time (typically 12-24 hours) as per the manufacturer’s instructions. A properly chilled bowl is critical for successful churning. Assemble your ice cream maker according to its manual, then turn it on. Once the paddle is rotating, slowly pour your combined blueberry and cream mixture into the frozen bowl. Do not fill past the manufacturer’s recommended maximum fill line.
The machine will begin to churn, slowly thickening the mixture as it freezes. The constant motion prevents large ice crystals from forming, leading to a smooth, creamy texture. Refer to your specific machine’s instructions for detailed operation. For another fantastic dessert, consider making our Peanut Butter Brownie Swirl Cookies.
Churning Time and Consistency
The churning time will vary depending on your specific ice cream maker, the ambient temperature, and the initial temperature of your base. Generally, it takes anywhere from 20 to 30 minutes for the ice cream to reach a soft-serve consistency. You’ll notice the mixture thickening significantly and pulling away from the sides of the bowl. When it’s ready, it should resemble soft-serve ice cream—creamy, but not yet firm enough for perfect scoops. This is the ideal stage to transfer it for final freezing. If you churn for too long, the ice cream can become too hard or develop an off-texture, so keep an eye on it. The goal is to achieve a consistent, smooth texture before moving to the next stage of freezing.
Freezing for Best Ice Cream Texture
After churning, your homemade blueberry ice cream will have the consistency of soft-serve. While delicious at this stage, it needs further freezing, often called “curing” or “ripening,” to achieve the firm, scoopable texture we typically associate with ice cream. This final freezing step allows the ice cream to set properly and further develop its creamy consistency. Skipping this step or rushing it can lead to a less satisfying experience, so patience is key.
Transfer to Airtight Container
Immediately after churning, use a rubber spatula to scrape the soft-serve consistency ice cream into a freezer-safe, airtight container. The airtight aspect is crucial; it prevents freezer burn and keeps unwanted odors from seeping into your delicious dessert. Glass or sturdy plastic containers with tight-fitting lids work best. Avoid containers that are too shallow, as they can expose more surface area to air, increasing the risk of freezer burn. Press a piece of plastic wrap directly onto the surface of the ice cream before sealing the lid. This extra layer provides an additional barrier against ice crystals and air, ensuring a smoother texture. This small step makes a big difference in maintaining the quality of your frozen treat during its time in the freezer.
Chilling Until Firm
Once transferred and sealed, place the container in the coldest part of your freezer. Allow the ice cream to chill for a minimum of 4-6 hours, or ideally overnight, until it becomes firm enough to scoop. The longer it freezes (within reason), the firmer it will get. If your freezer runs very cold, it might firm up faster. Conversely, a less powerful freezer may take longer. Before serving, you might need to let the ice cream sit at room temperature for 5-10 minutes to soften slightly, making it easier to scoop. This final chilling process ensures that all the efforts you put into preparing and churning result in a perfectly textured, ready-to-enjoy homemade blueberry ice cream. Remember to share your culinary creations with us on Instagram!
Tips for Perfect Blueberry Ice Cream
Achieving truly perfect homemade blueberry ice cream goes beyond just following the steps; it involves understanding a few key principles and implementing some expert tips. These insights will help you avoid common pitfalls and elevate your dessert from good to absolutely outstanding. Pay attention to these details, and you’ll consistently create a frozen treat with superior flavor and an irresistibly creamy texture that will impress everyone who tries it. Small adjustments can make a big difference.
Frozen Ice Cream Maker Bowl
This cannot be stressed enough: ensure your ice cream maker bowl is *completely* frozen. Most manufacturers recommend freezing the bowl for at least 12 to 24 hours prior to use. A well-frozen bowl is essential for efficient churning and proper ice crystal formation. If the bowl isn’t cold enough, your ice cream mixture won’t freeze properly during churning; instead, it will remain slushy, or worse, not thicken at all. Place the bowl in the coldest part of your freezer and avoid opening the freezer door frequently while it’s chilling. Keeping an extra bowl in the freezer is always a good idea if you make ice cream frequently, or perhaps want to try our Quick Italian Cream Cake recipe for another speedy dessert.
Ripe Blueberries for Flavor
The flavor of your ice cream is only as good as the flavor of your blueberries. Opt for ripe, sweet blueberries. Ripe berries are plump, have a deep blue color, and often a slight “dusty” bloom on their surface. They will also have a more intense natural sweetness and less tartness. If your blueberries are a bit under-ripe, you might consider adding a touch more sugar to the puree or even a tiny splash of a complementary fruit liqueur to boost their flavor. Taste your blueberry mixture after cooking and before chilling; this is your chance to adjust the sweetness or tartness to perfection. The quality of your primary ingredient directly impacts the vibrancy of your finished frozen treat.
Don’t Over-Churn Mixture
While churning is important for texture, there’s such a thing as over-churning. Once your ice cream reaches the consistency of soft-serve, it’s time to stop the machine and transfer it to the freezer. Over-churning can cause the ice cream to become too stiff, grainy, or even develop a somewhat buttery texture, especially if the butterfat in the cream starts to separate. It also warms the mixture slightly from friction, which can lead to larger ice crystals during final freezing. Pay close attention to the consistency as your machine churns; usually, within 20-30 minutes, it will reach the desired thickness. When in doubt, it’s better to under-churn slightly and allow it to firm up more in the freezer than to over-churn. This balance is crucial for a smooth, velvety finished product.
Creative Blueberry Ice Cream Variations
While the classic homemade blueberry ice cream is a delight on its own, one of the joys of making it from scratch is the freedom to experiment with creative variations. These additions and twists can transform your dessert, adding layers of flavor, texture, and visual appeal. Don’t be afraid to personalize your batch and make it uniquely yours. These ideas are just a starting point for culinary exploration, allowing you to tailor the experience to your preferences or surprise your guests with something new and exciting.
Add a Swirl of Sauce
To elevate your blueberry ice cream, consider adding a complementary swirl of sauce during or after the churning process. A raspberry coulis, a lemon curd, or even a simple vanilla bean sauce can add an extra dimension of flavor and a beautiful visual marble effect. For a contrasting texture, a drizzle of warm fudge or caramel sauce just before serving creates a decadent experience. You can gently fold the sauce into the ice cream during the last few minutes of churning, or layer it into the container when transferring the soft-serve for final freezing. This technique ensures that each scoop offers a delightful surprise, making your homemade treat even more special and appealing.
Mix in Graham Crackers
For a delightful textural contrast and a hint of classic cheesecake flavor, try mixing in crumbled graham crackers. Once the ice cream has churned to a soft-serve consistency, gently fold in crushed graham crackers during the last few minutes of churning, or layer them into the container with the ice cream as you transfer it to freeze. The graham crackers will soften slightly but still provide a pleasant crunch, reminiscent of a blueberry cheesecake. You could even toast the graham cracker crumbs lightly for an enhanced nutty flavor before adding them. This variation is particularly appealing for those who enjoy a combination of creamy and crunchy elements in their desserts, adding a playful twist to the fruity ice cream.
Dairy-Free Coconut Option
For those with dairy restrictions or who prefer a plant-based alternative, transforming this recipe into a dairy-free coconut option is surprisingly simple and equally delicious. Substitute the heavy cream with full-fat canned coconut milk (ensure it’s well-chilled, as the cream will separate and rise to the top, which you’ll use). Replace the whole milk with a dairy-free milk alternative like almond milk or more coconut milk. The coconut milk will impart a subtle tropical flavor that pairs wonderfully with the blueberries, creating a unique and refreshing twist. The fat in the full-fat coconut milk helps maintain a creamy texture, although it may be slightly less rich than its dairy counterpart. Ensure all other steps remain the same for a delightful, inclusive frozen treat. Remember to check out Carina Recipes on Pinterest for more dessert inspiration!
No Ice Cream Maker Alternative
Don’t have an ice cream maker? No problem! While a machine makes the churning process effortless, you can still achieve wonderfully creamy homemade blueberry ice cream using a few simple manual methods. The key principle remains the same: preventing large ice crystals from forming. This involves regular stirring and breaking up the freezing mixture as it solidifies. It requires a bit more effort and attention but yields satisfying results, allowing everyone to enjoy this delicious frozen treat without specialized equipment.
Freezing in a Shallow Dish
To begin your no-churn journey, pour your thoroughly chilled blueberry and cream mixture into a shallow, freezer-safe dish or pan. A metal baking pan (like a 9×13 inch) works exceptionally well because metal conducts cold efficiently, helping the mixture freeze faster and more evenly. Cover the dish tightly with plastic wrap to prevent freezer burn and keep the surface from forming a crust. Place the covered dish in the coldest part of your freezer. The shallow depth of the dish is important as it allows the mixture to freeze more quickly and makes it easier to stir, which is crucial for preventing ice crystal formation. This initial freeze sets the stage for the manual churning process that follows.
Stirring Every 30 Minutes
The secret to no-churn ice cream’s creamy texture lies in consistent manual intervention. After the first 30-45 minutes in the freezer, the edges of your mixture will start to freeze. At this point, take the dish out of the freezer and use a sturdy fork or a spatula to thoroughly stir the mixture, scraping down the frozen edges and incorporating them into the softer center. Break up any ice crystals that have formed. Return the dish to the freezer and repeat this stirring process every 30 minutes for the next 2-3 hours, or until the ice cream has reached a soft, scoopable consistency. Each stir breaks down developing ice crystals, resulting in a smoother, creamier end product. This active freezing method mimics the churning action of an ice cream maker, creating a delicious homemade treat without the specialized equipment.
Chef’s Pro Tips for Success
Beyond the basic steps, certain chef’s tips can truly elevate your homemade blueberry ice cream, transforming it from good to extraordinary. These insights come from years of culinary experience and focus on maximizing flavor, texture, and overall enjoyment. Incorporating these small but impactful techniques will help you achieve a more sophisticated and memorable dessert, proving that attention to detail can make all the difference in the kitchen. Prepare to impress with these expert recommendations.
Roasting Blueberries for Flavor
For an even deeper, more complex blueberry flavor, consider roasting your blueberries instead of just simmering them. Toss the fresh blueberries with a little sugar (about 1-2 tablespoons) and spread them in a single layer on a baking sheet lined with parchment paper. Roast in a preheated oven at 375°F (190°C) for 15-20 minutes, or until the berries are bursting and slightly caramelized. Roasting concentrates their natural sugars and intensifies their flavor, adding a richer, more profound berry note to your ice cream. Let them cool completely before blending into a puree. This extra step is a game-changer for blueberry enthusiasts, providing an unparalleled depth of taste that a simple simmer can’t achieve.
Adding a Pinch of Salt
A tiny pinch of salt in sweet recipes is a well-kept secret among chefs, and it’s particularly effective in ice cream. While counter-intuitive for a dessert, salt doesn’t make your ice cream taste salty; instead, it acts as a powerful flavor enhancer. It sharpens the sweetness, brightens the fruit flavors, and balances the richness of the cream, preventing the ice cream from tasting one-dimensional or cloyingly sweet. Add a small pinch (about 1/4 teaspoon for a typical batch) to your dairy base along with the vanilla. You’ll be amazed at how this simple addition makes all the other flavors pop and creates a more well-rounded, delicious dessert experience. It’s a subtle tweak that yields significant results.
Taste Before Churning
This is arguably one of the most important pro tips: always taste your ice cream base before it goes into the churner. Since flavors mute when frozen, your base mixture should taste slightly sweeter and more intensely flavored than you think it should. This allows for the flavor dilution that occurs during freezing. If it tastes just right at room temperature, it will likely be bland once frozen. This is your last chance to adjust. Need more sweetness? Add a tablespoon of sugar. Want more blueberry punch? Stir in a bit more blueberry puree. This simple tasting step empowers you to fine-tune the flavor profile, ensuring your homemade blueberry ice cream hits all the right notes every single time. Take advantage of this opportunity for a perfectly balanced final product.
Storing Your Delicious Blueberry Treat
Proper storage is essential to maintain the quality, texture, and flavor of your homemade blueberry ice cream. While it’s tempting to devour it all in one sitting, knowing how to store it correctly ensures you can enjoy its creamy goodness for an extended period without succumbing to freezer burn or textural degradation. Follow these simple guidelines to keep your delicious treat fresh and ready for whenever a craving strikes.
Keep in Airtight Container
As mentioned earlier, transferring your churned ice cream to an airtight container is paramount. Once the ice cream has firmed up in the freezer, ensure it remains in a container with a tight-fitting lid. Exposure to air is the primary cause of freezer burn, which manifests as icy crystals and a drier, less flavorful texture. Additionally, tightly sealed containers prevent your ice cream from absorbing odors from other foods in the freezer, ensuring the pure blueberry flavor remains untainted. For optimal protection, you can press a piece of plastic wrap directly onto the surface of the ice cream before securing the lid. This extra barrier minimizes air contact and helps preserve its pristine quality, keeping it creamy and delightful for future servings.
Lasts Up to Two Weeks
While homemade ice cream is at its absolute best within the first few days of making it, properly stored blueberry ice cream can maintain excellent quality for up to two weeks in a standard freezer. Beyond two weeks, you might start to notice a slight decline in texture, with more ice crystals forming, and a subtle dulling of flavor. For optimal enjoyment, try to consume your batch within this timeframe. If you have a larger batch and want to extend its life, consider investing in specific ice cream storage containers that are designed to minimize freezer burn. Regularly check the container seal and avoid placing the ice cream near the freezer door, where temperature fluctuations are more common. This simple awareness ensures every scoop remains a delightful experience.
Quick Times for This Easy Recipe
One of the best aspects of this homemade blueberry ice cream recipe is its relatively quick active preparation time. While there’s passive chilling and freezing involved, the hands-on work is surprisingly minimal, making it an excellent choice for a weekend project or a spontaneous desire for a fresh, frozen dessert. Understanding the breakdown of these times helps you plan your day around the recipe, ensuring a smooth and enjoyable process from start to finish. You’ll be amazed at how efficiently you can create such a delicious treat.
Only 20 Minutes Prep
The active preparation for this recipe is incredibly efficient, requiring only about 20 minutes of your time. This includes washing and cooking the blueberries, blending and straining the puree, and whisking together the cream base. Most of this time involves straightforward tasks like stirring and combining ingredients. This short prep time makes homemade ice cream an achievable goal even on busy days, allowing you to quickly get the base ready for chilling before the churning phase. It’s a testament to the simplicity and accessibility of creating such a luxurious dessert from scratch.
Just 15 Minutes Cook
The actual cooking involved in this recipe is minimal, clocking in at approximately 15 minutes. This period is dedicated primarily to simmering the blueberries with sugar until they burst and form a rich, flavorful puree. The process is gentle and requires occasional stirring, but it’s not intensive. This short cooking time helps to preserve the fresh, vibrant flavor of the blueberries while ensuring they are perfectly softened and integrated into the base. This brief cooking phase is a vital step in extracting and intensifying the fruit’s natural essence, which will be the star of your homemade ice cream.
Total Time 35 Minutes
The combined active preparation and cooking time for your homemade blueberry ice cream is a remarkably efficient 35 minutes. This makes it an incredibly appealing recipe for those who appreciate homemade quality without an extensive time commitment. While there are passive chilling and freezing periods that extend the overall waiting time, your hands-on involvement is less than an hour. This efficiency means you can quickly get the core components of your ice cream ready, leaving the machine (or your freezer) to do the rest of the work. Enjoy the satisfaction of creating a delicious, creamy blueberry ice cream with surprisingly little effort.