
Potato pierogi are a classic comfort food, cherished for their tender dough and savory potato and cheese filling. This comprehensive guide will walk you through creating delicious homemade pierogi from scratch, covering everything from mixing the perfect pierogi dough to cooking and serving these delightful dumplings. Get ready to savor tradition!
Key Takeaways
- Homemade pierogi offer superior freshness and customizable flavor.
- Crafting the dough requires precise mixing and careful kneading for optimal texture.
- A delicious filling combines creamy potatoes with savory cheese and sautéed onions.
- Proper shaping and sealing are key to preventing the pierogi from opening during cooking.
- Pierogi can be boiled and then pan-fried, and they freeze well for future meals.
Making pierogi is a rewarding culinary art. Fresh ingredients yield the best taste. Patience ensures perfect shaping. Boiling them gently preserves texture. Enjoy this delicious comfort food!
Start Your Potato Pierogi Journey Now
Embarking on the creation of homemade pierogi is a culinary adventure that promises delightful results. There’s something incredibly satisfying about preparing these beloved dumplings from scratch, transforming simple ingredients into a dish brimming with warmth and flavor. This process not only allows for complete control over the taste and quality but also connects you to a rich tradition of cooking that spans generations. Whether you’re new to making pasta or dough-based dishes or a seasoned cook looking for a rewarding project, the journey to perfect potato pierogi is well worth the effort. Consider this your invitation to dive into a truly authentic cooking experience.
Why Make Pierogi at Home
Choosing to make pierogi at home offers several distinct advantages. Firstly, the freshness of homemade pierogi is unmatched. You control every ingredient, ensuring no artificial additives or preservatives, just pure, wholesome goodness. This allows for a deeper, more vibrant flavor profile that store-bought versions often lack. Secondly, making them yourself means you can customize every aspect to your liking, from the type of cheese in the pierogi filling to the thickness of the pierogi dough. This personal touch makes the dish uniquely yours. Finally, there’s immense satisfaction in serving a dish you’ve crafted with your own hands, especially a beloved comfort food like this. It’s a labor of love that tastes truly exceptional, and the process itself can be a wonderfully relaxing and creative outlet.
Getting Ready to Cook
Before you begin the hands-on process, it’s crucial to prepare your kitchen and gather all necessary items. Start by ensuring you have a clean, spacious countertop for mixing and kneading the pierogi dough, as well as for shaping the individual pierogi. Read through the entire potato pierogi recipe first to familiarize yourself with each step. Gather all your ingredients, measuring them out and having them within easy reach. This practice, known as mise en place, streamlines the cooking process and prevents frantic searching mid-preparation. Having your tools ready, such as a large mixing bowl, rolling pin, and a pasta cutter or round cookie cutter, will also contribute to a smoother, more enjoyable cooking experience. A well-prepared workspace sets the stage for success in creating these delicious dumplings.
Ingredients for Delicious Potato Pierogi
Creating truly delicious potato pierogi starts with selecting the right ingredients. For a dish that relies on simplicity, the quality of each component makes a significant difference. Using fresh, high-quality potatoes, flavorful cheese, and good flour will elevate your homemade pierogi from good to truly exceptional. Don’t skimp on the basic elements, as they are the foundation of this delightful comfort food. The combination of a tender, pliable dough with a rich, savory filling is what defines the classic pierogi experience, so choose wisely.
What You Need for Dough
The pierogi dough is the protective casing for your flavorful filling, and its texture is paramount. For a supple, easy-to-work-with dough that cooks up tender, you will typically need the following:
- All-purpose flour: About 3-4 cups, plus extra for dusting. This provides the structure.
- Large egg: One egg helps bind the dough and adds richness.
- Warm water or milk: Approximately 1/2 to 1 cup. The exact amount can vary based on flour and humidity, so add gradually. Warm liquid helps activate gluten and makes the dough more pliable.
- Salt: A teaspoon for flavor.
- Vegetable oil or melted butter: About 2 tablespoons. This makes the dough more elastic and easier to roll, preventing it from drying out. Some recipes prefer butter for a richer taste.
Ensuring these ingredients are at room temperature, especially the egg and liquid, can contribute to a more cohesive and smooth dough. The goal is a dough that is firm but not stiff, and elastic enough to roll thinly without tearing.
Items for Filling and Topping
The heart of your pierogi lies in its filling and the delightful toppings that complement it. The classic potato pierogi recipe often features a simple yet incredibly satisfying combination. For the filling, you’ll need:
- Potatoes: Around 2 pounds, starchy varieties like Russet or Yukon Gold work best for mashing. Visit the Wikipedia page for potatoes to learn more about different types.
- Cheese: 1-1.5 cups. Farmer’s cheese is traditional, but sharp cheddar, cottage cheese, or cream cheese can also be used for different flavor profiles.
- Butter: 2-3 tablespoons for richness in the filling and sautéing onions.
- Salt and black pepper: To taste, for seasoning the filling.
For traditional toppings that enhance the pierogi’s flavor:
- Onions: 1 large, finely diced, sautéed until golden brown.
- Sour cream: A generous dollop for a tangy, creamy contrast to the savory pierogi.
- Crispy bacon bits: (Optional) For added texture and smoky flavor.
Having these components ready ensures a harmonious balance of flavors and textures in every bite of your homemade pierogi, elevating it to true comfort food status.
Crafting Perfect Pierogi Dough Smoothly
The secret to fantastic pierogi often begins with the dough. A well-made pierogi dough is soft, pliable, and easy to roll, yet strong enough to hold its filling without tearing during cooking. It’s a delicate balance that requires attention to detail, but with a little practice, you’ll be creating beautiful dough in no time. Think of it as the canvas for your culinary masterpiece, setting the stage for the delicious experience to come. This foundational step is crucial for the overall success of your potato pierogi recipe.
Mixing Flour and Salt
Begin by measuring your flour accurately. Too much flour can result in a tough dough, while too little will make it sticky and difficult to handle. In a large mixing bowl, combine the all-purpose flour with a teaspoon of salt. Use a whisk to thoroughly mix the two dry ingredients, ensuring the salt is evenly distributed. This step might seem minor, but it’s important for consistent flavor throughout the dough. After mixing, create a well in the center of the flour mound. This well will be where you add your wet ingredients, making it easier to incorporate them gradually without creating a messy avalanche of flour.
Adding Wet Ingredients
Into the well created in your flour, crack one large egg. Follow with the warm water (or milk) and the vegetable oil or melted butter. Start by adding about half a cup of the warm liquid, reserving the rest. Using a fork or your fingers, gently start to incorporate the flour from the sides into the wet ingredients in the center. Continue mixing, gradually drawing more flour in, until a shaggy dough begins to form. If the dough seems too dry and crumbly, add the remaining warm liquid teaspoon by teaspoon until it comes together. The goal is to achieve a moist, but not sticky, consistency. This careful addition prevents an overly wet dough, which can be harder to work with.
Kneading Dough Until Smooth
Once the dough has come together in a shaggy mass, turn it out onto a lightly floured surface. Now comes the kneading! Knead the dough for about 5-10 minutes. Use the heel of your hand to push the dough away from you, then fold it back over itself, rotating slightly after each push. This process develops the gluten in the flour, making the dough elastic and smooth. You’ll notice the dough becoming progressively smoother, more elastic, and less sticky as you knead. It should feel soft and resilient to the touch. Once kneaded, form the dough into a ball, lightly oil it, and place it back in the bowl. Cover the bowl with plastic wrap or a damp cloth and let the dough rest for at least 30 minutes at room temperature. This resting period is crucial; it allows the gluten to relax, making the dough much easier to roll out thinly without shrinking back.
Delicious Potato and Cheese Filling
The filling is undoubtedly the heart of your potato pierogi, delivering that comforting, savory flavor that makes this dish so beloved. A well-prepared filling is creamy, perfectly seasoned, and complements the tender pierogi dough beautifully. While potatoes and cheese are the stars, the addition of sautéed onions adds a layer of depth and sweetness that truly rounds out the flavor profile. Pay attention to the texture and seasoning here, as it will define the taste experience of your homemade pierogi. For another delicious main course idea, check out our creamy baked mac and cheese recipe.
Combining Potatoes and Cheese
Start by boiling your chosen potatoes (Russet or Yukon Gold are excellent) until they are fork-tender. Drain them thoroughly and return them to the hot pot to allow any residual moisture to evaporate. This step is crucial for preventing a watery filling. Mash the potatoes until smooth, ensuring there are no large lumps. Now, it’s time to incorporate the cheese. Add your preferred cheese, whether it’s traditional farmer’s cheese, sharp cheddar, or a blend. The heat from the mashed potatoes will help the cheese melt and combine easily. Stir vigorously until the cheese is fully integrated and the mixture is smooth and creamy. Season generously with salt and black pepper to taste. Some cooks also like to add a pat of butter or a splash of milk to the potatoes for extra creaminess. Taste and adjust seasonings as needed, remembering that the filling should be flavorful on its own before being encased in dough.
Sautéed Onions for Flavor
Sautéed onions are a simple addition that brings a significant boost of flavor to your potato pierogi filling. In a skillet, melt a tablespoon or two of butter over medium heat. Add finely diced onions and cook them slowly, stirring occasionally, until they are soft, translucent, and slightly caramelized. This process can take 8-10 minutes, and the goal is a golden-brown color rather than a burnt one. The slow cooking brings out the natural sweetness of the onions, creating a wonderful counterpoint to the savory potatoes and cheese. Once cooked, you have a couple of options: you can either stir a portion of the sautéed onions directly into your potato and cheese filling for an integrated flavor, or you can reserve them to use as a topping for the cooked pierogi, or even do both! For a rich, savory dinner, you might also enjoy our easy butter chicken recipe.
Shaping Your Homemade Pierogi Gently
Shaping the pierogi is arguably the most artistic part of the process, transforming flat circles of dough into plump, half-moon dumplings bursting with delicious filling. It requires a gentle touch and a bit of patience, but the satisfaction of creating perfectly formed pierogi is immense. Take your time with this step, as proper sealing is key to preventing the filling from escaping during cooking. This stage truly brings your potato pierogi recipe to life, adding a visual appeal to their comforting taste.
Rolling Dough and Cutting Circles
Once your pierogi dough has rested, divide it into two or three manageable portions. On a lightly floured surface, take one portion and roll it out evenly. The ideal thickness for pierogi dough is about 1/16 to 1/8 inch (2-3 mm) – thin enough to be delicate but thick enough to hold the filling without tearing. Avoid rolling it too thick, as this will result in a heavy, doughy pierogi. Using a round cookie cutter, a drinking glass, or a specific pierogi cutter, cut out circles of dough. A typical size is 2.5 to 3 inches (6-7.5 cm) in diameter. Collect the dough scraps, gently re-knead them, and let them rest for a few minutes before rolling them out again to cut more circles. This minimizes waste and ensures all your dough is used efficiently.
Filling Each Dough Circle
Now comes the delicious part: adding the potato pierogi filling! Take one dough circle and place it in the palm of your hand or on your clean work surface. Spoon a small amount of the cooled potato and cheese filling into the center of the circle. The amount is crucial – typically about 1 teaspoon to 1 tablespoon, depending on the size of your dough circle. Be careful not to overfill, as this will make sealing difficult and may cause the pierogi to burst during cooking. Leave a clear border of dough around the edges to ensure a good seal. The filling should be centrally located, giving you ample room to work with the edges of the dough.
Folding Pierogi Half-Moon Shape
To create the classic pierogi half-moon shape, gently fold one side of the dough circle over the filling to meet the other side, forming a semi-circle. Carefully press the edges together with your fingers, starting from one end and working your way around, to seal the pierogi completely. It’s important to remove any air bubbles as you seal. For an extra secure and decorative seal, you can crimp the edges with the tines of a fork. Alternatively, if you have a pierogi maker tool, it can streamline this step. Place the finished pierogi on a lightly floured baking sheet or parchment paper, ensuring they don’t touch each other to prevent sticking. Continue this process with the remaining dough and filling. This precise shaping makes your main course truly special.
Cooking Your Fresh Pierogi Easily
Once your homemade pierogi are beautifully shaped, the next step is cooking them to perfection. While there are a few ways to enjoy pierogi, boiling is the most common initial cooking method, ensuring the dough is tender and cooked through. After boiling, many people enjoy pan-frying them for a delightful crispy exterior. The goal is to achieve that ideal balance of soft, pillowy dough and a warm, flavorful filling. Knowing how to cook pierogi properly will ensure your efforts in creating the pierogi dough and pierogi filling pay off with a truly delicious outcome.
Boiling Until They Float
Bring a large pot of salted water to a rolling boil. Adding salt to the water not only seasons the pierogi from the outside but also helps prevent them from sticking together. Once the water is boiling rapidly, carefully drop a batch of pierogi into the pot. Do not overcrowd the pot; cook them in batches if necessary, allowing them enough space to float freely. Overcrowding can lower the water temperature too quickly and cause the pierogi to stick. The pierogi will sink to the bottom initially. As they cook, they will rise to the surface and float. This usually takes about 2-3 minutes for fresh pierogi. Once they float, let them cook for an additional 1-2 minutes to ensure the dough is fully cooked through and tender. For delicious side dishes that pair well, explore options like our crispy cauliflower recipe.
Checking for Doneness
After the pierogi have floated to the surface and cooked for a couple more minutes, they should be done. To check for doneness, carefully remove one pierogi from the pot and cut into it. The dough should be translucent and tender, with no raw or gummy texture. The filling should be hot and fragrant. Once cooked, use a slotted spoon to carefully lift the pierogi out of the boiling water, allowing excess water to drain. You can then serve them immediately with your preferred toppings, or you can opt for an extra step of pan-frying. To pan-fry, melt some butter in a skillet over medium heat, add the boiled pierogi, and cook until golden brown and slightly crispy on both sides. This adds a wonderful texture and richness to your homemade pierogi, enhancing the overall comfort food experience.
Serving Warm Pierogi with Toppings
Serving freshly cooked potato pierogi is the culmination of your culinary efforts. While delicious on their own, traditional toppings elevate the flavor and provide a delightful contrast in textures and tastes. These simple additions transform a humble dumpling into a truly satisfying meal, embodying the essence of comfort food. Presentation matters, so arrange them appealingly on plates, ready for everyone to enjoy this homemade treat.
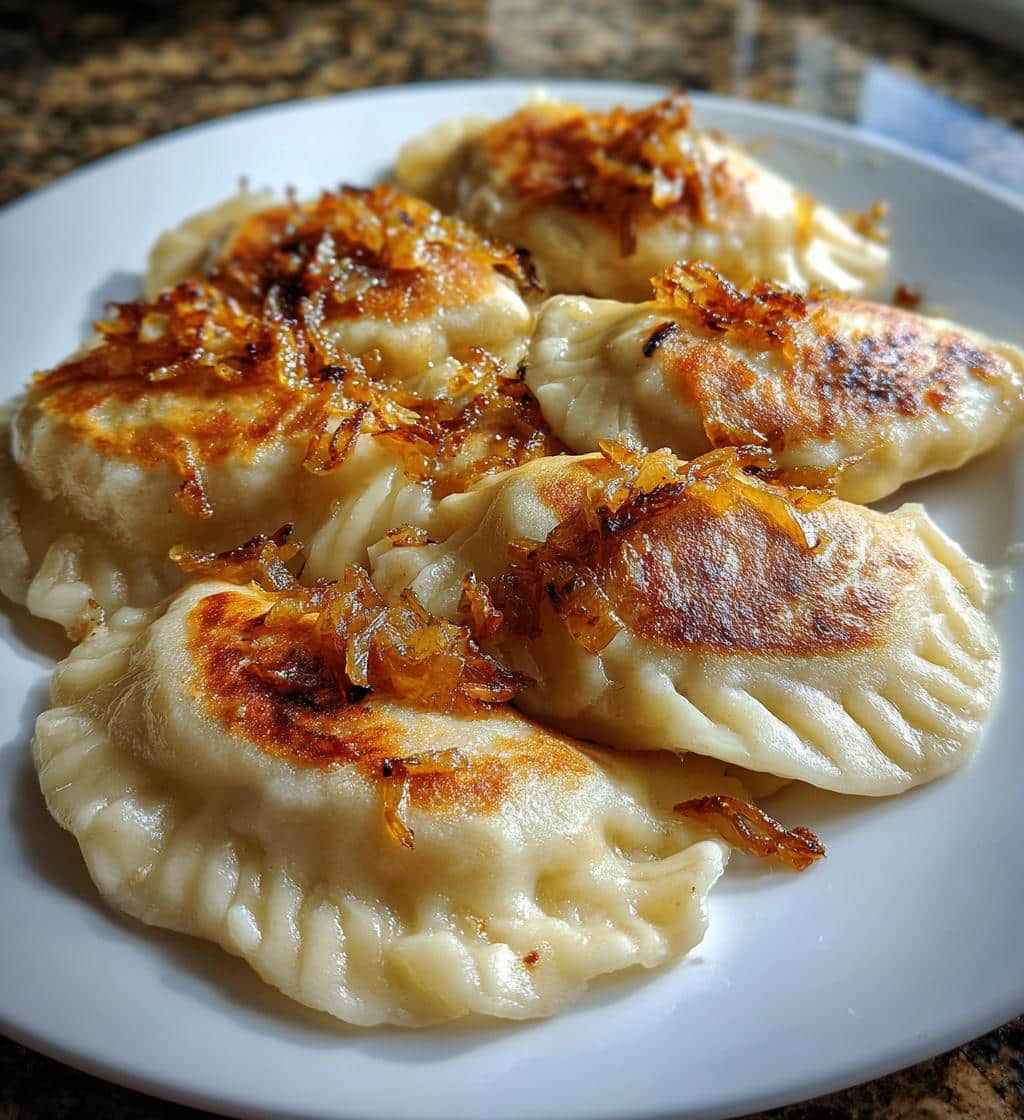
Topping with Sautéed Onions
One of the most classic and beloved toppings for pierogi is a generous serving of sautéed onions. Finely dice a large onion and cook it slowly in butter over medium-low heat until it turns beautifully golden brown and caramelized. This process takes patience, allowing the natural sugars in the onion to develop, resulting in a sweet and savory flavor that perfectly complements the rich potato and cheese filling. Ladle these warm, buttery onions directly over your hot pierogi before serving. The soft texture of the onions and their sweet aroma add an irresistible layer to your homemade pierogi, creating a harmonious blend of tastes.
Adding Sour Cream for Taste
Another essential topping that provides a wonderful balance to the savory pierogi is sour cream. Its tangy, creamy coolness cuts through the richness of the potato and cheese, offering a refreshing counterpoint. A dollop of full-fat sour cream on each serving is standard, but you can be as generous as you like. Some people prefer to swirl the sour cream into the sautéed onions, while others add it directly to their plate alongside the pierogi. The combination of warm pierogi, sweet sautéed onions, and cool, tangy sour cream creates a symphony of flavors that defines this comfort food. For more recipe ideas and visual inspiration, make sure to visit us on Pinterest and Instagram!
Quick Guide to Potato Pierogi Recipes
Having a quick overview of the time and yield for a potato pierogi recipe can be incredibly helpful when planning your meal. While making homemade pierogi is a rewarding process, it does require a bit of time commitment, especially if you’re making them from scratch. Understanding these details will help you manage your expectations and schedule your cooking time effectively, ensuring you can enjoy this delightful comfort food without feeling rushed.
Prep Time and Cook Time
Making homemade pierogi involves distinct phases, each contributing to the overall time.
- Prep Time: Expect about 60-90 minutes. This includes mixing and resting the pierogi dough, boiling and mashing potatoes, preparing the filling, and shaping all the individual pierogi. The dough resting time accounts for about 30 minutes of this.
- Cook Time: Once the pierogi are shaped, the cooking process itself is quite fast. Boiling typically takes 3-5 minutes per batch. If you plan to pan-fry them afterward, add another 5-7 minutes per batch. Total active cooking time usually ranges from 15-25 minutes, depending on how many batches you need to cook.
These times are estimates and can vary based on your speed and experience in the kitchen, as well as whether you choose to freeze pierogi for later. The most time-consuming part is often the shaping, especially if you are new to it.
How Many Servings
A typical potato pierogi recipe using the amounts listed for dough and filling (e.g., 3-4 cups of flour, 2 lbs of potatoes) usually yields a substantial batch, making it perfect for family meals or for freezing extras.
- Yield: You can expect to make approximately 40-50 pierogi, depending on the size of your dough circles.
- Servings: This amount typically serves 6-8 people as a main course, or more if served as a side dish or appetizer. A common serving size is about 5-7 pierogi per person, alongside toppings.
The generous yield makes homemade pierogi an excellent choice for meal prepping or entertaining. If you’re cooking for a smaller household, freezing a portion of the pierogi for later is a fantastic option, ensuring you always have this comfort food ready for a quick meal.
Step-by-Step Potato Pierogi Making
Creating potato pierogi from scratch is a rewarding process that, when broken down, is quite manageable. This section offers a concise overview of the entire journey, from raw ingredients to delicious, cooked dumplings. Following these steps systematically will help you achieve perfect results every time. Remember, cooking is as much about the journey as it is about the destination, and each stage contributes to the final, comforting outcome of your homemade pierogi.
Full Recipe Instructions Overview
- Prepare the Dough: Combine flour and salt. Add egg, warm water, and oil. Knead until smooth and elastic, then let it rest for at least 30 minutes.
- Make the Filling: Boil and mash potatoes. Stir in cheese, butter, salt, and pepper until creamy. Sauté onions separately until golden.
- Shape the Pierogi: Roll out the rested dough to 1/16-1/8 inch thickness. Cut into 2.5-3 inch circles.
- Fill and Seal: Place about 1 teaspoon to 1 tablespoon of cooled potato and cheese filling in the center of each dough circle. Fold the dough over to form a half-moon, pressing the edges firmly to seal. Crimp with a fork for a secure seal.
- Cook the Pierogi: Bring a large pot of salted water to a boil. Drop pierogi in batches, ensuring not to overcrowd. Cook until they float to the surface (2-3 minutes), then continue to boil for another 1-2 minutes.
- Serve or Fry: Remove pierogi with a slotted spoon. Serve immediately with sautéed onions and sour cream. Optionally, pan-fry in butter until golden brown for added texture.
- Store or Freeze: Cooked pierogi can be refrigerated for 3-4 days. Uncooked pierogi can be frozen solid on a floured baking sheet before transferring to freezer bags for long-term storage.
This systematic approach ensures every aspect of the potato pierogi recipe is covered, guiding you to a successful and delicious dish.
Handy Tips for Pierogi Makers
Making pierogi can be a joyful process, and a few clever tips can make it even easier and more efficient. From utilizing existing ingredients to planning for future meals, these insights are designed to enhance your pierogi-making experience. Whether you’re a novice or a seasoned cook, these practical suggestions will help you master the art of homemade pierogi and truly embrace this comfort food.
Using Leftover Mashed Potatoes
One of the best shortcuts for a potato pierogi recipe is to use leftover mashed potatoes. If you have plain mashed potatoes (without too many added herbs or strong flavors), they are perfect for pierogi filling. Simply ensure they are well-seasoned and mix in your cheese and any sautéed onions. This not only saves you time but also helps reduce food waste. Just be sure the mashed potatoes aren’t too wet; if they are, you might need to add a bit more cheese or a spoonful of flour to firm them up slightly. This makes creating your pierogi filling even quicker, speeding up the process of getting that delicious comfort food on your plate.
Freezing Pierogi for Later
Homemade pierogi are excellent for meal prep. To freeze pierogi:
- Uncooked: Place freshly shaped, uncooked pierogi in a single layer on a lightly floured baking sheet. Ensure they don’t touch. Freeze until solid (about 1-2 hours). Once frozen, transfer them to a freezer-safe bag or airtight container. They can be stored for up to 3 months. When cooking from frozen, drop them directly into boiling water, adding a few extra minutes to the cooking time until they float and are tender.
- Cooked: If you’ve boiled your pierogi and have leftovers, you can also freeze them. Toss them lightly with a little oil or butter to prevent sticking, then freeze in a single layer on a baking sheet. Once solid, transfer to a freezer bag. Reheat from frozen by pan-frying until golden brown, or gently boiling for a few minutes.
Freezing pierogi means you always have a quick, satisfying meal ready to go, making this homemade comfort food incredibly convenient.
Serving Suggestions
While sautéed onions and sour cream are classic, there are many other delightful ways to serve your potato pierogi:
- Crispy Bacon Bits: Fry up some bacon until crispy, then crumble it over your pierogi for a smoky, salty crunch.
- Melted Butter and Fresh Herbs: A simple drizzle of melted butter with chopped fresh chives or dill adds a touch of elegance and flavor.
- Creamy Mushroom Sauce: A rich, savory mushroom sauce can transform pierogi into a gourmet dish.
- Caramelized Applesauce: For a sweet and savory twist, serve with a side of warm applesauce or fried apples. This is particularly popular in some European traditions.
- Garlic Butter and Parmesan: Sauté pierogi in garlic butter and finish with a sprinkle of grated Parmesan cheese for an Italian-inspired touch.
These variations allow you to customize your serving style, keeping this homemade comfort food exciting and versatile.
Potato Pierogi Nutrition Facts Revealed
Understanding the nutritional content of your homemade potato pierogi can be helpful, especially if you’re mindful of your dietary intake. While pierogi are undeniably a comfort food, made with simple, wholesome ingredients, their nutritional profile can vary depending on the specific ingredients used, portion sizes, and preparation methods (e.g., boiled vs. pan-fried). This section offers a general idea of what you might expect from this delicious dish, helping you make informed choices.
Calories and Key Nutrients
A typical serving of homemade potato pierogi, generally comprising 5-7 pieces, will provide a satisfying amount of calories and essential nutrients. Keep in mind that these are approximations and can fluctuate based on the type of flour, fat content in the cheese, and how much butter is used for sautéing or toppings.
- Calories: Approximately 300-450 calories per serving (5-7 pierogi), especially if pan-fried with butter and served with sour cream. Boiled pierogi alone will be on the lower end.
- Carbohydrates: As expected, pierogi are rich in carbohydrates due to the potato and flour in the dough, providing a good source of energy.
- Protein: The cheese and egg in the dough contribute a decent amount of protein, ranging from 10-15 grams per serving.
- Fat: The fat content comes from butter in the filling, any oil in the dough, and particularly from butter used for frying and sour cream toppings.
- Vitamins and Minerals: Potatoes offer potassium and Vitamin C, while cheese provides calcium.
These homemade pierogi provide a hearty and filling meal, packed with energy and a balance of macronutrients. Adjusting the amount of cheese or frying method can slightly alter these figures.
Serving Size Details
Defining a serving size for homemade potato pierogi can be subjective, as appetites and dietary needs vary. However, for nutritional estimation and meal planning, a standard serving is often considered to be:
- 5 to 7 medium-sized pierogi (approximately 2.5-3 inches in diameter).
This portion provides a substantial main course for most individuals when accompanied by traditional toppings like sautéed onions and sour cream. If pierogi are served as a side dish or appetizer, the serving size might be smaller, typically 3-4 pierogi per person. It’s important to be mindful of the additional calories and fats from toppings. If you are serving a large group, plan on about 6 pierogi per person to ensure everyone gets a satisfying taste of this beloved comfort food. Adjusting serving sizes allows you to enjoy potato pierogi as part of a balanced diet.
Enjoying Your Comforting Pierogi Creation
Congratulations! You’ve successfully navigated the wonderful world of homemade potato pierogi, from mixing the delicate dough to carefully folding and cooking these delightful dumplings. The aroma filling your kitchen is a testament to your efforts, promising a meal that is not only delicious but also deeply satisfying. There’s a special magic in creating comfort food from scratch, and pierogi embody that feeling perfectly. Take a moment to appreciate your culinary achievement before diving in. This is more than just food; it’s a connection to tradition, a labor of love, and a true taste of home. Share your creations, savor every bite, and enjoy the warmth that homemade pierogi bring to your table.