
Garlic Parmesan Cheeseburger Bombs are a fantastic choice for a fun and flavorful meal. These savory bites combine seasoned ground beef and a cheesy filling, all wrapped in soft biscuit dough. They make a perfect weeknight dinner or impressive party food, offering a delicious, comforting experience that everyone will enjoy quickly.
Key Takeaways
- Effortlessly prepare flavorful garlic parmesan cheeseburger bombs.
- Learn simple steps for beef seasoning and cheese mixing.
- Master biscuit dough handling for perfect bomb formation.
- Get tips for baking, serving, and customizing your cheesy bombs.
- Understand nutrition facts and convenient make-ahead options.
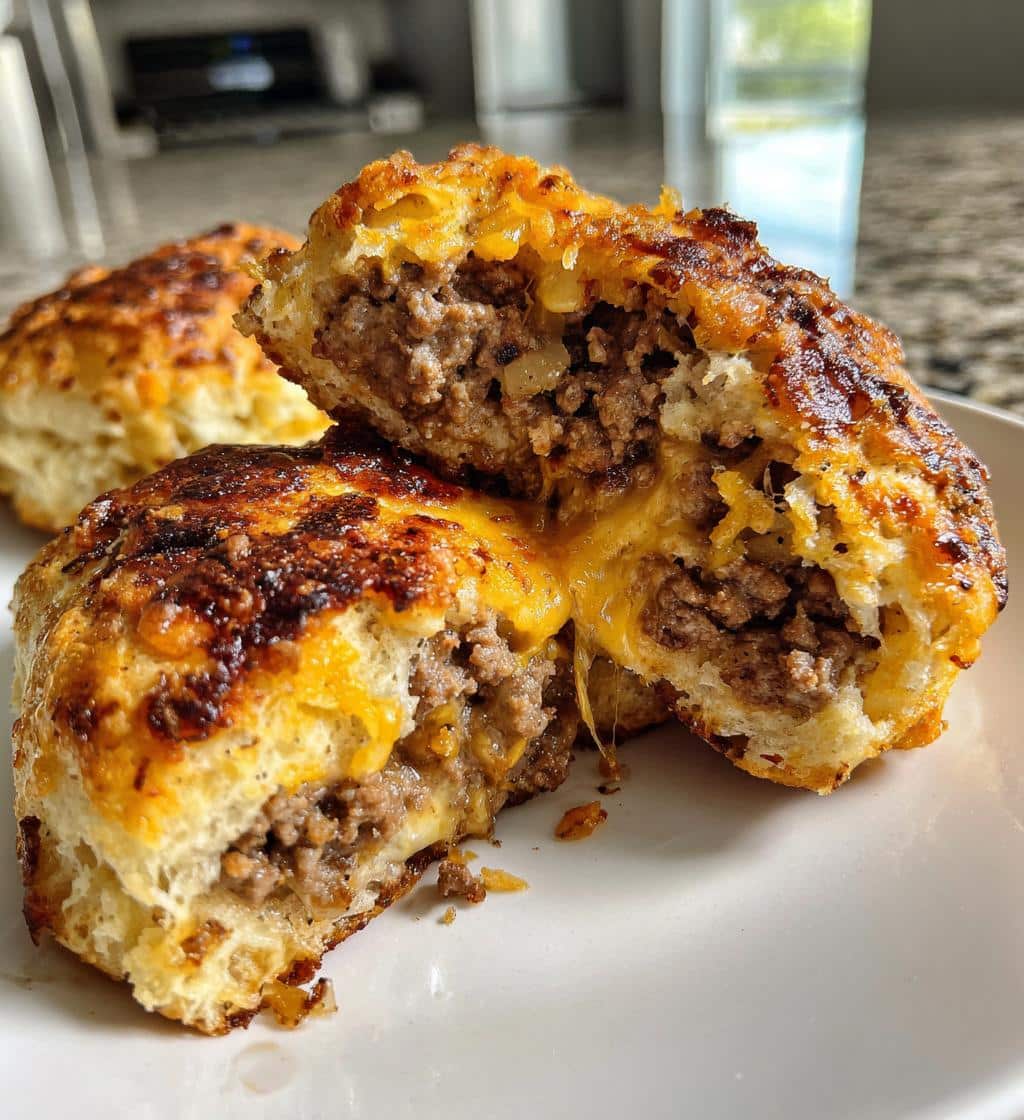
These cheeseburger bombs truly satisfy. They are savory, cheesy, and utterly delicious. Perfect for a quick family meal. Everyone will ask for more. Enjoy this comforting delight soon.
Make Irresistible Garlic Parmesan Cheeseburger Bombs
Creating these delightful garlic parmesan cheeseburger bombs is simpler than you might imagine, and the payoff is a batch of savory, cheesy bites that are perfect for any occasion. This section will guide you through gathering your ingredients and ensuring you have the right tools on hand, setting the stage for a smooth and enjoyable cooking experience. From the foundational ground beef to the crucial biscuit dough, every component plays a vital role in achieving the perfect balance of flavors and textures in these popular treats. These bombs are a fantastic alternative to a traditional hamburger, offering a portable and fun twist.
What You’ll Need to Begin
To start your cheeseburger bomb journey, ensure you have these key ingredients ready. You’ll need about one pound of lean ground beef, which forms the hearty core of each bomb. For the cheesy filling, grab a block of sharp cheddar cheese and a wedge of Parmesan. The dough component is easily handled with a can of refrigerated biscuit dough. Don’t forget your flavor enhancers: minced garlic, onion powder, salt, and black pepper. A little olive oil for browning the beef completes your pantry list. Having all your ingredients prepped and measured makes the assembly process much faster and more enjoyable, especially when preparing for a cheesy chicken and rice casserole or another family meal.
Essential Kitchen Tools
Having the right kitchen tools makes preparing your cheeseburger bombs a breeze. A large non-stick skillet is crucial for browning the ground beef evenly. You’ll also need a cutting board and a sharp knife for mincing garlic and shredding cheese, if you’re not using pre-shredded varieties. A mixing bowl will be handy for combining your cheese mixture. For shaping the bombs, a clean surface or parchment paper is ideal. Finally, a baking sheet lined with parchment paper is essential for baking them to golden perfection. Measuring spoons and cups will ensure accurate seasoning, contributing to a consistently delicious outcome every time.
Simple Steps to Prepare Your Beef
The foundation of truly irresistible garlic parmesan cheeseburger bombs lies in perfectly prepared ground beef. Achieving the right texture and flavor balance for your beef mixture is crucial. This section focuses on the initial cooking stages, ensuring your ground meat is browned to perfection and infused with a robust, aromatic seasoning that will make every bite bursting with flavor. Proper preparation here ensures that the beef complements the cheesy filling and soft biscuit dough, creating a harmonious and savory experience. Remember, this step sets the tone for the entire dish.
Browning the Ground Meat
Begin by heating a large skillet over medium-high heat. Add a small amount of olive oil, then carefully place your ground beef into the hot pan. Break it apart with a spoon, stirring occasionally to ensure it cooks evenly. The goal is to brown the meat thoroughly until no pink remains. This process not only cooks the beef but also renders out excess fat, which you’ll want to drain to prevent soggy bombs. Once browned, transfer the cooked beef to a bowl, leaving any rendered fat behind in the pan, or carefully drain it. This step ensures a clean, meaty flavor without unnecessary grease.
Adding Flavorful Spices and Garlic
With your ground beef perfectly browned, it’s time to infuse it with the signature garlic parmesan flavors. Return the drained beef to the skillet (or a clean pan if you prefer). Add your minced garlic, onion powder, salt, and black pepper. Stir well, allowing the spices to toast slightly and the garlic to become fragrant, usually for about 1-2 minutes. Be careful not to burn the garlic. This quick sauté enhances the aroma and deepens the flavor profile of the beef, making it savory and incredibly aromatic. This seasoned beef will be the heart of your cheeseburger bombs, delivering that classic taste within every bite. You might find similar flavor profiles if you enjoy dishes like other main courses or crispy parmesan chicken.
Mixing Cheeses for Perfect Bombs
The gooey, savory center of these cheeseburger bombs is all about the cheese. A well-balanced cheese mixture is paramount to achieving that irresistible melty goodness and depth of flavor. Combining different types of cheese introduces layers of taste and texture, ensuring each bite offers a delightful surprise. This section guides you through selecting and preparing the cheeses that will create the perfect interior for your bombs, making them truly unforgettable. The right blend guarantees a creamy, flavorful core that complements the seasoned beef beautifully.
Shredded Cheddar for Richness
Shredded cheddar cheese forms the backbone of our cheesy filling. Its creamy texture and sharp, distinct flavor are classic partners for beef. Whether you choose mild, medium, or sharp cheddar, shredding it yourself from a block will always yield a superior melt and fresher taste compared to pre-shredded options, which often contain anti-caking agents. Aim for about one cup of shredded cheddar per batch. This cheese provides the primary gooey factor, pulling apart beautifully when the bombs are warm and fresh from the oven, much like the delicious cheese found in creamy baked mac and cheese.
Grated Parmesan for Zesty Taste
To complement the richness of the cheddar, grated Parmesan cheese adds a fantastic salty, nutty, and zesty dimension. Its finely grated texture allows it to blend seamlessly into the mixture and distribute its robust flavor evenly throughout the bombs. A quarter to a half cup of grated Parmesan is usually sufficient to impart that signature savory tang without overpowering the other ingredients. Together, the cheddar and Parmesan create a dynamic duo, ensuring every garlic parmesan cheeseburger bomb is packed with a complex, satisfying cheesy punch. Combine both cheeses in a bowl and mix well, ready for filling.
Working with Biscuit Dough for Bombs
The magical outer shell of our garlic parmesan cheeseburger bombs is the humble biscuit dough. Its convenience and flaky texture make it the ideal wrapper for our savory filling. Mastering the handling of this dough is key to creating perfectly sealed bombs that bake up golden and delicious. This section will guide you through preparing the dough, ensuring each bomb is uniformly sized and securely encased, ready to burst with flavor when cooked. Proper technique here prevents messy fillings and ensures a beautiful, appealing final product for your `party food` or `weeknight dinner`.
How to Separate Each Piece
Start by opening the can of refrigerated biscuit dough. Gently separate each biscuit piece from the roll. Most cans contain 8-10 biscuits, which will yield the same number of cheeseburger bombs. Lay each biscuit flat on a lightly floured surface or a piece of parchment paper. If the biscuits are connected, carefully pull them apart without tearing. The goal is to have individual, intact dough rounds, each ready to be stretched and filled. This initial separation is straightforward but crucial for maintaining the integrity of each bomb, similar to preparing dough for other bread-based recipes.
Gentle Handling of Dough
Once separated, it’s time to prepare each biscuit for filling. Gently press or roll each biscuit into a thin, approximately 4-inch round. Avoid overworking the dough, as this can make it tough. You want the dough to be thin enough to wrap around the filling without being too thick, but not so thin that it tears easily. Handle the dough with care to maintain its elasticity and prevent it from shrinking back excessively. A delicate touch ensures the dough remains pliable and easy to seal around the beef and cheese mixture, guaranteeing a soft, flaky crust for your `cheeseburger bombs`. This careful approach ensures your `savory snack` turns out perfectly.
Filling Each Garlic Parmesan Cheeseburger Bomb
This is where your garlic parmesan cheeseburger bombs truly come to life! The filling process requires a bit of attention to detail to ensure each bomb is generously packed with flavor and perfectly sealed. A well-filled and securely closed bomb means no cheese escapes during baking, preserving that wonderful gooey center. This section walks you through the precise steps of spooning in your savory beef and cheese mixture, then expertly sealing the dough to create neat, irresistible parcels ready for the oven. This stage is key to making sure your `cheesy filling` stays exactly where it should be.
Spoon in Beef Mixture
Take one prepared biscuit dough round. In the center of each dough round, place a spoonful of the seasoned ground beef mixture. Aim for about 1-2 tablespoons, depending on the size of your biscuit. Don’t overfill, or it will be difficult to seal the bomb securely. Next, add a small pinch of the mixed cheddar and Parmesan cheese on top of the beef. This layering ensures both components are evenly distributed within the bomb, giving you a balanced flavor in every bite. This precise filling technique is similar to preparing other wrapped delights like cheesy garlic chicken wraps.
Sealing Your Bombs Securely
Once filled, it’s time to seal your cheeseburger bombs. Carefully gather the edges of the biscuit dough up and over the filling. Pinch the seams firmly together at the top to create a sealed ball. Ensure there are no gaps or openings, as this could lead to the cheese melting out during baking. Once sealed, gently roll the bomb between your palms to smooth out the seams and create a more uniform, round shape. Place the sealed bombs seam-side down on your prepared baking sheet. Repeat this process for all remaining biscuits and filling. A tight seal is vital for maintaining the bomb’s integrity and keeping that `cheesy filling` locked in for optimal `delicious` results.
Baking Your Golden Cheeseburger Bombs
The final step before enjoying your homemade garlic parmesan cheeseburger bombs is baking them to golden perfection. This stage transforms the raw dough and filling into a warm, flaky, and irresistibly cheesy delight. Achieving the right oven temperature and knowing precisely when your bombs are done ensures a perfectly cooked interior and a beautifully browned exterior. Follow these guidelines for a successful bake every time, guaranteeing that your `garlic parmesan` creations are crisp on the outside and wonderfully gooey within. This crucial step brings all your preparation together for a `quick cook` masterpiece.
Setting the Right Oven Temperature
Preheating your oven to the correct temperature is paramount for even baking. For cheeseburger bombs, a temperature of 375°F (190°C) is generally ideal. This temperature allows the biscuit dough to cook through and puff up, becoming golden brown, while ensuring the beef heats up and the cheese inside melts perfectly. Make sure your oven has reached the target temperature before placing the bombs inside, as a cold oven can lead to uneven cooking and a longer bake time. Consistent heat ensures that your `biscuit dough` turns out light and fluffy, encapsulating the `ground beef` and `cheesy filling` beautifully.
Knowing When They’re Done
Baking time for cheeseburger bombs typically ranges from 12 to 18 minutes, but this can vary slightly depending on your oven and the size of your bombs. You’ll know they’re done when the biscuit dough is beautifully golden brown all over, and the bombs appear puffed and firm to the touch. A good indicator is also a slight crispness on the exterior. If you see any cheese oozing out, don’t worry too much – it’s a common and often delicious side effect! Once baked, carefully remove the baking sheet from the oven. For best results, let them cool for a few minutes before serving, allowing the melted cheese to set slightly, enhancing the overall `delicious` experience. This method of cooking is similar to other recipes found in our baking category.
Quick Times for Delicious Bombs
One of the many appealing aspects of these garlic parmesan cheeseburger bombs is how quickly they come together, making them a fantastic option for a `weeknight dinner` or when you need a speedy `party food` solution. Understanding the time commitment for both preparation and cooking helps in planning your meal efficiently. This section provides a clear breakdown of how long you can expect to spend in the kitchen, from mixing ingredients to pulling out golden, savory bombs from the oven. This quick overview helps you manage your time effectively, ensuring a stress-free cooking experience.
Total Preparation Time
The total preparation time for your cheeseburger bombs is surprisingly short, making this an `easy recipe` for busy schedules. Typically, you can expect to spend about 15-20 minutes getting everything ready. This includes browning the ground beef, chopping garlic, shredding cheeses, and filling the biscuit dough. If you opt for pre-shredded cheese and pre-minced garlic, you might even shave off a few minutes. The quick prep makes these `cheeseburger bombs` an ideal choice for spontaneous gatherings or a quick family meal when time is of the essence. You’ll be amazed at how fast these `savory snack` bombs come together.
Expected Cooking Duration
Once prepped, the cooking duration for these delicious bombs is equally brief. They typically bake for about 12-18 minutes in a preheated oven. This `quick cook` time means you won’t be waiting long to enjoy your creations. While they bake, you have time to whip up a `dipping sauce` or set the table. Always keep an eye on them, especially during the last few minutes, to ensure they don’t over-brown. The combination of minimal prep and short cooking time cements their status as a go-to recipe for when you crave comfort food without the lengthy kitchen commitment. This `kid-friendly meal` will be ready in a flash.
Serving Your Irresistible Cheeseburger Bombs
Once your garlic parmesan cheeseburger bombs emerge from the oven, golden and fragrant, the next step is enjoying them! How you serve these delightful bites can enhance the overall experience, whether they’re the star of a casual `weeknight dinner` or a highlight at a `party food` spread. This section offers suggestions for enjoying them at their best and provides creative ideas for `dipping sauce` pairings that will elevate every bite. Presentation and accompanying flavors can turn a simple snack into a memorable meal, making these `cheesy bombs` even more irresistible.
Best Ways to Enjoy Warm
Garlic parmesan cheeseburger bombs are undeniably at their best when served warm, straight from the oven (after a brief cooling period to prevent burnt tongues!). The cheese inside will be perfectly melted and gooey, and the biscuit dough will be soft and flaky. Arrange them on a platter for easy access at a party, or serve them individually on plates for a family meal. They are hearty enough to be a standalone `main course` but also work wonderfully as an appetizer or `savory snack`. Consider garnishing with a sprinkle of fresh parsley or chives for a touch of color and freshness. Enjoying them while they are still warm ensures you get that classic cheeseburger flavor and texture in every single bite.
Fun Dipping Sauce Ideas
While delicious on their own, cheeseburger bombs truly shine when paired with a complementary `dipping sauce`. Classic options like ketchup and mustard are always a hit. For something a little different, try a tangy BBQ sauce or a creamy ranch dressing. A spicy aioli or a simple `garlic parmesan` mayo can also add an exciting kick. Don’t be afraid to get creative! A homemade “special sauce” (a blend of mayo, ketchup, relish, and a dash of hot sauce) is a fantastic choice that mimics a true burger experience. Share your creations and find more recipe inspiration by following Carina Recipes on Pinterest or our Instagram account for more fun ideas.
Handy Notes for These Cheeseburger Bombs
Beyond the basic recipe, there are several ways to make these garlic parmesan cheeseburger bombs truly your own, or to make your life easier in the kitchen. These handy notes cover customization options that can cater to different tastes and dietary preferences, as well as practical tips for meal prepping. Whether you want to add extra flair with various toppings or ensure you have a `freezer friendly` batch ready for a future `weeknight dinner`, these suggestions will help you `maximize` the versatility and convenience of this `easy recipe`. They are perfect for tailoring to any preference, ensuring everyone enjoys their `comfort food` experience.
Customizing with Toppings
One of the best things about cheeseburger bombs is their versatility. Feel free to get creative with your additions! Before sealing, you could add a tiny bit of cooked, crumbled bacon for a smoky flavor, finely diced pickles for a tangy crunch, or even a sliver of jalapeño for a spicy kick. For serving, offer a variety of toppings on the side, just like you would with a regular burger bar. Shredded lettuce, diced tomatoes, thinly sliced onions, or extra pickles can be served alongside, allowing everyone to customize their `cheeseburger bombs` to their liking. These small additions can significantly `transform` the flavor profile and make each bite unique.
Freezing for Future Meals
These `garlic parmesan cheeseburger bombs` are wonderfully `freezer friendly`, making them an excellent option for meal prep. To freeze, let the baked bombs cool completely. Then, place them in a single layer on a baking sheet and freeze until solid. Once frozen, transfer them to a freezer-safe bag or airtight container. They can be stored in the freezer for up to 2-3 months. When ready to enjoy, reheat them from frozen in an oven at 350°F (175°C) for 20-25 minutes, or until heated through and golden. This `make ahead` tip ensures you always have a quick and `delicious` `kid-friendly meal` ready, similar to how you might prepare a batch of easy honey garlic chicken for later.
Nutrition Facts for Each Bomb
Understanding the nutritional content of your garlic parmesan cheeseburger bombs can be helpful, especially if you’re mindful of your dietary intake. While these bombs are a delightful `comfort food` and `savory snack`, being aware of their caloric and macronutrient breakdown allows for informed portion control. Keep in mind that exact figures will vary based on the specific ingredients you use (e.g., lean ground beef vs. regular, type of biscuit dough, cheese fat content). This section provides a general overview, offering a realistic expectation of what each `cheeseburger bomb` contributes to your daily nutrition, helping you enjoy this `delicious` treat responsibly.
Calories and Protein Per Serving
On average, one garlic parmesan cheeseburger bomb typically contains between 200-250 calories. This estimate is based on using lean ground beef and standard biscuit dough. The protein content is notably good, often ranging from 12-15 grams per bomb, thanks to the substantial amount of ground beef and cheese. This makes them a satisfying and relatively high-protein `savory snack` or `main course` component. The protein helps with satiety, making these a fulfilling option that keeps hunger at bay. Always consider your specific brands and serving sizes for precise nutritional values. The `ground beef` and `cheesy filling` are the primary contributors here.
Breakdown of Fat and Carbs
For fat content, each cheeseburger bomb typically contains around 12-18 grams. This includes fats from both the ground beef and the cheeses. Choosing leaner ground beef can help reduce this number. The carbohydrate content primarily comes from the biscuit dough, with each bomb usually contributing about 15-20 grams of carbohydrates. There’s a minimal amount of sugar. Dietary fiber is generally low, unless you add vegetables. While these bombs are a delicious indulgence, they fit well into a balanced diet when enjoyed in moderation. They offer a good mix of macros for energy and satisfaction, perfect as an `easy recipe` for a `weeknight dinner` treat.
Common Questions About Cheeseburger Bombs
As with any popular `easy recipe`, certain questions frequently arise about making and enjoying garlic parmesan cheeseburger bombs. Addressing these common queries can help you prepare and serve your bombs with confidence, whether you’re a seasoned cook or trying this dish for the first time. This section provides practical advice on how to `make ahead` these delightful `cheeseburger bombs` and offers the best methods for reheating them, ensuring they taste just as `delicious` as when they were freshly baked. These tips are crucial for convenience and for ensuring your `party food` or `weeknight dinner` remains a hit.
Tips for Making Ahead
Preparing cheeseburger bombs in advance is a fantastic way to save time, especially for `party food` or busy `weeknight dinner` scenarios. You can assemble the bombs completely, including filling and sealing, then arrange them on a baking sheet lined with parchment paper. Cover the sheet loosely with plastic wrap and refrigerate for up to 24 hours before baking. Alternatively, as mentioned earlier, they are very `freezer friendly`. Freezing them unbaked is also an option; simply add an extra 5-10 minutes to the baking time when cooking from frozen, keeping an eye on them until golden. Making them ahead ensures a quick `cook` and less stress when you’re ready to serve.
Simple Reheating Instructions
Reheating garlic parmesan cheeseburger bombs successfully means retaining their delicious flavor and texture. If they’ve been refrigerated, you can reheat them in a preheated oven at 350°F (175°C) for about 10-15 minutes, or until warmed through and the cheese is gooey again. For frozen bombs, place them on a baking sheet and bake at 350°F (175°C) for 20-25 minutes, or until thoroughly heated and the crust is crisp. Avoid microwaving if possible, as it can make the dough soggy, though it will heat them quickly. A toaster oven can also work well for smaller batches, providing a quick and `delicious` way to enjoy leftover `savory snack` bombs.
Why Everyone Loves These Cheesy Bombs
The widespread appeal of garlic parmesan cheeseburger bombs is no accident. These delectable bites strike a perfect balance between familiar flavors and an exciting, easy-to-eat format. They offer the comforting essence of a classic cheeseburger encapsulated in a fun, portable package, enhanced by the aromatic `garlic parmesan` twist. This section highlights the key reasons why these `cheesy bombs` have become a beloved recipe, whether you’re hosting a crowd or simply seeking a reliable `kid-friendly meal`. Their versatility and `delicious` taste make them a standout choice for various occasions and appetites.
Perfect for Any Gathering
Whether you’re hosting a casual game night, a birthday party, or a holiday get-together, cheeseburger bombs are a guaranteed crowd-pleaser. Their individual serving size makes them ideal `party food`, easy to grab and enjoy without the need for plates and forks. They’re less messy than traditional burgers and offer a unique, engaging way to serve up a favorite flavor. Plus, their savory nature pairs well with a variety of drinks and other appetizers. The “bomb” format adds an element of fun and surprise, ensuring these `garlic parmesan` creations are a memorable hit at any social event. They easily fit onto a spread alongside other popular appetizers.
A Fantastic Kid-Friendly Meal
Parents often seek `easy recipe` ideas that both adults and children will enthusiastically eat, and cheeseburger bombs fit this bill perfectly. Their small, handheld size is ideal for little hands, and the familiar flavors of beef and cheese are universally loved by kids. The fun “bomb” shape also adds an element of novelty that can entice even picky eaters. They are a less intimidating way to enjoy a burger, without the potential mess of a full bun and toppings. As a `kid-friendly meal`, they’re quick to prepare, nutritious (especially with lean beef), and guaranteed to bring smiles to the dinner table, making your `weeknight dinner` much smoother and more enjoyable for everyone.