
Cheesy Pizza Bombs are a fantastic way to enjoy the flavors of pizza in a fun, bite-sized form. This easy snack recipe is perfect for game nights, parties, or simply as a satisfying meal. Get ready to prepare some warm, gooey, and utterly delicious cheesy bites that both kids and adults will crave.
Key Takeaways
- Quickly prepare and bake delicious pizza bombs with simple ingredients.
- Assemble easily by flattening dough, adding filling, and sealing.
- Freeze for future convenience or enjoy immediately with dipping sauces.
- Learn tips for perfect results, unique variations, and proper storage.
Craving pizza without the fuss? These bombs are a game-changer. They are perfect easy snack appetizers. Everyone will love these cheesy bites. Make them today for a treat!
Cheesy Pizza Bombs Recipe: Overview
These Cheesy Pizza Bombs redefine convenience and deliciousness, offering all the delightful flavors of a traditional pizza without the extensive preparation time. They are designed to be a **quick recipe**, making them an ideal choice for busy weeknights, impromptu gatherings, or when you need a satisfying snack in a pinch. The beauty of this recipe lies in its simplicity and efficiency, ensuring you spend less time in the kitchen and more time enjoying your culinary creation. Whether you are hosting a casual get-together or simply looking for a fun meal option, these **homemade pizza** bombs deliver big on taste and ease. They are truly an **easy snack** that satisfies.
Quick Prep and Cook Times
One of the most appealing aspects of making Cheesy Pizza Bombs is their remarkably fast turnaround. Typically, the prep work for these delightful **appetizers** takes no more than 15-20 minutes, especially if you opt for pre-made dough. The baking time is equally swift, usually ranging from 12 to 15 minutes, until they achieve a beautiful golden-brown finish. This means you can go from craving to serving in under 40 minutes, making them a perfect last-minute addition to any meal plan. For those evenings when time is short but the desire for something savory is strong, these pizza bombs are your go-to solution. The combination of speed and simple ingredients makes this a genuinely hassle-free baking experience, much like preparing a creamy baked mac and cheese.
How Many Bites to Expect
Each Cheesy Pizza Bomb is perfectly portioned to be a satisfying individual bite or two, depending on their size and your appetite. When made according to the recipe, they are typically small enough to be picked up easily and enjoyed without a plate, making them excellent **party food**. A batch usually yields a good number of bombs, enough to serve several people as an appetizer or a smaller group as a main course alongside a fresh salad. They are also incredibly **kid-friendly**, making mealtime fun and appealing. You might find yourself reaching for more than one, as their rich, gooey center and crispy exterior are quite addictive. Plan for about 2-3 bombs per person if serving as a side, and more if they are the main attraction.
What You Need for Pizza Bombs
Creating these scrumptious Cheesy Pizza Bombs requires a straightforward list of ingredients, many of which you likely already have on hand. The beauty of this recipe is its adaptability; while we suggest certain items, you can easily customize it based on your preferences or what’s available. The foundation relies on good quality dough and a selection of cheeses that melt beautifully to give you those irresistible **cheesy bites**. Thinking about dinner ideas? These bombs are a creative and simple solution!
Pantry Staples and Fresh Cheese
For the dough, you can opt for pre-made refrigerated pizza dough or biscuit dough, which significantly cuts down on prep time. If you’re feeling ambitious, homemade pizza dough also works wonderfully. Beyond the dough, you’ll need a few common pantry items: a little olive oil for brushing, garlic powder, onion powder, dried oregano, and a pinch of red pepper flakes for a subtle kick. A dash of salt and black pepper will enhance the overall flavor. The heart of these pizza bombs, of course, is the cheese. A blend of fresh, shredded mozzarella and a good quality provolone or cheddar will give you that perfect gooey stretch. Consider adding a touch of Parmesan for an extra layer of savory depth. Freshly grated cheese melts much better and tastes superior to pre-shredded varieties, which often contain anti-caking agents. You’ll find these **simple ingredients** come together to create a truly **delicious** and satisfying **savory treat**.
Preparing Your Pizza Bomb Filling
The filling is what transforms simple dough into a burst of pizza goodness. Taking a moment to prepare your cheese and seasonings properly will ensure every bite is packed with flavor. This step is quite simple, yet it’s crucial for achieving that consistent, mouthwatering taste throughout all your **cheesy bites**. It’s where the magic truly begins before these become **party food** superstars.
Mixing Cheese and Seasonings
In a medium-sized bowl, combine your chosen shredded cheeses: mozzarella, provolone, and Parmesan if you’re using it. Next, add your seasonings. A good starting point includes a teaspoon of garlic powder, half a teaspoon of onion powder, a teaspoon of dried oregano, and a quarter teaspoon of red pepper flakes (adjust to your heat preference). A sprinkle of salt and freshly ground black pepper will tie all the flavors together. Gently toss everything with your hands or a spoon until the cheeses are evenly coated with the herbs and spices. This thorough mixing ensures that each Cheesy Pizza Bomb has a balanced flavor profile and that the seasonings are distributed throughout the gooey cheese as it melts. You want to see the vibrant flecks of oregano and the subtle hint of garlic powder clinging to the cheese shreds. This quick preparation makes assembly a breeze and guarantees a flavorful result, similar to how a well-seasoned filling can make a spinach feta quesadilla truly sing.
How to Assemble Pizza Bombs
Assembling Cheesy Pizza Bombs is a fun and interactive part of the process, much like creating little culinary presents. This step requires a bit of care to ensure your bombs bake perfectly without any cheese leaks. The goal is to create a snug package that encases the flavorful filling, guaranteeing a delightful burst of cheese with every bite. This is where your **homemade pizza** skills shine, turning simple dough into a delightful **savory treat**.
Flattening Dough and Adding Mix
Start by lightly flouring your work surface. If using refrigerated pizza dough, roll it out and cut it into approximately 2-inch squares. If using biscuit dough, separate each biscuit and gently flatten it into a circle, about 3-4 inches in diameter. The thickness should be even, not too thin that it tears, nor too thick that it becomes bready. Once your dough pieces are ready, place a generous spoonful (about 1-1.5 tablespoons) of your prepared cheese and seasoning mix into the center of each dough piece. Avoid overstuffing, as this can make sealing difficult and lead to leaks during baking. You want enough filling to be satisfying, but not so much that the dough struggles to contain it. Consider adding a small slice of pepperoni or a bit of cooked sausage at this stage for added flavor, turning them into mini **dinner ideas** or hearty snacks.
Sealing Each Dough Bomb Tight
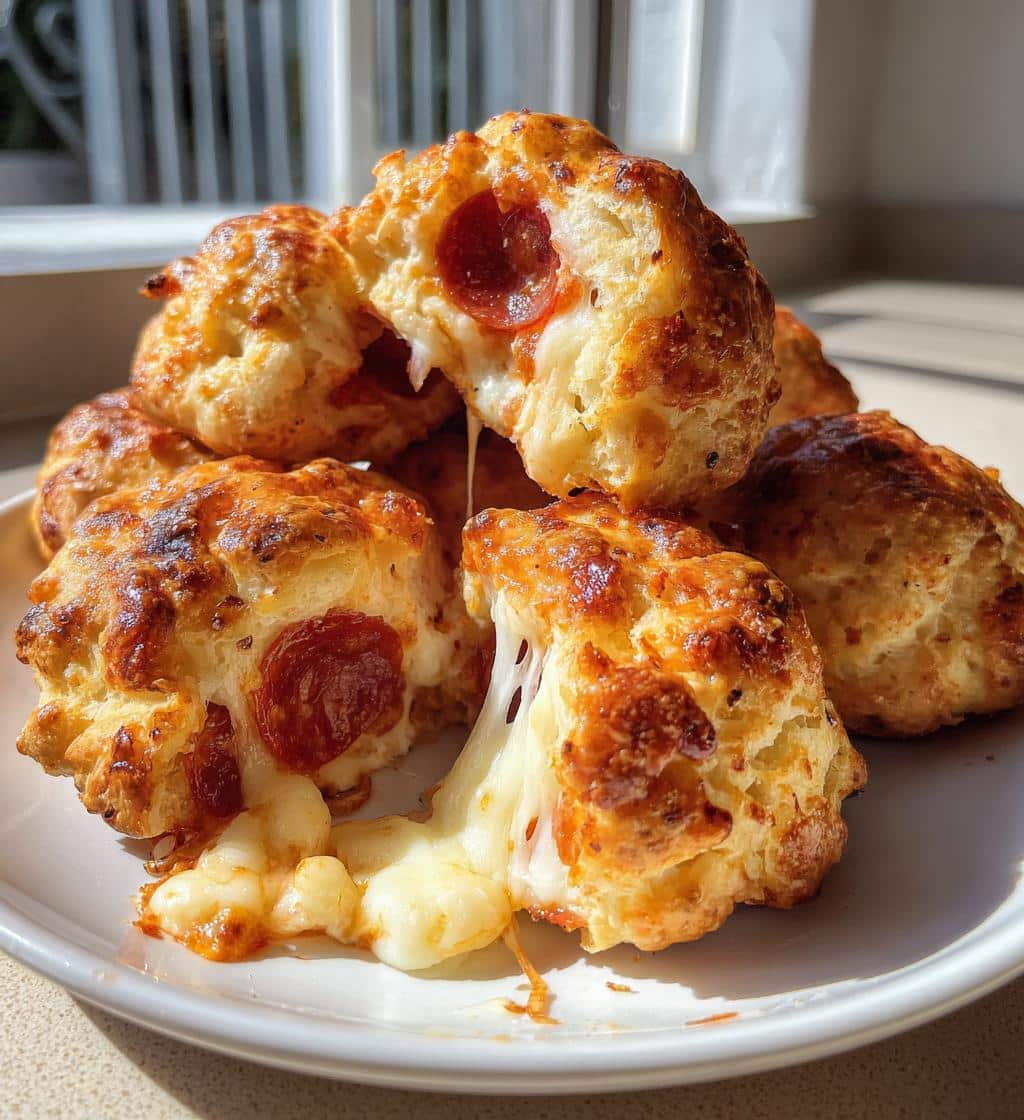
This is arguably the most critical step in assembly. To seal a pizza bomb, gather the edges of the dough around the filling, bringing them together at the top. Pinch the seams firmly and securely to create a tight seal. Think of it like making a small dumpling or a potsticker. Ensure there are no gaps or openings where the cheese could escape during baking. After sealing, gently roll the dough ball between your palms to smooth out the seams and create a more uniform, round shape. Place the sealed bombs seam-side down on a baking sheet lined with parchment paper. This helps keep them intact and prevents the cheese from oozing out onto the sheet. A well-sealed pizza bomb means a perfectly contained, gooey, **delicious** **cheesy bite** every time. For other great main course options, check out our selection of main course recipes.
Baking Your Cheesy Pizza Bombs
Baking is where your patiently assembled pizza bombs transform from raw dough into golden, gooey perfection. The right temperature and bake time are crucial for achieving a crispy exterior and a melted, flavorful interior. This step is quite straightforward, but paying attention to your oven and the visual cues will ensure your **homemade pizza** bombs come out just right.
Oven Temperature and Bake Time
Preheat your oven to 375°F (190°C). A properly preheated oven ensures even baking from the moment your bombs enter. Arrange your sealed pizza bombs on a baking sheet lined with parchment paper, leaving a little space between each one to allow for air circulation. Bake for approximately 12-15 minutes. The exact time can vary depending on your oven and the type of dough used, so it’s always a good idea to keep an eye on them. For optimal results, you want the dough to cook through completely and the cheese inside to be thoroughly melted and bubbly. This **bake** process creates the ideal texture for these **cheesy bites**.
Achieving Golden Brown Tops
The key indicator that your Cheesy Pizza Bombs are ready is their appearance. They should have puffed up slightly and developed a beautiful golden-brown color on top and on the bottom. If they appear pale after the suggested bake time, you can extend baking by a few minutes, checking frequently. For an extra golden hue and a subtle sheen, you can brush the tops of the bombs with a little melted butter or olive oil before placing them in the oven. This also helps to achieve a slightly crispier crust. Once they reach that inviting golden color, remove them from the oven. Let them cool on the baking sheet for a few minutes before serving, as the cheese inside will be extremely hot. This short cooling period also allows the cheese to set slightly, preventing it from completely oozing out when bitten into. Enjoy these as a **savory treat**.
Serving Your Delicious Pizza Bombs
Once your Cheesy Pizza Bombs emerge from the oven, golden and fragrant, they are ready to be the star of your table. While they are undoubtedly **delicious** on their own, pairing them with the right dipping sauces and complementary sides can elevate the experience even further. These **cheesy bites** are versatile enough to fit into many meal scenarios, from casual snacks to more structured **dinner ideas**.
Best Dipping Sauce Options
No pizza experience is complete without the perfect dipping sauce, and pizza bombs are no exception. The classic choice is, of course, a warm marinara sauce. Its rich tomato flavor and slight acidity perfectly complement the savory cheese and dough. Beyond marinara, consider creamy ranch dressing for a cool, tangy contrast, or a garlic aioli for an extra punch of flavor. A spicy sriracha mayo can add a nice kick for those who like a bit of heat. Don’t shy away from experimenting! You could even offer a selection of sauces for guests to choose from, making these **party food** items even more interactive. A simple pesto dip also offers a fresh, herbaceous option that pairs beautifully with the baked dough and cheese.
Sides to Enjoy With Them
While pizza bombs are quite filling, they can be part of a larger meal, especially if you’re looking for satisfying **dinner ideas**. For a lighter approach, serve them alongside a crisp green salad with a vinaigrette dressing. The freshness and crunch of the salad provide a lovely balance to the rich, gooey bombs. A simple side of roasted vegetables like broccoli or asparagus also works wonderfully. If you’re hosting a party, consider offering other easy **appetizers** like a fruit platter or a veggie stick medley with hummus. For a heartier meal, you could pair them with a light soup, such as a tomato basil, or even a simple pasta dish if you want to double down on the Italian theme. They make fantastic additions to any game day spread or movie night, providing a fun and **kid-friendly** meal or snack. For more creative presentation ideas and meal pairings, check out our Pinterest page.
Top Tips for Perfect Pizza Bombs
Even though Cheesy Pizza Bombs are relatively **easy snack** to make, a few key tips can help you achieve consistently perfect results every time. Paying attention to these small details will prevent common mishaps and ensure your bombs are nothing short of **delicious** and satisfying. These pieces of advice are crucial for creating those ideal **cheesy bites** that everyone will rave about.
Avoid Overstuffing Dough
One of the most common mistakes when making pizza bombs is adding too much filling. While it might seem tempting to pack in as much cheese and toppings as possible, overstuffing can lead to disaster during baking. When the cheese melts and expands, it needs room within the dough. If there’s too much filling, the dough will struggle to contain it, leading to ruptures and cheese oozing out onto your baking sheet. This not only makes for a messier cleanup but also results in less gooey goodness inside the bomb itself. Stick to the recommended amount, usually about 1 to 1.5 tablespoons of filling per dough piece, to ensure a perfect balance. This consideration is vital whether you’re making these for simple **dinner ideas** or a large gathering, keeping your cooking experience smooth.
Secure Dough Seals Well
Closely related to avoiding overstuffing is the importance of a tight, secure seal. A poorly sealed pizza bomb is an open invitation for molten cheese to escape, creating a flat, empty shell instead of a puffy, cheesy sphere. After gathering the edges of the dough and pinching them together, take an extra moment to thoroughly crimp and press the seams. You can even roll the sealed ball lightly in your hands to ensure the seam is fully integrated and smooth. Placing the bombs seam-side down on the parchment-lined baking sheet also adds an extra layer of security. A well-sealed bomb means all that glorious cheese and seasoning stays exactly where it belongs, ensuring every **cheesy bite** is a delightful surprise.
Make Your Pizza Bombs Unique
While the classic Cheesy Pizza Bomb is undeniably **delicious**, there’s ample room for creativity and customization. Making your pizza bombs unique allows you to cater to different tastes, utilize ingredients you have on hand, and simply have fun in the kitchen. This adaptability is what makes them such a great **quick recipe** for any occasion, from **dinner ideas** to **party food**.
Adding Extra Toppings
Beyond the basic cheese and seasonings, a myriad of extra toppings can be incorporated into your pizza bombs to boost their flavor and complexity. Just remember the “avoid overstuffing” rule! Finely diced pepperoni is a popular and classic choice, adding a salty, savory kick. Cooked and crumbled sausage, crispy bacon bits, or even tiny pieces of cooked chicken can turn your bombs into mini meal experiences. For veggie lovers, consider finely chopped bell peppers, mushrooms, black olives, or sautéed onions. Sun-dried tomatoes or a sprinkle of fresh basil can add a gourmet touch. Ensure any meat toppings are pre-cooked and cooled before adding them to the filling. These additions can transform your simple **cheesy bites** into a more substantial and personalized **savory treat**.
Trying Different Cheese Types
The cheese blend is a fundamental component of your pizza bombs, and experimenting with different types can dramatically alter the flavor profile. While mozzarella is a staple for its melt factor, don’t hesitate to branch out. Provolone adds a sharper, nuttier flavor, while Monterey Jack offers a very smooth melt with a mild taste. For a bolder flavor, try incorporating some shredded Gruyère or even a small amount of smoked Gouda for a unique smoky note. A blend of three or four different cheeses can create a more complex and rich interior. If you’re making them for a specific event, like an Italian-themed dinner, a Pecorino Romano could add an authentic zing. The goal is to find a combination that melts well and complements the other fillings, making your **homemade pizza** bombs truly your own. For more culinary inspiration, consider browsing our Instagram page.
Can You Make Pizza Bombs Ahead?
Life can be hectic, and having delicious, homemade options ready to go is a game-changer. The good news is that Cheesy Pizza Bombs are wonderfully **freezer-friendly**, making them an excellent choice for meal prep or for stashing away **easy snack** options for unexpected cravings. This adaptability makes them a truly versatile **quick recipe** and a fantastic **savory treat** to have on hand.
Freezing for Later Baking
To prepare pizza bombs for freezing, assemble them entirely but do not bake them. Place the unbaked, sealed pizza bombs in a single layer on a parchment-lined baking sheet. Flash freeze them for about 1-2 hours, or until they are solid. This step prevents them from sticking together. Once frozen solid, transfer the pizza bombs to a freezer-safe airtight bag or container. They can be stored in the freezer for up to 2-3 months without a significant loss in quality. When you’re ready to **bake** them, simply remove them from the freezer and place them on a parchment-lined baking sheet. You can bake them directly from frozen; however, you will need to increase the bake time. Add an additional 5-10 minutes to the original baking time, or until they are golden brown and cooked through, and the cheese is bubbly. This **freezer-friendly** method ensures you always have a batch of **cheesy bites** ready for an impromptu gathering or a quick family meal, similar to how you might prepare a batch of cookies like Snickerdoodle Cobbler ahead of time.
Storing Leftover Cheesy Pizza Bombs
It’s rare to have leftovers of these incredibly **delicious** Cheesy Pizza Bombs, but if you do, proper storage is key to maintaining their taste and quality. Keeping them fresh ensures you can enjoy your **homemade pizza** **cheesy bites** later without compromising on flavor or texture. These make for great **easy snack** choices even on the second day.
Fridge Storage Guidelines
Once baked and completely cooled, leftover pizza bombs should be stored in an airtight container in the refrigerator. This method will keep them fresh for up to 2-3 days. To prevent them from becoming soggy, you can place a paper towel at the bottom of the container to absorb any excess moisture. Avoid leaving them at room temperature for extended periods, as this can lead to spoilage and a decline in quality. When storing, try to arrange them in a single layer if possible, or use parchment paper between layers if you have many. This helps maintain their shape and prevents them from sticking together. While they won’t be as crispy as freshly baked, proper fridge storage ensures they remain a tasty option for a quick lunch or an afternoon pick-me-up. For more tips on food storage and preparation, checking out reliable sources like Wikipedia’s article on food storage can be very informative.
Reheating Pizza Bombs for Best Taste
Reheating your leftover Cheesy Pizza Bombs can bring them back to life, though the method you choose will impact their texture. For the best possible taste and an enjoyable eating experience, especially for these **homemade pizza** **cheesy bites**, consider the following options. Whether you prioritize crispiness or speed, there’s a method to suit your needs for these **easy snack** items.
Oven Method for Crispiness
If you want to restore the crispy exterior and gooey interior of your pizza bombs, the oven is your best friend. Preheat your oven to 350°F (175°C). Place the leftover bombs on a baking sheet, ideally lined with parchment paper, and heat for about 8-12 minutes, or until they are heated through and the crust has re-crisped. This method prevents them from becoming rubbery and ensures the cheese inside melts beautifully without making the dough soggy. For an even crispier result, you can use an air fryer at 325°F (160°C) for 5-7 minutes. This is highly recommended if you have the time, as it brings them closest to their fresh-baked glory, making them feel like freshly prepared **party food**.
Quick Microwave Option
When time is of the essence, the microwave offers the quickest way to reheat your pizza bombs. Place one or two bombs on a microwave-safe plate and heat on high for 15-30 seconds. Be cautious not to overheat, as this can make the dough tough and the cheese overly molten and potentially messy. While the microwave will heat them thoroughly, it won’t replicate the crispy crust achieved in an oven or air fryer. The result will be a softer dough, but the cheese will still be delightfully melted. This method is perfect for a super **quick recipe** snack when you’re in a hurry and just need that **savory treat** right away. For a deeper understanding of food heating and cooking, you might find Wikipedia’s page on cooking beneficial.
Nutrition Facts for Each Pizza Bomb
Understanding the nutritional content of what you eat can be helpful for meal planning and dietary considerations. While the exact nutrition facts for your Cheesy Pizza Bombs will vary based on the specific ingredients you use (e.g., type of dough, cheese, and any added toppings), we can provide a general idea of what to expect for these **cheesy bites**. This information is an estimate, making them useful for those monitoring their intake.
Calories and Macronutrients
A single homemade Cheesy Pizza Bomb, made with standard refrigerated pizza dough and a mozzarella-provolone blend, typically contains approximately 150-250 calories. This range accounts for slight variations in dough size and cheese quantity. In terms of macronutrients, you can generally expect:
- Protein: Around 8-12 grams, primarily from the cheese and potentially from any meat toppings.
- Carbohydrates: Approximately 15-25 grams, mostly from the dough.
- Fat: Roughly 8-15 grams, largely from the cheese and any oils used in preparation.
These figures do not include dipping sauces, which can add significant calories and macronutrients. For example, a serving of ranch dressing can add an extra 60-100 calories. If you’re looking to adjust the nutritional profile, consider using whole wheat dough for more fiber, opting for lower-fat cheeses, or increasing vegetable fillings to boost micronutrients. Always remember that these are estimations, and precise nutritional values would require calculation based on your exact ingredient choices and quantities, but they offer a good starting point for enjoying these **delicious** **party food** options responsibly.