
Reese’s Butterfinger Cheesecake Bars offer a delightful blend of creamy, crunchy, and chocolate peanut butter goodness. This popular dessert recipe is surprisingly simple to create at home, perfect for any occasion. Prepare to impress family and friends with these irresistible sweet treats, featuring your favorite candies in every bite.
Key Takeaways
- Simple steps for a delicious candy-infused cheesecake.
- Uses a classic graham cracker base and creamy filling.
- Reese’s and Butterfinger add amazing flavor and texture.
- Proper chilling is crucial for the best bar consistency.
- Perfect dessert for gatherings or a satisfying sweet treat.
These bars are incredibly satisfying. Rich cream cheese meets candy. A perfect texture contrast. Simple to bake, easy to love. They disappear fast!
Making Reese’s Butterfinger Cheesecake Bars
Quick overview of steps
Crafting Reese’s Butterfinger Cheesecake Bars is a fun and rewarding process that brings together two beloved candy flavors with the rich, tangy creaminess of a classic cheesecake. This dessert recipe is designed to be approachable for home bakers of all skill levels, delivering a show-stopping sweet treat with minimal fuss. The journey begins with a buttery graham cracker crust, a foundational element that provides a delightful crunch against the smooth filling. Following this, you’ll prepare a luscious cheesecake batter, infused with vanilla and eggs, before folding in generous amounts of chopped Reese’s Peanut Butter Cups and Butterfinger candy bars. These famous candies don’t just add incredible flavor; they also introduce a fantastic texture contrast, from the smooth peanut butter chocolate to the crisp, flaky crunch of Butterfinger.
Once assembled, the cheesecake bars bake gently, allowing the flavors to meld and the filling to set beautifully. The final, and arguably most important, step involves proper cooling and chilling to achieve that signature firm, sliceable cheesecake consistency. The result is a batch of homemade dessert bars that are perfect for sharing at parties, enjoying as an afternoon indulgence, or gifting to friends and family. Get ready to experience the joy of creating a truly irresistible dessert. For more delightful sweet recipes, be sure to explore our dedicated desserts category, where you’ll find plenty of inspiration for your next baking adventure.
Ingredients for Your Cheesecake Bars
What you need to start
To create these extraordinary Reese’s Butterfinger Cheesecake Bars, gathering high-quality ingredients is key. The foundation of any great cheesecake starts with premium full-fat cream cheese, which ensures a rich, dense, and wonderfully creamy filling. You’ll need several blocks to achieve the perfect texture. Granulated sugar provides the essential sweetness, balancing the tanginess of the cream cheese, while a hint of vanilla extract adds warmth and depth to the overall flavor profile. Eggs act as the binding agent, giving the cheesecake its structure and smoothness, preventing it from becoming too crumbly.
For the graham cracker crust, you’ll need finely crushed graham cracker crumbs, readily available in most grocery stores, along with melted unsalted butter and a touch more sugar to create that perfectly sweet and sturdy base. The stars of this dessert, of course, are the candies: Reese’s Peanut Butter Cups and Butterfinger candy bars. Opt for standard-sized bars or minis, making sure to chop them into bite-sized pieces so they are evenly distributed throughout the cheesecake filling and as a crunchy topping. These specific ingredients ensure each bite delivers the iconic chocolate peanut butter and crisp candy goodness that makes these bars truly special.
Crafting the Graham Cracker Crust
Simple base for bars
The graham cracker crust forms the delicious, crunchy foundation for your Reese’s Butterfinger Cheesecake Bars. It’s a simple base that provides textural contrast to the creamy filling and adds a pleasant buttery sweetness. To begin, you’ll need finely crushed graham cracker crumbs. You can achieve this by pulsing whole graham crackers in a food processor until they resemble fine sand, or by placing them in a Ziploc bag and crushing them with a rolling pin. The finer the crumbs, the more cohesive your crust will be. Once your crumbs are ready, combine them in a medium bowl with granulated sugar and melted unsalted butter. The butter is crucial as it binds the crumbs together, allowing the crust to hold its shape.
Mix these ingredients thoroughly until the crumbs are evenly moistened and resemble wet sand. Press this mixture firmly into the bottom of a 9×13-inch baking pan. Using the bottom of a flat glass or a measuring cup can help you achieve a compact and even layer. A well-pressed crust is less likely to crumble when you cut into the finished bars. This simple base for bars doesn’t require pre-baking, as it will firm up nicely during the main baking process. The sweet, slightly spiced flavor of the graham cracker provides a classic backdrop that wonderfully complements the rich cheesecake and candy inclusions, ensuring every bite begins with a satisfying crunch.
Mixing Creamy Cheesecake Filling
How to get it smooth
Achieving a perfectly smooth and velvety cheesecake filling is paramount for these Reese’s Butterfinger Cheesecake Bars. The secret lies in using room temperature ingredients and proper mixing techniques. Start by ensuring your full-fat cream cheese is softened to room temperature. This is crucial because cold cream cheese will resist blending smoothly, leading to lumps in your batter. In a large mixing bowl, beat the softened cream cheese on medium speed until it’s light and fluffy, usually for about 2-3 minutes. This step incorporates air and breaks down any initial stiffness, setting the stage for a lump-free filling.
Adding vanilla and eggs
Once the cream cheese is smooth, gradually add the granulated sugar, continuing to beat until it’s fully incorporated and the mixture is light and creamy. Scrape down the sides of the bowl frequently to ensure everything is evenly mixed. Next, stir in the vanilla extract. Pure vanilla extract adds an irreplaceable depth of flavor that complements the richness of the cream cheese and the sweetness of the candies. Finally, add the eggs, one at a time, mixing on low speed just until each egg is incorporated. Overmixing the eggs can incorporate too much air, which can lead to cracks in your cheesecake during baking. The goal is a smooth, homogenous batter that’s ready for the star candy additions. For more tips on achieving perfect textures in your baked goods, check out our quick Italian cream cake recipe for insights into delicate dessert preparations.
Folding in Reese’s and Butterfinger
Chopped candies complete the mix
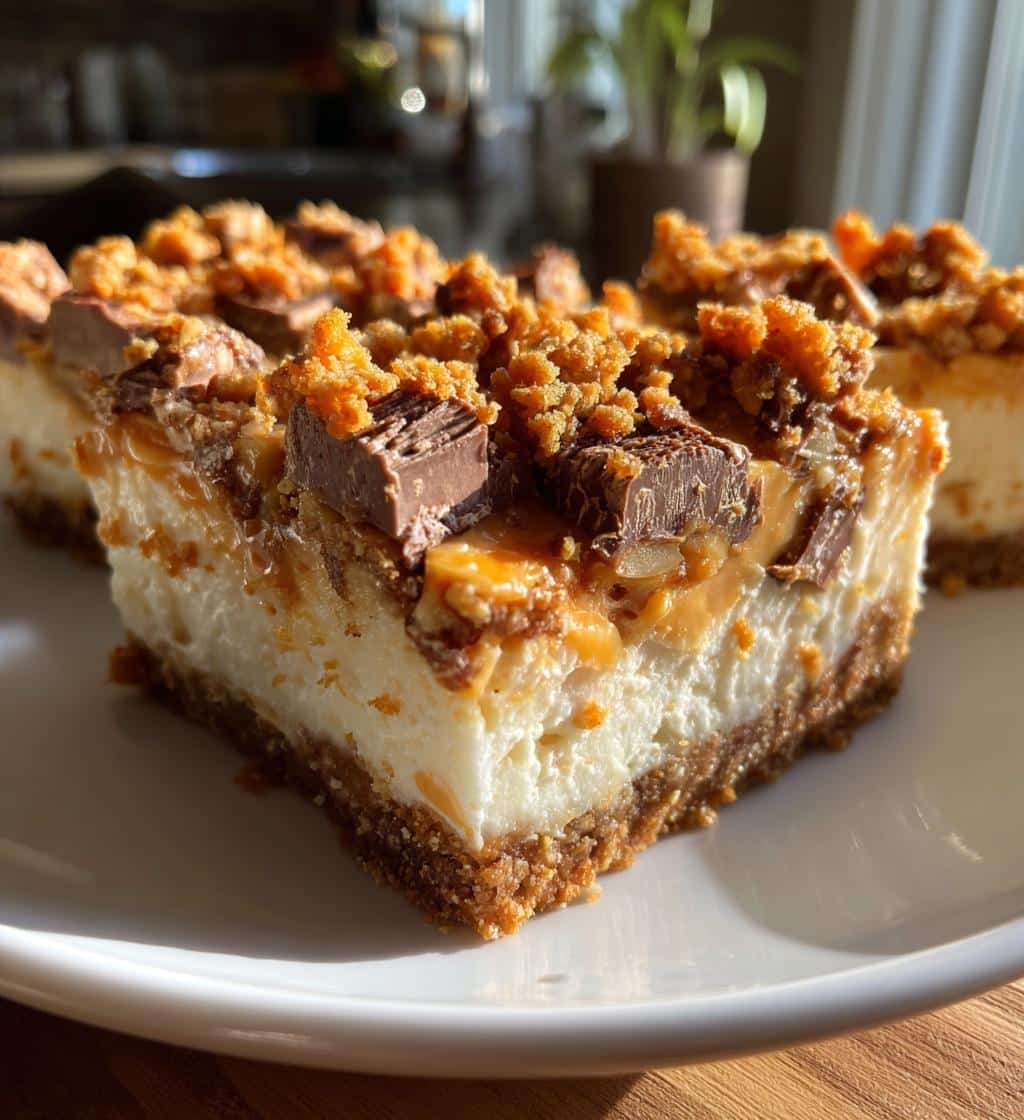
Now for the exciting part: incorporating the beloved candies that give these cheesecake bars their irresistible name and flavor. The combination of Reese’s Peanut Butter Cups and Butterfinger candy bars creates a dynamic duo of textures and tastes. For the Reese’s, you’ll want to chop them into small, manageable pieces. This ensures that every bite of cheesecake has a delightful burst of chocolate peanut butter goodness without being overly chunky. The rich, creamy peanut butter and smooth milk chocolate will melt slightly into the cheesecake, infusing it with their iconic flavor.
Similarly, the Butterfinger candy bars should be chopped into small, irregular pieces. The unique crisp, flaky texture of Butterfinger adds an amazing crunch that stands out against the smooth cheesecake. When folding these chopped candies into your creamy cheesecake filling, be gentle. You want to distribute them evenly without deflating the batter you worked so hard to make smooth. Reserve a portion of the chopped candies to sprinkle over the top of the bars before baking; this creates an appealing visual and an extra layer of crunchy topping. These chopped candies complete the mix, transforming a classic cheesecake into a fun, decadent, and truly memorable dessert that will have everyone reaching for another piece. If you’re a fan of the distinctive crunch of Butterfinger, you might also enjoy making Butterfinger balls for another delightful treat.
Baking Your Delicious Cheesecake Bars
Perfect oven temperature
Baking your Reese’s Butterfinger Cheesecake Bars correctly is essential for achieving that characteristic creamy texture without cracks. The perfect oven temperature for cheesecake is often lower and slower than other baked goods, designed for a gentle, even bake. Preheat your oven to 325°F (160°C). A lower temperature helps prevent the cheesecake from rising too quickly and then collapsing, which can lead to a dense center and cracked surface. Make sure your oven is fully preheated before placing the pan inside to ensure consistent heat from the start. Some bakers even place a pan of hot water on the rack below the cheesecake to create a moist environment, preventing cracking.
Knowing when they are done
Knowing when your cheesecake bars are done requires a keen eye. The baking time will typically range from 45 to 55 minutes, but it’s more about visual cues than strict timing. The edges of the cheesecake should appear set, while the center should still have a slight jiggle to it when you gently shake the pan. It shouldn’t be liquidy, but rather like a very firm custard. Overbaking is the primary cause of cracks in cheesecake, so it’s better to underbake slightly, as the cheesecake will continue to set as it cools. Once the bars are baked, turn off the oven, crack the door open slightly, and let the cheesecake cool inside for about an hour. This gradual cooling prevents sudden temperature changes that can also lead to cracking. This careful baking process helps create the perfectly creamy cheesecake you desire, ready for the crucial chilling phase.
Cooling and Chilling Cheesecake Bars
Essential for proper set
Once your Reese’s Butterfinger Cheesecake Bars have finished baking, the cooling and chilling process is just as critical as the baking itself, perhaps even more so, for achieving the perfect texture and stability. Immediately removing a hot cheesecake from the oven and placing it directly into a cold environment can cause it to crack due to the sudden temperature shock. Instead, after baking, turn off the oven and leave the cheesecake bars inside with the oven door propped open slightly for about an hour. This allows for a gradual decrease in temperature, minimizing the risk of cracks.
After this initial cooling period, remove the pan from the oven and let it sit on a wire rack at room temperature for another 1-2 hours, or until it is completely cool to the touch. Once cooled to room temperature, cover the pan tightly with plastic wrap. Now comes the most essential step: chilling the cheesecake bars in the refrigerator for at least 4-6 hours, but preferably overnight. This extended chilling period is absolutely vital for a proper set. During this time, the fats in the cream cheese solidify, and the cheesecake firms up, becoming dense, creamy, and sliceable. Rushing this step will result in bars that are too soft, crumbly, and difficult to cut neatly. Patience during cooling and chilling will reward you with beautifully firm and undeniably delicious cheesecake bars.
Serving Reese’s Butterfinger Bars
Cut into 16 perfect pieces
After patiently cooling and chilling, your Reese’s Butterfinger Cheesecake Bars are finally ready to be served and enjoyed! The key to presenting them beautifully is in the cutting. For optimal presentation and portion control, aim to cut your 9×13-inch pan of bars into 16 perfect pieces. You can achieve this by first cutting the cheesecake into four equal rows lengthwise, and then cutting each of those rows into four equal sections crosswise. For clean cuts, use a sharp, thin-bladed knife and wipe it clean with a warm, damp cloth after each slice. This prevents the filling from sticking to the knife and creating messy edges, especially with the added candy inclusions.
These dessert bars are wonderfully rich and satisfying, making 16 pieces an ideal serving size. Garnish each bar, if desired, with an extra sprinkle of finely chopped Reese’s and Butterfinger, or a drizzle of chocolate or peanut butter sauce for an even more decadent touch. They are best served cold, straight from the refrigerator, ensuring the filling remains firm and the flavors are at their peak. These bars are perfect for any gathering, from casual potlucks to celebratory occasions, and are sure to be a crowd-pleaser. If you love the combination of chocolate and peanut butter, you might also enjoy our recipe for peanut butter brownie swirl cookies, another fantastic sweet treat.
7 Irresistible Tips for Amazing Bars
Use full-fat cream cheese
Creating truly amazing Reese’s Butterfinger Cheesecake Bars goes beyond just following the recipe; it involves incorporating a few expert tips that elevate your baking to the next level. First and foremost, always use full-fat cream cheese. While light or reduced-fat options might seem healthier, they contain more water and can lead to a less rich, runnier cheesecake that doesn’t set as beautifully. Full-fat cream cheese is the secret to that classic, dense, and luxurious texture we all crave.
Chill overnight for best results
Secondly, ensure all your dairy ingredients, especially the cream cheese and eggs, are at room temperature before mixing. This prevents lumps and ensures a smooth, uniform batter. Third, do not overmix the cheesecake batter once the eggs are added; mix just until combined to avoid incorporating too much air, which can cause cracking. Fourth, gently tap the pan on the counter a few times before baking to release any large air bubbles. Fifth, resist the urge to open the oven door frequently during baking. Consistent temperature is key for a smooth finish.
Sixth, allow the cheesecake bars to cool gradually inside the turned-off oven with the door ajar before transferring to a wire rack. This slow cooling process minimizes temperature shock. Finally, and perhaps most importantly, chill overnight for best results. While 4-6 hours is the minimum, an overnight chill allows the cheesecake to fully set, making it easier to slice and enhancing the flavors. These amazing bars will be worth the wait! For more visual inspiration and recipe ideas, be sure to follow us on Pinterest.
Nutrition per Reese’s Cheesecake Bar
Calories and other facts
Understanding the nutrition per Reese’s Cheesecake Bar can be helpful for those monitoring their intake, though this decadent dessert is certainly a treat to be savored! Given the rich ingredients—cream cheese, sugar, butter, and two types of candy—these bars are undeniably indulgent. While precise nutrition facts can vary based on exact ingredient brands and portion sizes, we can offer a general estimate for a single bar from a 9×13-inch pan cut into 16 servings.
Each Reese’s Butterfinger Cheesecake Bar is typically estimated to contain approximately 350-450 calories. This includes a significant amount of fat, primarily from the cream cheese, butter, and the candies themselves, often ranging from 25-35 grams per bar. Carbohydrate content will also be high, largely due to the sugar and graham cracker crust, likely around 30-45 grams, with a portion of that being sugars. Protein content will be moderate, perhaps 5-8 grams, from the cream cheese and eggs. Fiber will be relatively low. Remember, these figures are approximate. These facts underscore that while these are incredible dessert bars, they are meant to be an occasional delightful indulgence rather than a dietary staple. Enjoy them mindfully!
Storing Your Reese’s Butterfinger Bars
Keep them fresh
Proper storage is key to keeping your Reese’s Butterfinger Bars fresh, delicious, and safe to eat for an extended period. Because they are a dairy-based dessert, cheesecake bars require refrigeration. After they have been completely cooled and chilled, cover the pan tightly with plastic wrap or transfer individual bars to an airtight container. This prevents them from drying out, absorbing odors from other foods in the refrigerator, and helps them maintain their creamy texture and candy crunch.
When stored correctly in the refrigerator, these cheesecake bars will remain fresh for up to 3-5 days. Beyond this timeframe, while they might still be safe to eat, their quality and texture may begin to diminish. If you’ve made a large batch and wish to enjoy them over a longer period, these bars also freeze beautifully. To freeze, wrap individual bars tightly in plastic wrap, then place them in an airtight freezer-safe container or freezer bag. They can be stored in the freezer for up to 1-2 months. When you’re ready to enjoy, simply thaw them in the refrigerator overnight or at room temperature for a couple of hours. With proper storage, you can keep them fresh and enjoy these amazing sweet treats whenever a craving strikes! For more culinary inspiration and daily recipe ideas, follow us on Instagram.