
ELECTRIFIED THUNDER GLOW JARS are a captivating project that combines art and basic science. Create your own mini glowing storm. This fun craft allows you to capture dramatic stormy energy right inside a jar. It’s perfect for a rainy day activity or unique home decor.
Key Takeaways
- Learn to make dynamic ELECTRIFIED THUNDER GLOW JARS with simple supplies.
- Combine water, oil, glow paint, and glitter for a unique visual effect.
- Quick crafting time makes it ideal for a spontaneous creative activity.
- Customize your glowing storm by adjusting shaking intensity and colors.
This craft brings magic to any room. It’s simple, yet truly captivating. Watch the tiny storm come alive. Kids love the glowing, swirling action. A perfect sensory experience awaits.
ELECTRIFIED THUNDER GLOW JARS Explained
Creating ELECTRIFIED THUNDER GLOW JARS is more than just a craft; it’s a delightful blend of artistry and simple scientific principles, offering a mesmerizing visual display. These glowing jars simulate a miniature storm, complete with swirling clouds and sparkling lightning. It’s an ideal project for all ages, making it a fantastic DIY glow jars experience that produces a unique piece of home decor or a thoughtful, handmade gift. The magic of a storm, usually observed from a distance, is brought right into your hands, allowing for safe and captivating interaction.
Dramatic science craft fun
At its core, this project serves as an exciting science experiment, demonstrating the immiscibility of oil and water, and the intriguing properties of glow-in-the-dark materials. Participants learn about density and light in an engaging, hands-on manner. It’s a dramatic science craft fun activity that sparks curiosity about natural phenomena while fostering creativity. The interactive nature of shaking the jar to create different storm intensities adds an element of playful discovery, turning a simple craft into an educational adventure. Whether you’re making creamy chicken alfredo lasagna rolls or crafting, the joy of creation is paramount.
Capturing stormy energy inside
Imagine harnessing the power and beauty of a thunderstorm within a small vessel. This is exactly what an electrified craft like the thunder jar achieves. By combining specific ingredients, you replicate the dynamic movement and visual spectacle of a storm. The swirling glow, the suspended glitter, and the separating liquids all contribute to the illusion of a vibrant, miniature storm. It’s an incredible way of capturing stormy energy inside a tangible, safe container, allowing you to observe its dramatic effects whenever you desire. The result is a calming yet exciting sensory craft that provides endless fascination.
Gather Your Glow Jar Supplies
Before you begin the exciting journey of creating your very own glowing storm, it’s essential to gather all the necessary ingredients and tools. Fortunately, most of these items are either readily available around your home or can be easily purchased from a craft store, making this a truly easy craft. Having everything laid out beforehand will ensure a smooth and enjoyable crafting process, transforming ordinary items into an extraordinary light-up jar that mimics an actual storm in a jar.
Clear jar and liquid needs
The foundation of your thunder jar is, naturally, a clear jar. A glass mason jar (pint or quart size) works perfectly, but any clean, transparent container with a lid will do. The clearer the jar, the better the visual effect of your glowing storm will be. For liquids, you’ll need regular tap water and baby oil or mineral oil. These oils are clear and create a distinct separation from the water, which is crucial for the dramatic stormy effects. Ensure your jar is clean and dry before you start.
Glow paint and glitter
The “glow” in your glow jar comes from glow paint or glow powder. Look for non-toxic, water-based glow paint, often found in craft or party supply stores. If using powder, mix it thoroughly with a small amount of water first to create a paste. Glitter is vital for simulating lightning-like sparks within your electrified craft. Fine or chunky glitter in silver, blue, or iridescent shades works best. Consider also adding a few small sequins for extra sparkle and visual texture, making your stormy creation truly unique.
Small LED light source
While the glow ingredients provide luminescence, a small LED light source enhances the effect dramatically, especially in darker environments. Submersible LED tea lights or small puck lights are ideal as they are waterproof and can be placed directly under the jar. These battery-operated lights provide a consistent, vibrant illumination that highlights the swirling glow and glitter, truly bringing your thunder jar to life. Make sure you have fresh batteries for uninterrupted enjoyment of your sensory craft.
Quick Crafting Time Required
One of the many appealing aspects of making ELECTRIFIED THUNDER GLOW JARS is the minimal time commitment, making it an ideal kids activity for spontaneous fun. Unlike more intricate projects that require hours of dedication, this easy craft is designed for instant gratification. The entire process, from gathering supplies to the final shake, fits comfortably into a short window, perfect for busy schedules or short attention spans. This quick crafting time ensures that anyone can create a mesmerizing light-up jar without feeling overwhelmed or rushed.
5 minutes preparation
The preparation phase is remarkably swift. In approximately five minutes, you can have all your clear jars, water, oil, glow paint, and glitter laid out and ready to go. This involves gathering materials from your cupboards or craft box, opening packages, and ensuring your workspace is tidy. The simplicity of the required items means less time spent searching and more time for the actual creation of your glowing storm. A well-organized start sets the stage for a smooth crafting experience.
10 minutes creation
Once prepped, the creative assembly of your thunder jar takes around ten minutes. This rapid creation time involves mixing the glowing water base, carefully adding the oil layer, incorporating the glitter, and securing the lid. Each step is straightforward and quick, allowing you to see your electrified craft come together before your eyes. The speedy completion makes this a rewarding project, especially for younger crafters eager to see immediate results. You’ll soon have your own storm in a jar, ready to glow!
Making Your Storm Water Base
The first critical step in bringing your ELECTRIFIED THUNDER GLOW JAR to life is creating the distinctive “storm water” base. This layer will form the dense, colored, and eventually glowing foundation of your density-based display, setting the stage for the dramatic oil and water separation. The choice of colors here is important as it dictates the overall mood of your glowing storm, transforming a simple liquid into a vibrant and moody backdrop that is perfect for a sensory craft.
Mixing water and food coloring
Begin with a clean mixing bowl or directly in your chosen clear jar if you prefer a one-container approach. Pour in enough water to fill approximately halfway to two-thirds of your jar. Now, add a few drops of blue or purple food coloring. For an authentic thunder jar effect, consider a dark blue or a deep violet. You can mix colors to achieve unique stormy hues, such as combining blue and a tiny drop of black for a really ominous sky. Stir the water and food coloring thoroughly until you achieve a consistent, dark color. This colored water will represent the stormy sky, providing a stark contrast to the oil layer and enhancing the visual impact of your electrified craft.
Remember that the intensity of the color will affect how well the glow elements stand out later, so aim for a color that is rich but not entirely opaque. This water base is a simple yet crucial component, laying the groundwork for the fascinating interplay of elements that defines a truly captivating glow jar. The depth of color will contribute significantly to the perceived “electrified” nature of the final product, especially when viewed in a dimly lit room with the LED light engaged.
Adding Glow Power to Water
This is where your ELECTRIFIED THUNDER GLOW JAR truly starts to live up to its name, transforming ordinary water into a luminescent, captivating liquid. Adding the glow power is a critical step in creating a mesmerizing glowing storm that will enchant observers. The secret lies in incorporating the right ingredients to achieve a vibrant and lasting luminosity, making this a truly exciting kids activity. Remember, safety first, especially when working on projects that might be handled frequently.
Incorporating glow paint or powder
Once you have your colored storm water base, it’s time to introduce the glow element. If using glow paint, squeeze a generous amount directly into the colored water. For glow powder, sprinkle it into the water. The key here is thorough mixing. Stir vigorously until the glow paint or powder is completely dispersed and dissolved. Any clumps will reduce the overall glow effect. You might need to add more glow material than you initially think to achieve a strong glow, particularly if your water base is a dark color. For more creative ideas, check out this cheesy garlic chicken wraps recipe, which also relies on unique ingredients for a great result.
To ensure a bright glow, consider the quality of your glow-in-the-dark material. High-quality phosphorescent pigments will absorb light better and emit it more brightly and for a longer duration. You can learn more about how these materials work by checking out the Glow-in-the-dark Wikipedia page. This glowing water forms the dynamic core of your sensory craft, mimicking the charged atmosphere of a real thunderstorm. The better the glow material is incorporated, the more impressive your light-up jar will be.
Ensuring non-toxic ingredients
Safety is paramount, especially when creating a DIY glow jars project that might be handled by children. Always ensure that the glow paint, glow powder, and food coloring you use are explicitly labeled as non-toxic. Craft paints and food colorings are generally safe, but it’s crucial to double-check. While the jar will be sealed, accidental spills or exposure can occur, so using child-safe products provides peace of mind. This commitment to non-toxic ingredients makes your electrified craft safe for everyone to enjoy, allowing you to focus on the fun without worrying about harmful chemicals. It’s a simple step that significantly enhances the safety and enjoyment of your unique gift.
Filling Your ELECTRIFIED THUNDER JAR
With your vibrant, glowing storm water prepared, the next step is to introduce it into your chosen container, making sure to set the stage for the dramatic oil layer that follows. This step is about precision and creating the right foundational volume for your DIY glow jars. The way you fill the jar initially will influence the overall aesthetic and the dynamic movement within your storm in a jar. Careful execution here ensures that each component of your electrified craft contributes to the spectacular final effect, forming a truly captivating light-up jar.
Halfway with glowing water
Carefully pour your glowing, colored water into the clear jar. The goal is to fill the jar approximately halfway. This measurement is crucial because it leaves ample space for the subsequent oil layer and, more importantly, provides enough room at the top of the jar for movement. This unoccupied space is essential for allowing the liquids to swirl and interact dramatically when the jar is shaken, simulating the turbulent energy of a thunder jar. If you fill the water too high, you won’t get the desired “storm” effect; if too low, the oil layer might overpower the glow. Aim for a balance that maximizes both visual impact and interactive potential, ensuring your sensory craft functions as intended. This specific fill level is key to creating a dynamic and engaging glowing storm.
Creating the Oil Layer Effect
After establishing your glowing water base, the introduction of the oil layer is a moment of anticipation, as it’s where the captivating separation and movement of your ELECTRIFIED THUNDER GLOW JAR truly begin to manifest. This stage highlights the scientific principles at play, demonstrating how different liquids interact (or don’t interact) due to their unique densities. It’s a fundamental part of achieving the iconic storm in a jar effect, adding depth and dynamic visual interest to your DIY glow jars.
Slowly pouring the oil
Now, gently and slowly pour the baby oil or mineral oil into the jar, on top of the glowing water layer. Pouring slowly is vital to prevent the oil from mixing too much with the water initially. You can pour it over the back of a spoon held against the inside of the jar to help minimize disturbance and create a cleaner separation. As you pour, you’ll observe the oil naturally settling above the water, forming a distinct, clear layer. This separation is key to the mesmerizing movement you’ll create later. The less mixing there is at this stage, the more pronounced and dramatic the stormy effect will be when you shake your electrified craft. This creates a beautiful, layered appearance even before any shaking begins, enhancing its appeal as a unique gift.
Leaving space at jar top
As you add the oil, continue until the jar is filled to about an inch or two from the very top. This crucial empty space serves a vital purpose: it provides room for the liquids to move freely and vigorously when you shake the jar. Without this airspace, the liquids would be too tightly packed, preventing the turbulent, cloud-like swirls and lightning-like glitter movements that characterize a thunder jar. Leaving adequate space at the jar top ensures maximum interaction between the oil and water, allowing your glowing storm to perform its full, dramatic display. It’s a small detail that makes a significant difference in the overall effect of this impressive sensory craft.
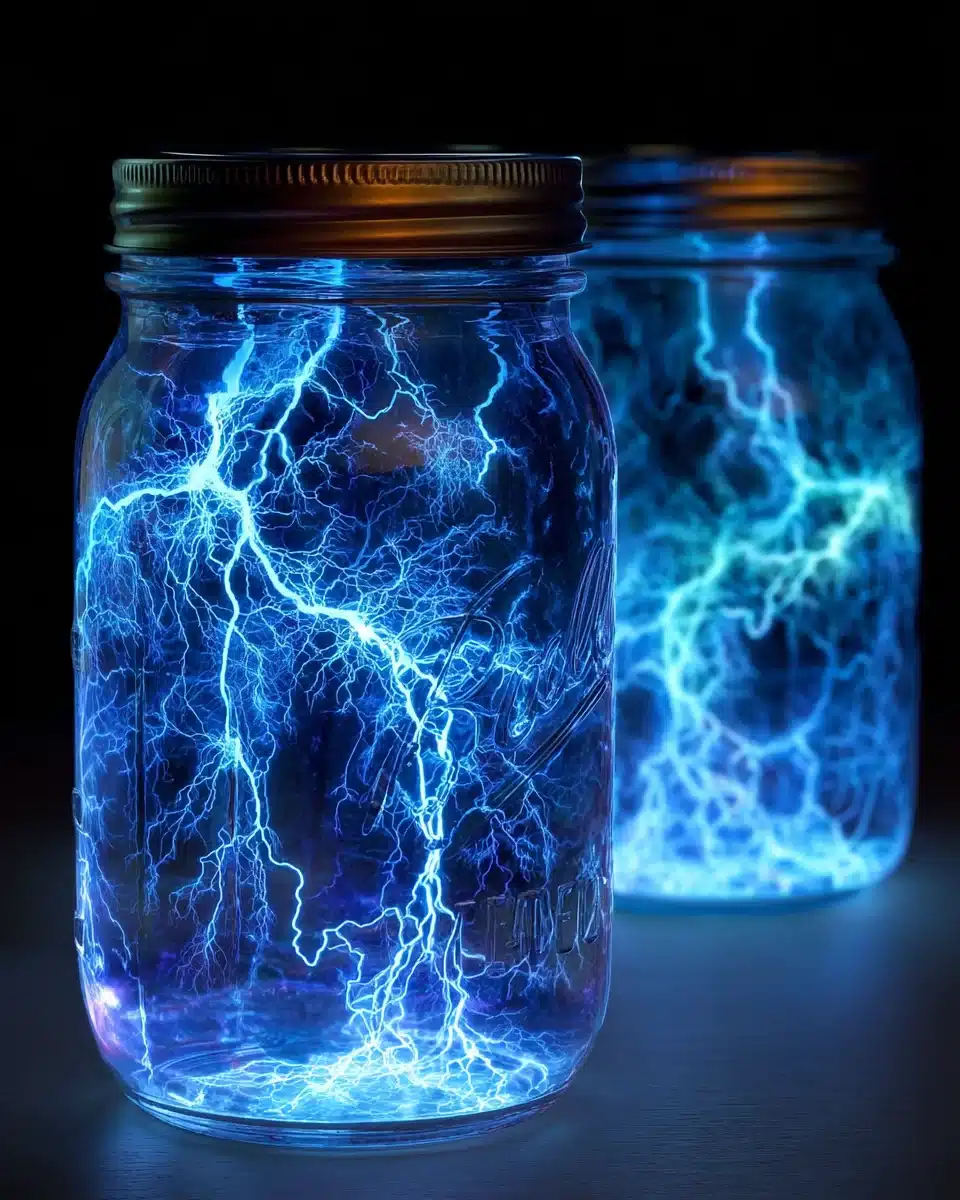
Sparkling Glitter for Thunder
To truly elevate your ELECTRIFIED THUNDER GLOW JAR from a simple light-up jar to a dynamic, visual spectacle, the addition of glitter is paramount. This shimmering element is not merely decorative; it serves a crucial role in replicating the dramatic effects of a real thunderstorm. It introduces texture and sparkle that perfectly complements the glowing water and oil layers, making your DIY glow jars truly unique and captivating. This step transforms your easy craft into a miniature, dazzling force of nature, perfect for any kids activity.
Sprinkling for lightning-like sparks
Once your oil and water layers are settled, it’s time to add the “lightning.” Take your chosen glitter – silver, blue, iridescent, or even a mix – and gently sprinkle a generous amount directly into the jar. The glitter will slowly fall through the oil layer, eventually settling on the interface between the oil and water. Some pieces might even suspend themselves in the oil. When you shake the jar, these tiny particles will swirl and dance through both layers, catching the light and creating brilliant, lightning-like sparks. This effect is what gives your thunder jar its electrified craft allure, making it seem as though miniature bolts of energy are flashing within. The quantity of glitter is up to you; more glitter will result in a more intense “storm,” while less creates a subtler, rolling thunder effect. This sparkling addition is key to bringing your glowing storm to vivid life, offering a dynamic and sensory craft experience.
Lighting Up Your Glow Creation
While the glow paint itself provides a subtle radiance, the true magic and dramatic impact of your ELECTRIFIED THUNDER GLOW JAR are fully unleashed with the strategic use of an external light source. This step transforms your intriguing concoction into a mesmerizing spectacle, enhancing the luminescence of the glow elements and highlighting the dynamic interaction of the liquids and glitter. It’s the final touch that converts a simple craft project into a captivating piece of home decor, bringing your storm in a jar to brilliant life.
Placing LED light underneath
To maximize the glowing effect, take your small LED light source – ideally a submersible LED tea light or puck light – and place it directly underneath the jar. The light shining up through the layers illuminates the glow paint from below, making it appear significantly brighter and more vibrant. This bottom-up illumination also accentuates the glitter as it swirls, creating dazzling flashes that truly mimic lightning. Ensure the light source is stable and can remain in place. For ongoing enjoyment, consider using rechargeable LED lights. This simple addition elevates your DIY glow jars from merely glowing to genuinely “electrified,” providing a consistent and stunning visual display that is perfect for a unique gift.
Dark room for best effect
For the most breathtaking experience, view your thunder jar in a dark room. Ambient light can diminish the impact of the glow and glitter. In complete darkness, the vibrant colors of the glowing water, the shimmering lightning sparks, and the mesmerizing movement are amplified, creating an immersive and almost magical effect. This low-light environment allows the unique properties of your sensory craft to shine, making it an ideal nightlight or a calming focal point in a quiet space. Witnessing your glowing storm come alive in the dark is truly the highlight of this captivating science experiment, providing a sense of wonder and calm. The darker the room, the more spectacular your light-up jar will appear.
Shaking Your ELECTRIFIED THUNDER JAR
This is the moment of truth for your ELECTRIFIED THUNDER GLOW JAR – the point where you activate the storm! The beauty of this easy craft lies in its interactivity. By simply manipulating the jar, you control the intensity and character of the glowing storm inside. It’s a fantastic way to engage with your creation, turning it into a dynamic sensory craft that responds to your touch. The varied shaking techniques allow you to explore different facets of a thunderstorm, making it an engaging and educational kids activity.
Gentle swirl for clouds
For a calm, rolling thunderclouds look, hold your thunder jar firmly and gently swirl it in a circular motion. This slow, deliberate movement will cause the glowing water and oil to mix slightly at their interface, creating soft, billowy formations that resemble fluffy clouds drifting across a twilight sky. The glitter will shimmer lazily, like distant flashes of lightning. This gentle swirl creates a more serene and contemplative storm in a jar, perfect for a calming atmosphere or as a unique gift for someone who appreciates subtle beauty. It showcases the delicate interplay between the layers without overwhelming the senses.
Fast shake for lightning storm
If you prefer a more dramatic display, simulating a wild lightning storm, hold the jar tightly and shake it quickly and vigorously up and down or side to side. This energetic action will cause the oil and water layers to temporarily emulsify, creating a chaotic, bubbly mix. The glow paint will burst into a brighter frenzy, and the glitter will become a torrent of flashing sparks, mimicking intense lightning strikes. The air bubble left at the top will also move around, enhancing the turbulent effect. As the mixture settles, the oil and water will slowly separate again, allowing you to witness the “calm after the storm.” This fast shake truly brings the “electrified craft” aspect to the forefront, offering an exciting and visually stunning experience that transforms your light-up jar into a miniature tempest. Remember to secure the lid tightly before shaking!
Tips for Perfect THUNDER GLOW JARS
To ensure your THUNDER GLOW JARS are as captivating and long-lasting as possible, a few expert tips can make all the difference. These insights will help you maximize the visual impact of your glowing storm and ensure the best possible performance from your DIY glow jars. From enhancing the glow to perfecting the color palette, these suggestions will help you create a truly spectacular electrified craft that stands out as a unique gift or cherished piece of home decor.
Charging glow ingredients
For the most vibrant and enduring glow, it’s crucial to “charge” your glow ingredients. Before dimming the lights, expose your completed thunder jar to a strong light source for a few minutes. Direct sunlight, a bright lamp, or even a flashlight will activate the phosphorescent pigments in your glow paint or powder, allowing them to absorb energy. The longer they are charged, the brighter and longer-lasting the glow will be once the lights are turned off. This simple step significantly enhances the visual drama of your light-up jar, ensuring your glowing storm performs at its peak. For other creative projects, similar attention to detail can yield great results, like perfecting a crispy parmesan chicken with a rich garlic sauce.
Combining blue and purple colors
While a single color can be effective, combining blue and purple food coloring for your water base creates a more dynamic and realistic stormy sky effect. Blue provides the depth and coolness, while purple adds a touch of ominous richness, mimicking the varied hues seen in real thunderclouds. You can experiment with different ratios to achieve your desired shade – a deeper blue with just a hint of purple for a classic look, or a more vibrant purple with blue undertones for a fantastical storm. This color combination enhances the overall aesthetic of your sensory craft, making the swirling liquids and sparkling glitter even more captivating against the backdrop of a beautifully colored sky.
Explore Different Storm Styles
One of the most exciting aspects of creating ELECTRIFIED THUNDER GLOW JARS is the ability to customize and experiment, allowing you to explore different storm styles. Your DIY glow jars are not limited to a single look; with minor adjustments in technique and ingredients, you can conjure a variety of atmospheric effects. This encourages creativity and repeated engagement with the easy craft, offering fresh visual experiences each time. It transforms the craft into a personal journey of discovery, perfect for a continuous kids activity. You can even find other diverse ideas on our Desserts category page for more creative inspiration.
Rolling thunderclouds look
To achieve a rolling thunderclouds look, use a larger clear jar, which provides more space for the liquids to move gracefully. Opt for a slightly thicker oil (like mineral oil) and a less intense shake. Focus on gentle tilting and slow, deliberate swirls rather than vigorous shaking. This encourages the oil and water to slowly interact, creating soft, undulating formations that drift and morph, reminiscent of distant, rumbling thunderclouds on the horizon. A subtle amount of fine, silvery glitter will catch the light, suggesting sporadic, gentle flashes of lightning without overpowering the calm, majestic cloud formations. This specific storm in a jar style offers a serene and contemplative visual, making it an excellent calming sensory craft for relaxation.
Wild lightning storm effects
For a wild lightning storm effects, choose a slightly smaller jar, which amplifies the turbulent movement when shaken. Use a generous amount of glow paint and a mix of fine and chunky glitter in silver and blue for maximum sparkle. The key here is an enthusiastic, fast shake. Agitate the jar vigorously to fully emulsify the oil and water, creating a dense, chaotic, and brightly glowing mixture. The rapid movement will make the glitter appear as constant, frenetic lightning strikes, while the glowing water base becomes a brilliant, charged sky. As the liquids begin to separate, you’ll observe the “aftershocks” of your miniature tempest, creating an intensely dynamic and electrifying display. Share your wild lightning storm creations with us on Instagram!