
A DIY lava lamp is a captivating and easy science experiment that brings visual science fun right into your home. This homemade lava lamp project is perfect for all ages, creating a mesmerizing display with everyday items. Learn how to create a lava lamp in minutes with simple steps and supplies for a fantastic visual experience.
Key Takeaways
- Homemade lava lamps are quick and easy to make using common household items.
- The captivating reaction involves oil, water, food coloring, and an antacid tablet.
- Customization options include different colors, bottle shapes, and reactivating the display.
- Proper preparation and storage ensure your DIY lava lamp magic lasts longer.
Creating a lava lamp is simple. Oil and water separate naturally. Antacid tablets cause fascinating bubbles. This visual experiment delights everyone. Enjoy the easy science fun.
Unlock DIY Lava Lamp Magic Fun
Dive into the world of creative science with your very own DIY lava lamp. This exciting project isn’t just about making a cool decoration; it’s an engaging, hands-on opportunity to observe basic scientific principles in action. Imagine the vibrant, undulating blobs dancing within a bottle, transforming simple household items into a mini light show. This homemade lava lamp brings joy and wonder, proving that science can be both educational and incredibly entertaining. It’s a fantastic way to spend an afternoon, offering a sense of accomplishment once your glowing creation comes to life.
Why Make Your Own?
Making your own lava lamp offers numerous benefits beyond just the visual appeal. Firstly, it’s an excellent way to introduce children to chemistry and physics concepts like density, polarity, and chemical reactions in an accessible and fun manner. It demystifies science, turning abstract ideas into tangible observations. Secondly, it’s a cost-effective alternative to store-bought lamps, utilizing items you likely already have around the house. This makes it a sustainable and budget-friendly activity for families or classrooms. Finally, the process of creating a lava lamp fosters creativity and problem-solving skills. You can experiment with different colors, bottle shapes, and even lighting to personalize your unique display. For more fun family activities that involve creating things, consider trying out a recipe for Creamy Baked Mac and Cheese or other delicious dinners that bring everyone together.
Quick 10-Minute Project
One of the most appealing aspects of this DIY lava lamp is its speed. You don’t need hours of prep or complicated tools. From gathering your supplies to initiating the first mesmerizing bubbles, the entire process can take as little as ten minutes. This makes it a perfect spontaneous activity for a rainy day, a quick classroom demonstration, or simply when you’re looking for an instant burst of visual entertainment. The quick turnaround means less waiting and more watching, keeping attention spans engaged and excitement high. It’s truly an easy science experiment that delivers instant gratification.
Gather Your Simple Lava Lamp Tools
To embark on your lava lamp project, you’ll be pleased to know that the required supplies are common and easy to find, often already available in your kitchen or medicine cabinet. The beauty of this project lies in its simplicity and accessibility. There’s no need for specialized lab equipment or expensive components. Instead, you’ll be harnessing the power of everyday items to create something truly magical. Collecting these items beforehand ensures a smooth and uninterrupted crafting session, letting you focus on the fun of assembly and observation. This simple list of lava lamp supplies is all you need to get started on your captivating visual science journey.
Bottles and Vegetable Oil
The foundation of your DIY lava lamp requires a clear container and a significant amount of oil. For the container, opt for a clean, transparent bottle or jar. Mason jars, old soda bottles (labels removed), or even tall glass vases work wonderfully. The clearer the vessel, the better you’ll be able to observe the dancing “lava.” Ensure it has a lid if you plan to store your lamp. As for the oil, any common vegetable oil will suffice. Canola oil, sunflower oil, or even baby oil are excellent choices because they are less dense than water and readily available. The oil creates the primary medium through which your colorful blobs will flow, so having enough on hand is crucial for a full, vibrant display.
Food Coloring and Antacid
These two components are where the magic truly happens, adding color and movement to your homemade lava lamp. Food coloring provides the vibrant hues that will tint your “lava” blobs. Liquid food coloring works best, and you can choose any color or combination of colors to personalize your lamp. Red, blue, green, or even a mix can create stunning effects. The antacid tablets are the key to the dynamic effervescent reaction. Tablets like Alka-Seltzer, which contain citric acid and sodium bicarbonate, are perfect. When these tablets dissolve in water, they release carbon dioxide gas, which then causes the colored water blobs to rise and fall, mimicking a traditional lava lamp. Make sure your tablets are fresh to ensure a vigorous reaction. You might even want to try making some Snickerdoodle Cobbler while your lava lamp is reacting for another fun home project.
Preparing Your Clean Bottles
Before you begin assembling your DIY lava lamp, a crucial preparatory step is ensuring your chosen bottle or jar is impeccably clean. This attention to detail might seem minor, but it plays a significant role in the overall success and visual clarity of your finished lava lamp. Any residue, whether from previous contents or cleaning agents, can interfere with the chemical reaction or cloud the liquid, diminishing the mesmerizing effect. A clean canvas allows for the most vibrant colors and unhindered movement of the “lava” blobs, making your lava lamp project truly shine.
Ensure They are Dry
After cleaning your bottles, it is equally important to ensure they are completely dry, both inside and out. Even a few drops of water remaining in the bottle can dilute the oil-water ratio, potentially affecting the density differences that are vital for the lava lamp’s operation. To dry your bottles thoroughly, you can air-dry them upside down on a rack, use a clean cloth or paper towel to wipe the interior, or even gently warm them in a low oven for a short period if they are heat-safe (e.g., glass jars). A perfectly dry bottle sets the stage for a pristine and effective lava lamp display, allowing the oil and water to interact exactly as intended without any pre-existing moisture interference. This careful preparation is one of the key lava lamp steps for a successful homemade creation.
Measure Oil for Lava Lamp Base
The correct proportion of oil to water is fundamental to the aesthetic appeal and functionality of your DIY lava lamp. The oil serves as the primary medium, providing the clear backdrop against which the colored water blobs will perform their captivating dance. An adequate amount of oil ensures that there’s enough space for the bubbles to rise and fall gracefully, creating that signature “lava” effect. Getting this step right from the beginning will set your lava lamp up for success, leading to a visually impressive and long-lasting display that everyone can enjoy. This precise measurement is a crucial element in how to create a lava lamp that truly impresses.
Fill Bottles Three-Quarters Full
Begin by carefully pouring your chosen vegetable oil into your clean, dry bottle. The ideal measurement is to fill the bottle approximately three-quarters of the way full with oil. This leaves enough room at the top for the water, the food coloring, and crucially, for the effervescent reaction to occur without overflowing. This ratio is important because it provides a sufficient volume of oil for the water-based colored blobs to travel through, showcasing their movement and the density difference between the two liquids. Too little oil, and the effect will be minimal; too much, and you won’t have enough space for the reaction. Take your time with this step, pouring slowly to avoid air bubbles, which can initially obscure the view but will dissipate over time. This foundational layer is what makes your homemade lava lamp come alive.
Top Off With Water and Color
Once your oil base is established, the next exciting phase involves introducing the water and infusing your DIY lava lamp with vibrant color. This is where your lava lamp truly begins to take on its unique character. The addition of water, being denser than oil, will naturally sink to the bottom, creating distinct layers that are essential for the “lava” effect. The food coloring, specifically designed to mix with water, will transform these lower layers into the colorful blobs that will soon ascend and descend. This step requires a bit of precision to ensure the perfect environment for your lava lamp show to unfold. It’s one of the most visually rewarding lava lamp steps, as you start to see the transformation.
Leave Space at the Top
After adding the oil, slowly and carefully pour water into the bottle. It’s critical to leave a noticeable amount of space at the very top of the bottle – about an inch or two, depending on your bottle’s size. This empty space is not merely for aesthetics; it serves a practical purpose. When the antacid tablet is introduced later, it will produce carbon dioxide gas, which needs room to expand and bubble without forcing the liquids to overflow. Leaving adequate headspace prevents messy spills and ensures the entire reaction stays contained within your vessel, allowing for an optimal lava lamp reaction experience. This foresight ensures a clean and effective experiment.
Add 4-5 Drops Food Dye
Now for the splash of color! Once the water has settled beneath the oil, add 4 to 5 drops of your chosen liquid food coloring directly into the bottle. You’ll notice the food coloring drops sinking through the oil layer and dispersing into the water layer at the bottom. The number of drops can be adjusted based on the intensity of color you desire, but starting with 4-5 usually provides a good, vibrant hue. Feel free to experiment with different colors or even combine two for a marbled effect. The food dye will color the water, which will eventually form the mesmerizing “lava” blobs. Swirl the bottle gently (do not shake vigorously) to help the color distribute evenly within the water layer, creating a uniform base for your amazing lava lamp show. For more creative ideas, visit Carina Recipes on Pinterest.
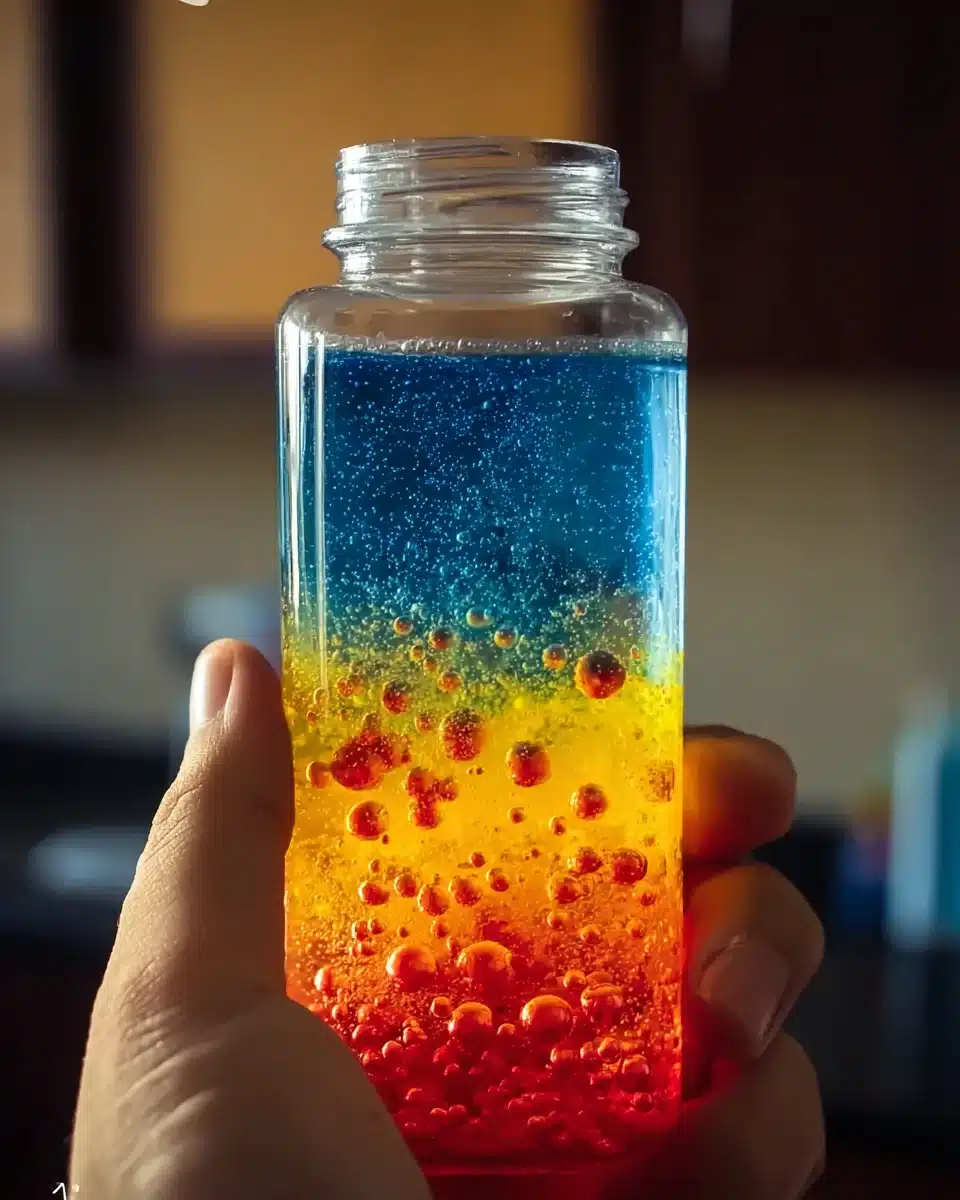
The Amazing Lava Lamp Reaction
The true marvel of a DIY lava lamp lies in the ingenious yet simple scientific principles that govern its mesmerizing movement. It’s more than just pretty bubbles; it’s a dynamic demonstration of density, solubility, and chemical reactions playing out before your eyes. Understanding these core concepts enhances the appreciation of your homemade creation, turning a simple craft into an engaging science lesson. This segment delves into the “why” behind the magic, explaining the fundamental interactions that cause the colored water to rise and fall, creating the iconic lava lamp effect. It’s an example of easy science experiment principles made fun.
Oil and Water Don’t Mix
At the heart of the lava lamp’s operation is the principle of immiscibility: oil and water do not mix. This is due to their differing molecular structures and polarities. Water molecules are polar, meaning they have a slight positive charge on one side and a slight negative charge on the other, allowing them to attract other polar molecules. Oil molecules, however, are non-polar. They prefer to associate with other non-polar molecules and are essentially repelled by water. This fundamental difference in molecular attraction causes them to separate into distinct layers, with the less dense oil floating above the denser water. This separation creates the two distinct phases necessary for the “lava” effect, ensuring that the colored water blobs remain intact as they travel through the oil. For a deeper dive into the science of immiscibility, you can explore the Lava Lamp Wikipedia page.
Antacid Creates Gas
The movement in your DIY lava lamp is powered by the chemical reaction of an antacid tablet with water. Antacid tablets, such as Alka-Seltzer, typically contain citric acid and sodium bicarbonate (baking soda). When these tablets come into contact with water, a chemical reaction occurs, producing carbon dioxide gas. This gas forms tiny bubbles that attach themselves to the colored water at the bottom of the bottle. Since gas is less dense than both oil and water, these gas-laden water blobs become buoyant and float upwards through the oil layer. As they reach the top, the gas bubbles pop and escape into the air, causing the now heavier water (without the attached gas) to sink back down. This continuous cycle of rising and falling blobs is the enchanting lava lamp reaction, creating the hypnotic visual display. It’s a perfect illustration of effervescence in action, a fascinating aspect of chemistry.
Activate Your DIY Lava Lamp Show
With all your preparations complete and the scientific principles understood, it’s time for the grand finale: activating your homemade lava lamp. This is the moment where the liquid layers, the vibrant color, and the chemical potential all converge to produce a truly captivating display. The anticipation as you drop in the antacid tablet is part of the fun, knowing that within moments, your bottle will transform into a dynamic, bubbling spectacle. Follow these simple lava lamp steps carefully to ensure a powerful and prolonged reaction, bringing your DIY lava lamp project to life and enchanting everyone who watches. Get ready to witness the magic firsthand.
Break Antacid in Half
For the best initial reaction and to ensure a prolonged display, it’s often beneficial to break a single antacid tablet in half. This serves a couple of purposes. Firstly, dropping in a smaller piece can help initiate the reaction more gently, allowing you to observe its onset clearly. Secondly, by using half a tablet at a time, you can extend the life of your lava lamp show, reactivating it later with the remaining half. Breaking the tablet is usually easy; you can gently snap it with your fingers or use a knife on a cutting board if needed. Make sure to have both halves ready, as you’ll only use one to start.
Drop in a Tablet Piece
Now, carefully drop one of the antacid tablet halves into your bottle. Watch closely as it sinks through the oil layer and reaches the colored water at the bottom. Almost immediately, you should see small bubbles begin to form around the tablet. These are the carbon dioxide gas bubbles mentioned earlier, and they are the engine of your lava lamp reaction. As more bubbles form and attach to the colored water, you’ll witness the water blobs detaching from the bottom and beginning their ascent through the oil. The speed and intensity of the reaction can vary slightly depending on the freshness of the tablet and the room temperature. This is the moment your simple supplies coalesce into a dynamic, visual science fun experience!
Watch Bubbles Dance and Swirl
Once the antacid tablet is introduced, the true magic of your DIY lava lamp unfolds. The bottle, which moments ago held static layers of oil and water, now becomes a vibrant, ever-changing tableau of motion and color. This is the payoff for all your preparation, a captivating visual spectacle that can hold attention for extended periods. Observing the intricate dance of the colored blobs provides not just entertainment, but also a deeper, intuitive understanding of the scientific principles at play. It’s a testament to how an easy science experiment can deliver profound visual satisfaction and wonder, making it a favorite among lava lamp for kids projects.
Enjoy the Mesmerizing Display
As the carbon dioxide bubbles attach to the colored water, you’ll see the water, now lighter, begin to rise in fascinating shapes and forms. These “lava” blobs will stretch, twist, and morph as they ascend through the oil, resembling the slow, viscous flow of molten rock. When they reach the surface, the gas bubbles burst, releasing the CO2 into the air. The water, now heavier, then gracefully sinks back down to the bottom, only to collect more gas and begin its journey upwards again. This continuous cycle creates a hypnotic, rhythmic movement that is incredibly soothing and endlessly watchable. The interplay of light, color, and motion makes your homemade lava lamp a truly engaging piece of kinetic art. For more ideas on how to engage with fun, family-friendly projects, check out some Peanut Butter Brownie Swirl Cookies.
Reaction May Start Slowly
While the reaction often begins almost instantly, it’s important to note that sometimes it may start slowly. Don’t be discouraged if you don’t see immediate, vigorous bubbling. Factors such as the temperature of the water (warmer water tends to speed up reactions) or the specific brand/freshness of the antacid tablet can influence the initial intensity. Give it a minute or two. The process typically builds momentum, and soon you’ll have a full, active display. If after a couple of minutes the reaction is still very minimal, you might try adding another small piece of the antacid tablet or gently swirling the bottle (do not shake) to encourage mixing near the bottom. Patience is key to enjoying the full glory of your DIY lava lamp.
Reactivating Your Lava Lamp Magic
One of the best features of a DIY lava lamp is its reusability. The initial reaction, while spectacular, will eventually wane as the antacid tablet completely dissolves and the carbon dioxide production ceases. However, this doesn’t mean the end of your fun! Your homemade lava lamp is designed for repeat performances, allowing you to enjoy its mesmerizing effects again and again. Reactivating it is just as simple as setting it up the first time, ensuring that your lava lamp project continues to be a source of wonder and enjoyment whenever you desire. It’s part of the extended life of your visual science fun.
Add Another Tablet Half
When the bubbling and rising “lava” blobs start to slow down significantly, or if they stop altogether, it’s time to reactivate your lava lamp magic. Simply take the other half of the antacid tablet that you saved earlier (or a fresh half if you’ve already used it) and drop it into the bottle. Just like before, the tablet will sink to the water layer, and the chemical reaction will kickstart anew, producing more carbon dioxide gas. This fresh supply of gas will once again attach to the colored water, making the blobs buoyant and sending them dancing upwards through the oil. You can repeat this process multiple times until you run out of antacid tablets, ensuring many sessions of fascinating lava lamp reaction. This simple step ensures your creative lava lamp continues to impress.
Creative Ideas for Your Lava Lamp
While the basic DIY lava lamp is fantastic on its own, there’s ample room for personalization and creativity to make your homemade creation truly unique. Beyond the standard setup, you can experiment with various elements to alter the visual experience, adding your personal touch to this easy science experiment. These creative modifications can transform a simple project into an even more engaging and customized piece of kinetic art, encouraging further exploration and imagination. This allows your lava lamp project to reflect your style and preferences, expanding the visual science fun.
Use Different Color Dyes
Don’t limit yourself to just one color! Experimenting with different food coloring dyes can yield stunning results. You can use two complementary colors, like blue and yellow, to create a greenish tint as they briefly mix. Or, try contrasting colors such as red and green for a vibrant, energetic display. You could even create layers of different colored water at the bottom (though they might mix over time) for a multi-hued effect as the blobs rise. Consider using neon food colorings for an extra bright, almost glowing look, especially if viewed under a blacklight. The possibilities are endless when it comes to customizing the visual appeal of your lava lamp with color.
Experiment with Bottles
The choice of bottle can significantly impact the aesthetics of your DIY lava lamp. While a standard soda bottle works well, don’t hesitate to experiment with different shapes and sizes. Tall, slender bottles might create a more elegant, vertical flow, while wider jars could allow for larger, more bulbous “lava” formations. You might also try bottles with interesting textures or slight curves. Just ensure the bottle is clear and made of a material that won’t react with the liquids. For an added touch, consider decorating the outside of your bottle with non-transparent paint or markers, leaving clear “windows” to view the lava lamp magic inside. This experimentation is part of the joy of how to create a lava lamp that is truly your own.
Quick Tips for Best Lava Lamps
To ensure your DIY lava lamp not only looks fantastic but also performs optimally and lasts longer, a few simple tips can make a significant difference. These are practical pieces of advice derived from common challenges and best practices in creating a homemade lava lamp. Implementing these quick tips will help you avoid common pitfalls and enhance the overall quality and enjoyment of your lava lamp project, solidifying it as a truly mesmerizing piece of visual science fun. They are vital lava lamp steps for consistent results.
Keep Bottles Very Clean
As mentioned earlier, cleanliness is paramount for a successful lava lamp. Any residual soap, grease, or dirt inside the bottle can interfere with the clear separation of oil and water, causing cloudiness or inhibiting the smooth movement of the “lava.” Before assembly, wash your bottle thoroughly with soap and hot water, then rinse it multiple times to remove all soap residue. Finally, ensure it is completely dry. A sparkling clean bottle guarantees maximum clarity, allowing you to fully appreciate the vibrant colors and dynamic motion of your lava lamp reaction without any visual obstructions. This critical step ensures your creative lava lamp is a pristine display.
Storing Your DIY Lava Lamp
Once your DIY lava lamp magic show is over for the day, proper storage is important to preserve its components and ensure it’s ready for future reactivations. While it’s a temporary display, a little care in storage can extend the life and visual quality of your homemade lava lamp, preventing premature degradation of the liquids or fading of the colors. Thinking ahead about storage ensures that your easy science experiment remains a source of wonder for many more sessions of visual science fun. Correct storage helps maintain the integrity of your lava lamp supplies.
Keep Away from Heat
The primary concern when storing your DIY lava lamp is heat. High temperatures can cause the oil to expand and potentially warp plastic bottles, or in extreme cases, affect the properties of the liquids. More importantly, consistent heat exposure can accelerate the degradation of the food coloring, causing it to fade prematurely, and may even encourage bacterial growth in the water layer over time. Store your lava lamp in a cool, dark place away from direct sunlight, radiators, or other heat sources. If your bottle has a lid, secure it tightly to prevent evaporation. Proper storage will help maintain the vibrant colors and the distinct separation of oil and water, ensuring your lava lamp project remains in top condition for its next performance. You can find more creative inspiration and ideas for your home on Carina Recipes on Instagram.