
DIY Bioplastic Suncatchers offer a wonderful opportunity for creative expression and environmental awareness. This exciting project combines simple bioplastic materials with natural elements to produce stunning, biodegradable art. Perfect for crafters of all ages, these homemade suncatchers add a touch of nature-inspired decor to any sunny window.
Key Takeaways
- Create charming, eco-friendly suncatchers using readily available bioplastic materials.
- Incorporate natural elements like leaves and flowers for unique designs.
- Enjoy a simple, engaging craft suitable for various age groups.
- Learn basic bioplastic creation techniques for sustainable art.
Making bioplastic suncatchers is simple. You use common household items. Nature provides beautiful additions. Watch your creations dry. Enjoy lovely window art.
DIY Bioplastic Suncatchers: Get Started!
Embarking on the creation of DIY bioplastic suncatchers is a fantastic way to blend creativity with a commitment to sustainability. This project offers a delightful experience for both children and adults, transforming everyday items into beautiful, nature-inspired decor. Before we dive into the fun, let’s ensure you have everything prepared for this engaging activity. Creating these beautiful pieces is not just about making art; it’s also a great way to introduce concepts of biodegradable plastic and responsible crafting, making it an educational and artistic endeavor.
What You Will Need
To begin your bioplastic suncatcher journey, you’ll need a few common items. The main ingredients are gelatin, water, and food coloring (optional). For molds, collect plastic lids from yogurt containers or other food packaging – they work perfectly for creating circular or square suncatchers. Don’t forget some string or yarn for hanging. You’ll also need a saucepan, a spoon for mixing, and a heat source. These simple supplies make the project accessible and enjoyable for everyone. For other creative projects, like preparing a delicious creamy baked mac and cheese, similar kitchen tools are often involved.
Quick Project Overview
This fun craft project involves a few straightforward steps. First, you’ll gather your natural treasures and arrange them in your chosen molds. Next, you’ll prepare the bioplastic solution using gelatin and water. This mixture is then poured over your arranged items. After a period of drying, your unique, homemade suncatchers will be ready to display. The process is designed to be simple, allowing for maximum creative freedom and minimal complexity. It’s an excellent way to spend an afternoon, resulting in charming window decorations that truly reflect your personal style. For more craft ideas and culinary inspirations, be sure to check out Carina Recipes on Instagram, where creativity often meets deliciousness.
Gathering Materials for Bioplastic Fun
The success of your gelatin art project hinges on having all your materials ready before you begin. This preparatory step ensures a smooth crafting process, preventing interruptions once you start mixing and pouring. Think of it like preparing ingredients for a recipe; having everything measured and organized makes the cooking, or in this case, crafting, much more enjoyable and efficient. Collecting these items can also be part of the fun, especially when involving younger participants in the hunt for suitable natural elements and simple household tools.
List of Main Ingredients
For your bioplastic base, you will need plain unflavored gelatin. This is the key ingredient that gives your suncatchers their unique, transparent, and biodegradable properties. You’ll also need water, preferably distilled, to ensure clarity and purity in your bioplastic mixture. If you wish to add color, food coloring is an easy option, but we’ll discuss natural dyes later on for an even more eco-friendly craft. Remember, the quality of your gelatin can influence the final strength and appearance of your finished suncatchers. Just as selecting the right ingredients is crucial for a savory dish like easy honey garlic chicken, it is vital for your bioplastic creations.
Tools and Supplies Needed
Beyond the main ingredients, you’ll need several tools and supplies. Shallow plastic lids, such as those from cottage cheese or sour cream containers, serve as excellent molds. Ensure they are clean and dry. A small saucepan is essential for heating the water and dissolving the gelatin. A whisk or spoon will be needed for thorough mixing. For handling hot liquids, adult supervision is highly recommended. You’ll also want scissors for cutting yarn or string, and perhaps some wax paper or a silicone mat for drying your suncatchers once they are cast. Having a designated crafting area will help keep things organized. Consider having paper towels on hand for any spills, making the cleanup process as straightforward as possible.
Collecting Nature’s Suncatcher Treasures
One of the most enjoyable aspects of making nature-inspired decor is the act of gathering the materials themselves. This step encourages you to step outside, observe your surroundings, and appreciate the small wonders that nature provides. Look for items that are relatively flat and thin, as these will embed best in your bioplastic. Remember, the goal is to create something truly unique, reflecting the beauty of your local environment. This connection to nature is what makes these homemade suncatchers so special, offering a glimpse of the outdoors even when displayed inside.
Finding Beautiful Loose Parts
Head to your backyard, a local park, or even a nearby walking trail to find “loose parts.” These can include small, pressed leaves, delicate flower petals, tiny twigs, feathers, or even thin slices of bark. Be mindful of ethical foraging practices; only take what you need and what is abundant. Avoid picking live plants; focus on items that have naturally fallen. Smooth pebbles or small shells can also work, but keep them thin to ensure they are fully encased by the gelatin. Consider collecting items with interesting textures or patterns to add visual depth to your bioplastic suncatchers. Just as a simple ingredient like crispy cauliflower can elevate a meal, natural elements can elevate your craft. More recipe inspirations can be found on our main course category.
Choosing Shapes and Colors
When selecting your natural treasures, think about how their shapes and colors will interact within your suncatcher design. Vibrant autumn leaves will create a warm glow, while delicate fern fronds offer intricate patterns. Different colored petals can form beautiful mosaics. Consider creating thematic suncatchers, perhaps focusing on a single type of leaf or a specific color palette. The transparency of the bioplastic will allow the natural colors to shine through when light hits them, creating a stained-glass effect. Don’t be afraid to experiment; sometimes the most unexpected combinations yield the most stunning results. This careful selection is part of what makes each piece of biodegradable art truly one-of-a-kind.
Setting Up Your Suncatcher Designs
Once you have gathered your nature’s treasures, the next step is to arrange them within your molds. This stage is where your artistic vision comes to life. Take your time to experiment with different layouts; there’s no right or wrong way to design your suncatchers. The goal is to create something visually appealing that will catch the light beautifully. Remember that the bioplastic base will be transparent, allowing the natural elements to be the stars of the show. Enjoy this creative process, letting your imagination guide you.
Arranging Items in Lids
Place your chosen plastic lids on a flat, protected surface, such as a baking sheet lined with parchment paper. This makes them easy to move later if needed. Carefully arrange your leaves, petals, twigs, and other collected items inside each lid. You can overlap them slightly, but avoid creating too much bulk, as this could prevent the gelatin from fully encasing them. Leave a small border around the edge of the lid, as this area will form the solid bioplastic frame of your suncatcher. Consider the negative space as well; sometimes, less is more, allowing individual elements to stand out. Think about how light will filter through your design.
Trying Different Patterns
Don’t limit yourself to a single design concept. Try symmetrical patterns for a classic look, or opt for an organic, free-form arrangement that mimics nature’s own randomness. You might create a mosaic effect with colorful petals, or a linear design using small twigs. Consider using a central focal point, like a vibrant flower, surrounded by smaller leaves. For another engaging activity that involves careful arrangement and pattern, consider trying out a recipe for peanut butter brownie swirl cookies, where the swirl itself is a form of edible art. The beauty of this craft is its versatility, allowing for endless possibilities and personalized creations. Each suncatcher can tell its own unique story.
Mixing Your Easy Gelatin Base
The core of your bioplastic materials lies in the simple combination of gelatin and water. This step is crucial, as a well-mixed gelatin base will ensure your suncatchers are clear, strong, and hold their shape once dry. While the process is straightforward, paying attention to the details here will make a big difference in the final quality of your biodegradable art. This edible form of plastic is surprisingly versatile and forms the transparent medium that will showcase your natural treasures beautifully. It’s an interesting science experiment combined with art.
Combining Gelatin and Water
To start, measure out the required amount of cold water into your saucepan. Sprinkle the unflavored gelatin powder evenly over the surface of the cold water. It’s important to sprinkle it rather than dumping it all at once, as this helps prevent clumping. Let the gelatin “bloom” or soften in the cold water for about five minutes. This allows the granules to absorb the water, making them easier to dissolve when heated. Use the ratios specified in your recipe, typically a higher concentration of gelatin than for edible jello, to create a more robust bioplastic. This initial hydration is key to a smooth mixture.
Stir Until Fully Dissolved
After the gelatin has bloomed, gently heat the mixture over low to medium heat on the stovetop. Do not let it boil vigorously, as excessive heat can degrade the gelatin’s gelling properties. Stir continuously with a spoon or whisk until all the gelatin granules are completely dissolved. The mixture should become clear and smooth, with no visible particles. Once dissolved, remove the saucepan from the heat. Allow the mixture to cool slightly before pouring; it should still be warm and liquid but not scalding hot, which could damage delicate natural elements or cause the plastic lids to warp. This clear, warm liquid is now your bioplastic solution, ready for the next exciting stage of your craft project.
Pouring Gelatin into Your Molds
With your gelatin base perfectly mixed and slightly cooled, it’s time for the delicate step of pouring it over your arranged nature’s treasures. This stage requires a steady hand and a bit of patience to ensure even coverage and to avoid disturbing your carefully crafted designs. The clear liquid will begin to set as it cools, slowly encasing your natural elements in a transparent, flexible layer. This transforms your collection of loose parts into cohesive, durable homemade suncatchers.
Careful Thin Layer Pour
Begin by pouring a very thin layer of the gelatin mixture into each plastic lid. This initial layer should just cover the bottom of the lid and lightly coat your arranged natural items. Use a spoon or a small measuring cup for better control. This thin layer helps to “glue” your items in place, preventing them from floating or shifting too much when you add the remaining gelatin. It also allows you to make any final adjustments to your design before the full pour. Work methodically, pouring slowly and evenly across all your molds.
Filling Each Plastic Lid
Once the initial thin layer has slightly firmed up (which happens quickly as it cools), proceed to fill each plastic lid with more of the gelatin mixture. Pour enough to completely cover your natural elements and fill the lid to a depth of about 1/4 to 1/2 inch. This depth ensures your suncatchers have sufficient thickness and strength once dry. Avoid overfilling, as this could make them too thick or spill over. Ensure that all parts of your leaves, petals, and twigs are fully submerged and encased in the bioplastic, creating a smooth, even surface. This meticulous filling ensures the durability and aesthetic appeal of your completed suncatchers.
Adding the Suncatcher Hanging Loop
To transform your beautiful bioplastic creations into true window decorations, they’ll need a way to hang. Adding a loop for hanging is a simple yet crucial step, best done while the gelatin is still wet but beginning to set. This ensures the loop is securely embedded within the bioplastic as it dries, making your suncatchers ready for display right away. Choose a strong, thin piece of yarn or string that complements your design.
Pressing Yarn into Gelatin
Once you’ve poured the gelatin and it has cooled for about 10-15 minutes (it should still be liquid but slightly thicker), cut a piece of yarn or string about 6-8 inches long. Form a loop and carefully press the two ends of the yarn into the gelatin near the edge of your mold. Gently push them down so they are submerged in the gelatin, ensuring they make good contact with the bioplastic solution. The goal is to embed the yarn deeply enough to create a strong anchor without disturbing your natural elements too much. This will create a sturdy point for hanging your creative kids activity project.
Securing Loop Before Drying
After pressing the yarn ends into the gelatin, double-check that the loop is positioned correctly and is firmly held by the setting bioplastic. You might need to gently nudge the gelatin around the yarn ends to fully encapsulate them. The setting gelatin will act as an adhesive, securing the yarn in place as it dries. If the gelatin is too liquid, the yarn might float; if it’s too firm, it won’t embed properly. Aim for that perfect semi-set consistency. Once the loops are secure, resist the urge to move the molds much, as this could dislodge the yarn or shift your carefully arranged items. Now your suncatchers are ready for the final, patient step of drying.
Drying Your Bioplastic Art Creations
Patience is a virtue when it comes to drying your biodegradable art. This stage is critical for achieving clear, firm, and long-lasting bioplastic suncatchers. Proper drying ensures that all the moisture evaporates, leaving behind a stable, translucent material that beautifully captures and refracts light. Rushing this process can lead to brittle or cloudy results, so plan for sufficient drying time. The transformation from liquid to solid art is a fascinating part of this eco-friendly craft.
Room Temperature for Days
Place your molds in a warm, dry area away from direct sunlight and excessive humidity. Room temperature is ideal. Do not attempt to speed up the drying process with heat, such as in an oven or with a hairdryer, as this can cause the gelatin to melt, warp, or become brittle. The drying process will take several days, typically 3 to 7 days, depending on the thickness of your suncatchers and the humidity levels in your environment. You’ll know they are ready when they feel completely rigid and have a distinct papery, plastic-like texture. Resist the urge to pop them out prematurely, as they might still be too soft.
Flattening During Drying
As the bioplastic dries, it may naturally curl or warp slightly due to the evaporation of water. To help keep your suncatchers flat, you can place a flat, lightweight object, such as a piece of cardboard or another flat lid, on top of them for part of the drying process. Do this after the initial setting, once the gelatin is firm enough not to stick to the object. Gently press down to encourage a flat shape. You can also carefully flip them over halfway through the drying time to ensure even air exposure on both sides. This attention to detail will result in more aesthetically pleasing and functional DIY bioplastic suncatchers ready for display.
Displaying Your New Bioplastic Suncatchers
The moment of truth arrives when your bioplastic suncatchers are fully dry and ready to be admired. This step is incredibly rewarding, as you finally get to see your hard work come to fruition and brighten up your living space. Getting them out of their molds and finding the perfect spot will truly bring these nature-inspired decor pieces to life, allowing them to sparkle and glow in the sunlight.
Popping Out Dry Suncatchers
Once your suncatchers are completely dry and rigid, they should be relatively easy to remove from their plastic lids. Gently flex the edges of the lid outwards, and the bioplastic suncatcher should pop right out. If it’s a bit stubborn, you can carefully use a thin, dull knife or a plastic scraper to loosen the edges, being careful not to scratch or damage your creation. The bioplastic might have a slightly translucent, almost frosted appearance, which will become clearer once light passes through it. Handle them with care, as while they are sturdy, they can still be delicate, especially at the edges.
Finding Sunny Window Spots
Now for the best part: finding the perfect place to hang your new gelatin art! Choose windows that receive plenty of natural sunlight throughout the day. The light will illuminate the embedded natural elements, making their colors pop and creating beautiful patterns of light and shadow on your walls and floors. You can hang them individually or create a charming mobile with several suncatchers. They also make thoughtful, personalized gifts. Enjoy the beauty and warmth these unique, homemade suncatchers bring to your home, celebrating both nature and your crafting skills.
Creative Ideas for Bioplastic Suncatchers
While the basic DIY bioplastic suncatchers are beautiful on their own, there are many ways to personalize and enhance your creations. Thinking beyond the standard method can open up a world of possibilities for truly unique and imaginative designs. These additional touches allow you to further customize your biodegradable art, making each piece even more special and reflective of your personal style. Let’s explore a few ideas to spark your imagination.
Optional Natural Dyes
Instead of artificial food coloring, consider using natural dyes to tint your bioplastic base. You can extract colors from various plant materials. For example, a small amount of beet juice can create a lovely pink hue, turmeric can yield a vibrant yellow, and spinach can produce a subtle green. Boil these ingredients in a small amount of water, strain the liquid, and use this colored water as part of your gelatin mixture. Always test a small batch first to check the color intensity. This approach enhances the eco-friendly craft aspect of the project, connecting even more deeply with nature’s palette.
Adding Glitter or Confetti
For a touch of sparkle and whimsy, you can add glitter or eco-friendly confetti to your gelatin mixture. Sprinkle a small amount directly into the molds before pouring the gelatin, or stir a tiny bit into the cooled, liquid gelatin just before pouring. Fine glitter will suspend more evenly, while larger pieces of confetti can create distinct visual elements. Be mindful not to add too much, as it can make the suncatchers opaque and block the light from shining through your natural elements. This can be a particularly fun addition for a fun craft project with kids, adding an extra layer of excitement to their creations.
Important Safety Tips for Crafting
While making DIY bioplastic suncatchers is generally a safe and enjoyable activity, it’s always important to prioritize safety, especially when working with children. Taking a few precautions ensures that the crafting experience remains positive and worry-free. Adhering to these guidelines will help prevent any mishaps and make the process smooth for everyone involved, reinforcing the enjoyment of creating beautiful, nature-inspired decor safely.
Use Non-Toxic Materials
Ensure that all materials used are non-toxic and child-safe, especially if young children are involved in the crafting. Plain unflavored gelatin is food-grade and safe. If using food coloring, opt for varieties specifically designed for food use. When collecting natural elements, be sure they are not poisonous or chemically treated. It’s always a good idea to supervise younger children to prevent them from ingesting any non-food items. The beauty of this eco-friendly craft is its reliance on simple, safe components, but vigilance is still key to a safe crafting environment for all participants.
Adult Supervision for Boiling
The part of the project that involves heating water and dissolving gelatin requires adult supervision, particularly when children are present. Hot water and stovetops can pose burn hazards. An adult should handle the heating, stirring, and initial pouring of the warm gelatin mixture into the molds. Once the gelatin has cooled sufficiently to be handled safely, children can then participate in arranging natural items, adding loops, and assisting with the drying process. Emphasize the importance of never touching hot surfaces or liquids without adult permission, making this a teachable moment about kitchen safety.
What Makes Bioplastic Suncatchers Special?
DIY bioplastic suncatchers stand out among craft projects for several compelling reasons. They offer a unique blend of artistry, environmental consciousness, and simple accessibility that appeals to a wide audience. Unlike traditional plastic crafts, these suncatchers embody sustainability, making them a thoughtful choice for mindful creators. This makes them more than just pretty objects; they are a statement of eco-friendly values and creative resourcefulness, truly a special form of biodegradable art.
Their primary appeal lies in their eco-friendly nature. Made from gelatin, a protein derived from collagen, these suncatchers are completely biodegradable. This means they won’t contribute to plastic pollution in landfills, offering a guilt-free crafting experience. They naturally break down over time, returning to the earth without harming the environment, making them an excellent example of sustainable creativity. This aspect alone makes them a remarkable alternative to many common craft materials.
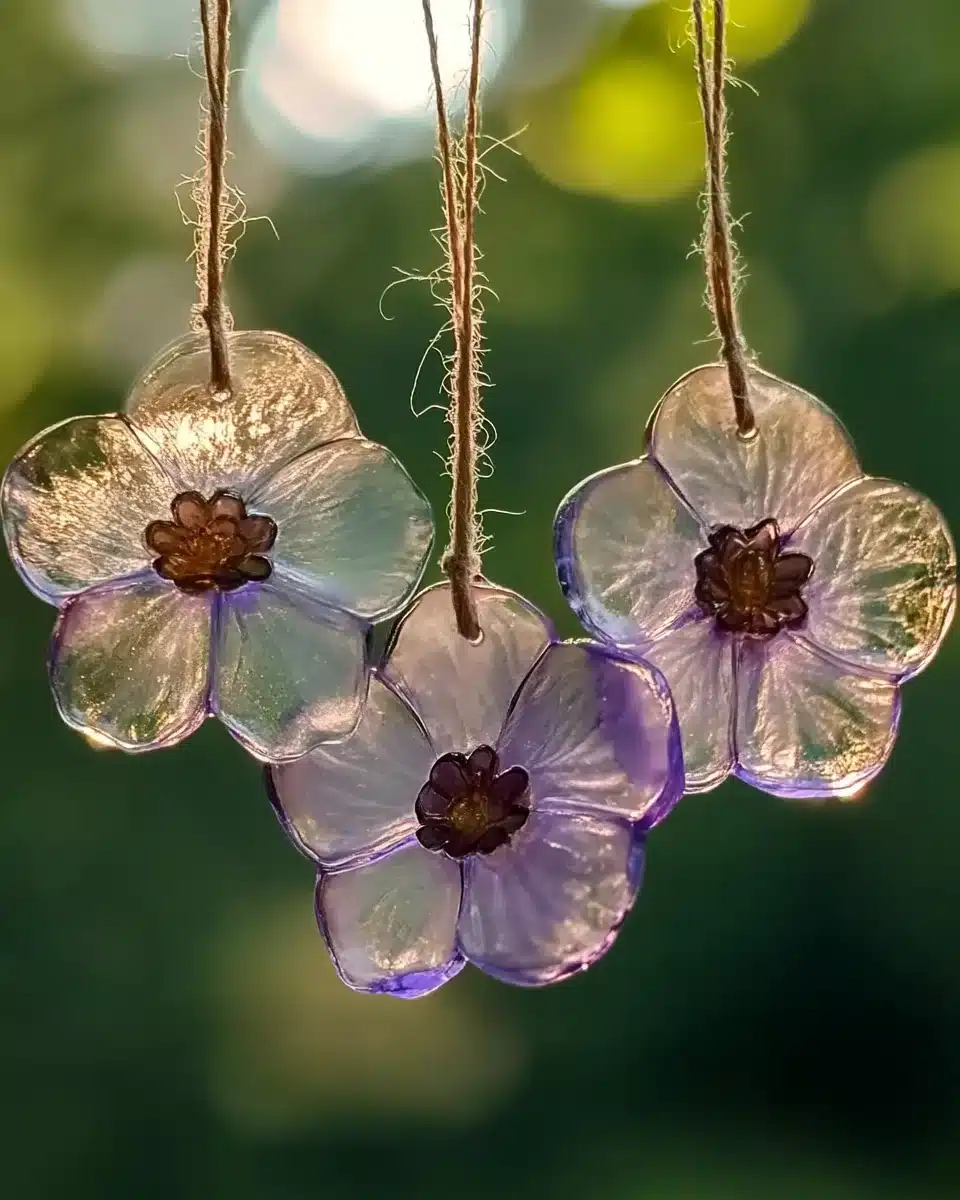
Beyond their environmental benefits, bioplastic suncatchers are incredibly versatile. They encourage creativity by inviting you to incorporate a wide array of natural elements—leaves, flowers, feathers, and more—each collected piece telling its own story. The transparent gelatin base allows light to filter through these treasures, creating a stunning stained-glass effect that changes with the day’s light. This interactive quality adds a dynamic element to your home decor, providing ever-changing visual interest. The simplicity of the materials, combined with the profound beauty of the finished product, makes these suncatchers a truly rewarding endeavor.
Furthermore, this project is a wonderful educational tool. It introduces concepts of bioplastics, biodegradability, and the science of gelling, all within a fun, hands-on context. It fosters an appreciation for nature and encourages observation skills during the gathering of materials. The ease of the process makes it an ideal creative kids activity, promoting fine motor skills, patience, and artistic expression. For all these reasons, these homemade suncatchers are more than just a craft; they are a celebration of nature, art, and responsible living.